How to Add Social Login Plugin to WordPress Website (Easy Guide)
Do you want to add social logins to your WordPress website?
The process of social login uses the existing social media credentials of a user so that they won’t have to go through the hassle of filling out registration forms. With social login, the users can immediately sign up for an account on your website and start accessing your services without delays.
In this article, we’ll show you how to add social login plugin to WordPress site using the LoginPress plugin’s Social Login add-on.
Table of Contents
Why Should You Add Social Logins to WordPress?
Adding social login to your WordPress website takes your website to the next level by facilitating the visitors who wish to become your registered users. Here are a couple of ways social login benefits your website.
Users Hate Creating New Accounts
Remembering usernames and passwords for every account is a huge hassle. Similarly, filling out the registration form when they wish to access your services is a significant reason many users close the tab and move away from your website.
Social login removes these hassles by allowing the users to register and log into your website with a click by providing their social media credentials as a substitute for the long registration forms.
Social Login Saves Time
Social login is convenient as users can quickly create an account on your website using their social media accounts instead of wasting time filling up the website registration form.
With social login to your website, users can quickly access your content or services without hassle. This is particularly important for users who need quick one-time access.
Social Login Prevents Password Fatigue
Password fatigue is a phenomenon where users find creating and remembering passwords a serious issue affecting their daily lives.
From the security perspective, password fatigue could result in weak passwords and thus weaken security. As a result, cybercriminals can easily break into your website.
Social media platforms generally enforce a strong password policy where users must create strong passwords for their accounts. Social login brings that security to your website by using those strong credentials for your website login.
You’ll See Less Failed Website Logins
Failed login attempts generally translate into a poor user experience. Additionally, many websites limit the number of login attempts as protection against brute force attacks. However, many failed login attempts are from users who forgot their credentials.
Social login minimizes the risk of failed login because the users don’t have to remember anything. They can quickly log in and go to their desired section of the website.
Social Login Increases the Accuracy of User Data
Most users admitted that they enter fake information or leave incomplete forms when creating a new account on a website because they don’t want to give out their information because of privacy concerns.
Website owners use user data to target the right segments in marketing campaigns. Social login ensures that the user information is correct and that the users are properly segmented. As a result, the marketing campaigns are correctly targeted and result in better ROI.
How to Add Social Login Plugin to WordPress Site With LoginPress
The LoginPress Social Login Premium add-on simplifies user signups by allowing them to easily register and log in to your website using their social media accounts, including Facebook, Twitter, or LinkedIn.
The Social Login add-on also reduces spam and bot registration. This is an important benefit for websites that use user data for segmented offers and location-specific campaigns.
Note: We assume you’ve already installed and activated LoginPress Pro on your WordPress website. If not, see our doc on the topic.
Step 1: Download the Social Login Add-on
The first thing you need to do is download the Social Login add-on.
Log in to your WPBrigade account and navigate to the Downloads tab.
Once you’re on the Downloads tab, look for the Social Login add-on and click Download.

Step 2: Install and Activate the Social Login Add-on
After downloading the add-on, you need to install and activate it. For this purpose, go to the left sidebar of the WordPress admin dashboard, navigate to Plugins, and click the Add New option.

On the Add Plugins page, click the Upload Plugins button. Next, click the Choose File button. A popup will open up where you can select the downloaded file.
When done, click the Install Now button.

Step 3: Set up the Social Login Add-on
Go to the left sidebar of the WordPress admin dashboard, navigate to LoginPress, and click the Add-Ons option.

Next, hover over the Social Login option and enable it.

Now that the plugin is activated, you need to navigate to the LoginPress settings. On the Settings page, you’ll see the Social Login tab.

Add Facebook Login With the LoginPress Social Login Add-on
Facebook has a huge user base, and allowing users to use their Facebook accounts to log into your website is a great idea. Let’s see how the Social Login add-on sets up a Facebook login for your WordPress website in a few minutes.
Note: You need a Facebook for Developers account to integrate Facebook login. We recommend you set up a Facebook for Developers account before proceeding with the following steps.
Go to the Social Login tab of LoginPress and go to the Settings tab.
To enable Facebook login, toggle on the Facebook Login.

Now go to Facebook for Developer and click Create App (found under My Apps). Select the Build Connected Experiences option and click Continue.

Now, fill out the form, click Create App and add a product for the app. In our case, it’s Facebook Login. Click Set Up under Facebook Login. Select the platform for this app (in our case, the Web). Enter your web URL and save the settings.

Next, go back to Settings and click Basic. Fill out the required fields (Contact Email, App Domain URL, Privacy Policy URL, and Data Deletion Instructions URL) and click Save.
Next, select the category and click Confirm. You will get the AppID and App Secret key. Copy these to a safe location because you must add these two to the LoginPress Social Login settings. Don’t forget to save the settings after you have added the values.

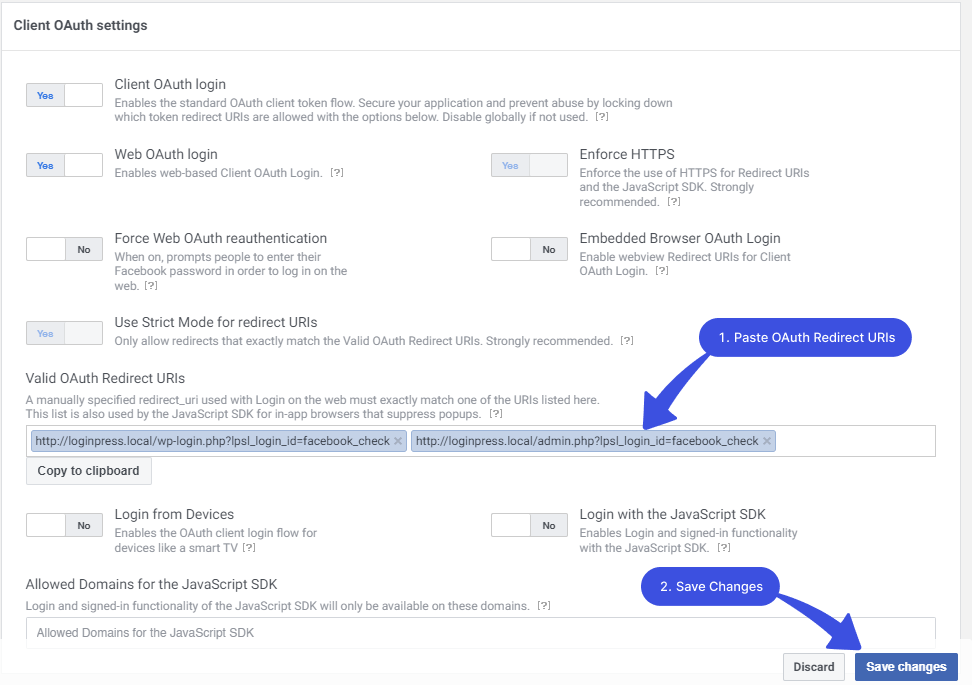
Now go back to the Facebook for Developers account. Go to Facebook Login, and then Settings. Add the valid OAuth redirect URIs here.

Now, scroll down on the same screen and click the save the settings.
On Facebook for Developer’s page, Go to Facebook Login > Settings from the left side menu.

Add valid OAuth redirect URIs here:
- http://loginpress.local/wp-login.php?lpsl_login_id=facebook_check
- http://loginpress.local/admin.php?lpsl_login_id=facebook_check
Note: We are performing it on a local environment; in your case, replace /loginpress.local/ with your domain name.
When you are done, click Save.
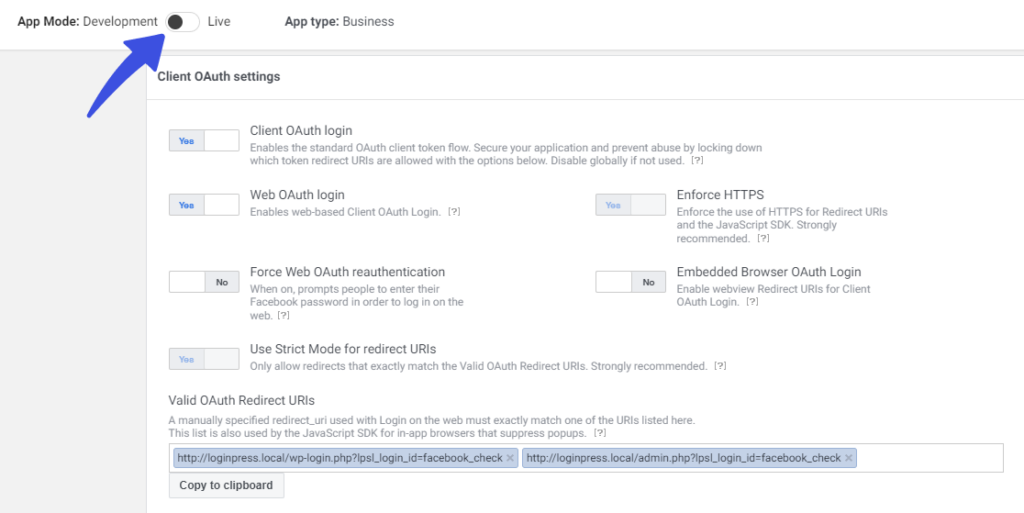
The final step of the process is to mark the app Public on Facebook for the Developer’s page. For this, check the box in the top bar. Remember to Save the settings.
Add Twitter Login with LoginPress Social Login Add-on
First, you’ll need to enable Twitter Login in the Social Login’s Settings tab.
Once you’ve enabled Twitter Login, other fields will open up, including Twitter API Key, Twitter API secret key, and Twitter Callback URL.

Next, you’ll need to register your website with Twitter at Twitter app.
Note: If you’re registering a fresh Twitter Developer Account, you might have to wait a couple of days for authentication.
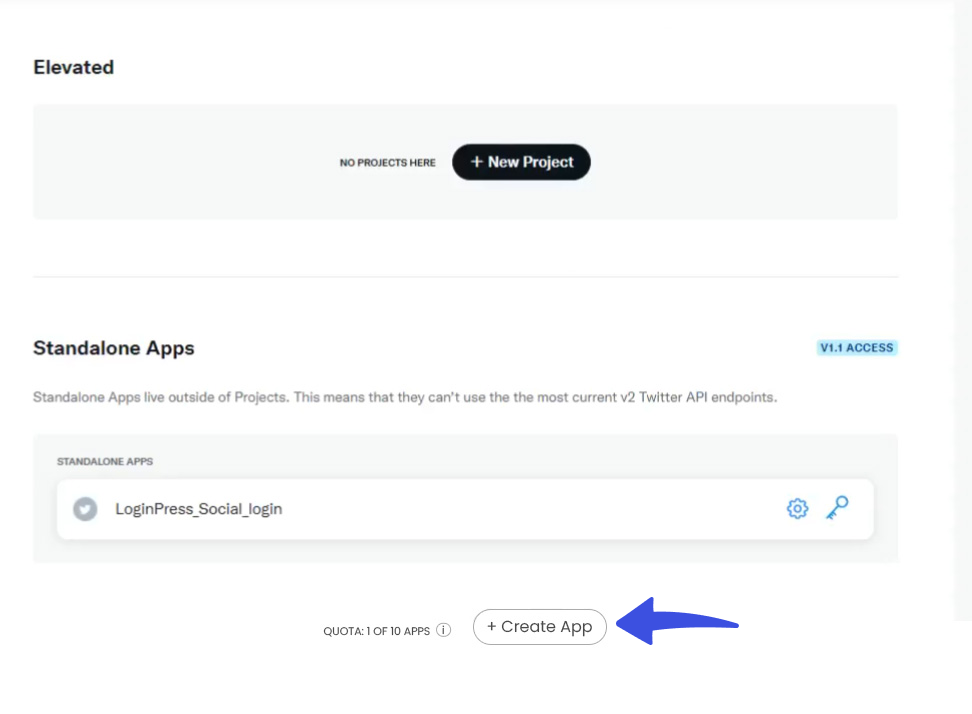
When you are done, you can proceed to the next step. Now, click on the “Create an App” Button.
A new screen with two tabs will open up. First, you’ll need to enter your app name.
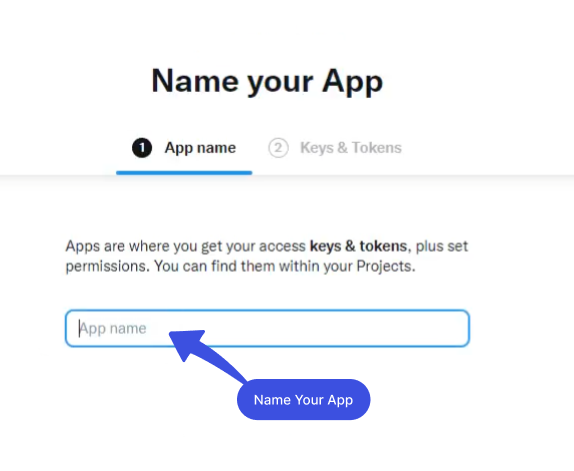
You’ll need to click the “Next” button in the bottom right corner when you’ve selected the app name.
From this tab, copy the API Key and API Secret.
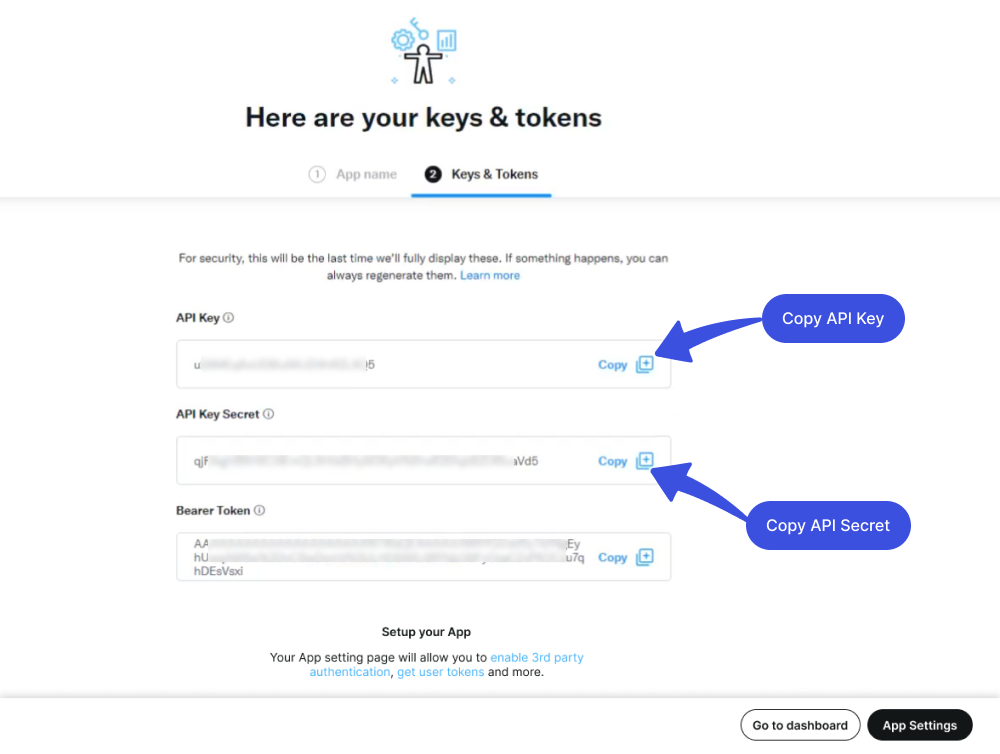
Now you’ll need to get back to the Social Login’s Settings tab and paste API Key and API Key Secret right next to the Twitter Login fields.

Once you’ve pasted the Twitter API key and Twitter API secret key, you’ll need Twitter Callback URL.
You don’t need to go anywhere for the Twitter Callback URL as it is under the Twitter Callback URL field. Copy and Paste it into the field.
Click the Save button when you’re done.
Add Google Login with LoginPress Social Login Add-on
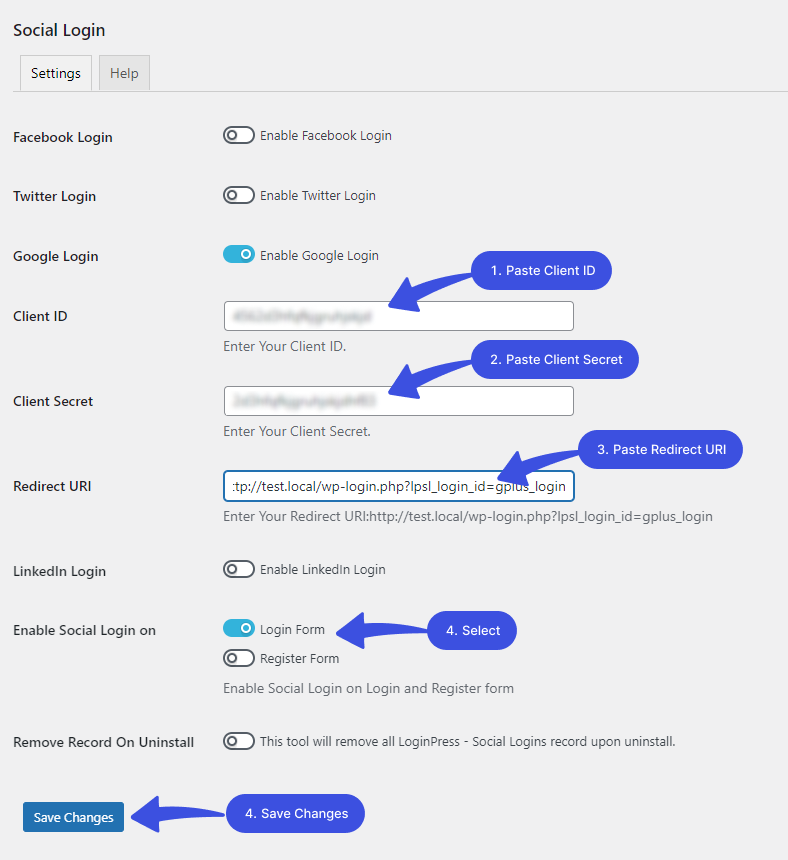
First, you’ll need to enable Google Login in the Social Login’s Settings tab.
Once you’ve enabled Google Login, other fields, including Client ID, Client Secret, and Redirect URI, will open up.

You must fill in these fields to integrate the LoginPress Google Login on the login and registration form.
You must register your website with Google APIs at Google Developer Console. When you are done, you can proceed to the next step.
Note: You’ll need to Login via your Google account.
Next, you’ll be on the Google Cloud screen.
Click on the “CREATE PROJECT” button in the upper right corner.
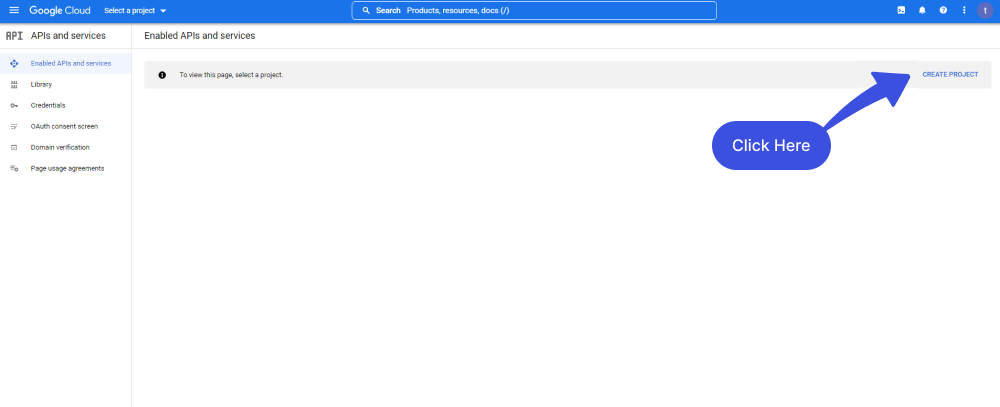
You’ll move to a new screen. From here, fill in the Project Name and Location fields.

Note: If you have more than 1 project in Google APIs, please confirm your project from the top left dropdown project list.
Click on the “OAuth consent screen” from the left side menu.

For User, Type chooses External and click Create button.

The OAuth consent screen WILL OPEN UP. Simply fill out the required informational fields, including Application Name, App domain links, and Authorized domains.
Save and Continue.
Note: For the Scopes and Test Users section, leave everything and click Save and Continue.

Go to the Credentials page from the left sidebar and select Create Credentials.
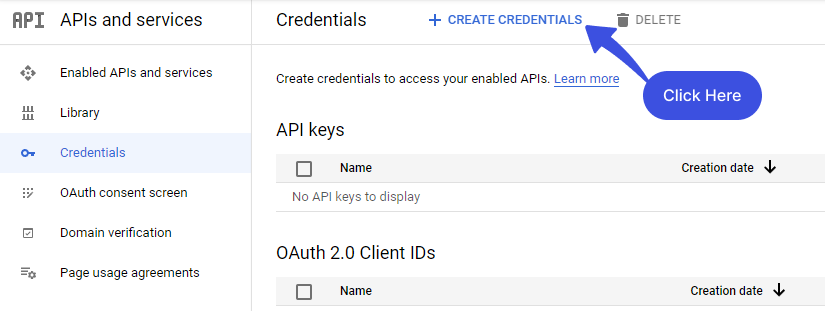
Next, select “OAuth client ID” from the dropdown.

Select the Application type here. In our case, it’s a Web application.

Fill out the required informational fields (Name of your Application & Authorized redirect URIs) and save the settings.
Note: Here are the Authorized redirect URIs: http://loginpress.local/wp-login.php?lpsl_login_id=gplus_login

After clicking the Create button, a popup screen with OAuth Client Created heading will appear.
It has Your Client ID and Your Client Secret keys.
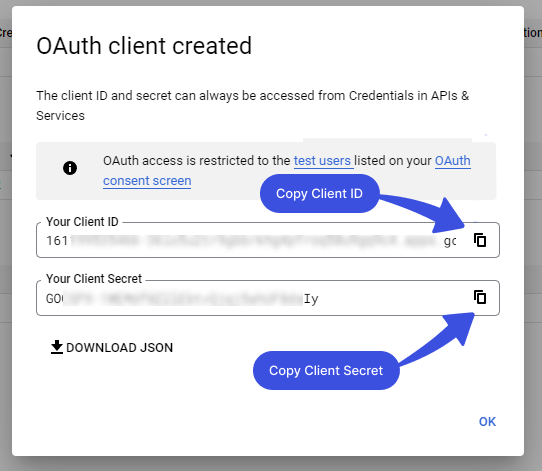
Once you’ve pasted the Your Client ID and Your Client Secret, you’ll need Redirect URI.
You don’t need to go anywhere for the Redirect URI as it is under the Redirect URI field. Copy and Paste it into the field.
Note: Change “/test.local/” to your domain name.
Click the Save button when you’re done.
Add LinkedIn Login with LoginPress Social Login Add-on
First, you’ll need to enable LinkedIn Login in the Social Login’s Settings tab.
Once you toggle on the Enable LinkedIn Login, other fields, including Client ID, Client Secret, and Redirect URI, will open up.

You must fill in these fields to integrate the LoginPress LinkedIn Login on the login or registration form (where you prefer).
Don’t worry! Simply follow the rest of the steps to get these keys. Buckle up!
Next, you’ll need to register your website with LinkedIn a LinkedIn developer account. When you are done, you can proceed.
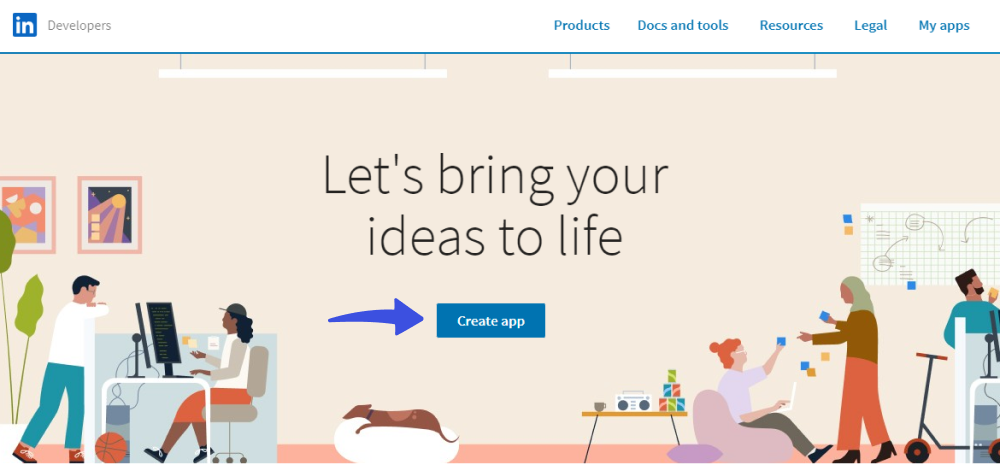
Now, click on My Apps to Create a LinkedIn Application.
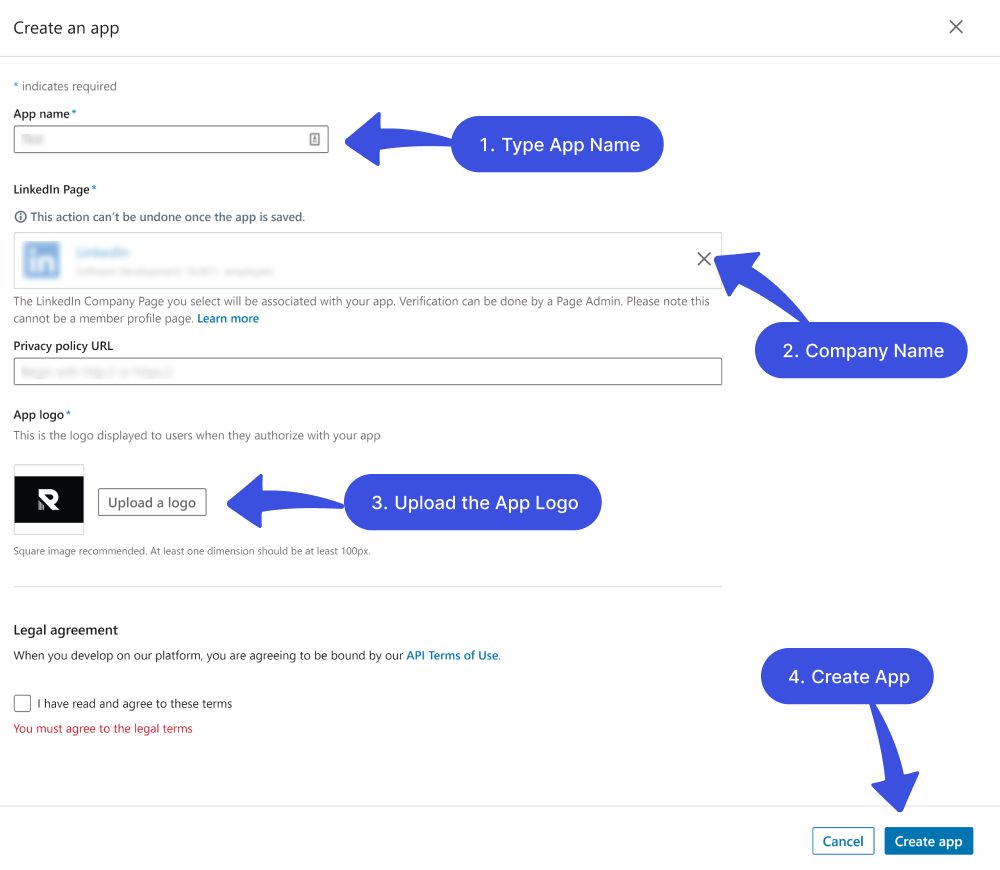
Here, you’ll need to fill out the required information fields on the form, including:
- App Name : Fill in the desired App name.
- Privacy Policy URL: A privacy policy URL is a link to the webpage where the privacy policy of your WordPress site is posted. Simply Copy and paste your website’s privacy policy URL here.
- App Logo: Add the logo of your app.
- Legal Agreement: Tick the Legal agreement checkbox to continue creating the app.
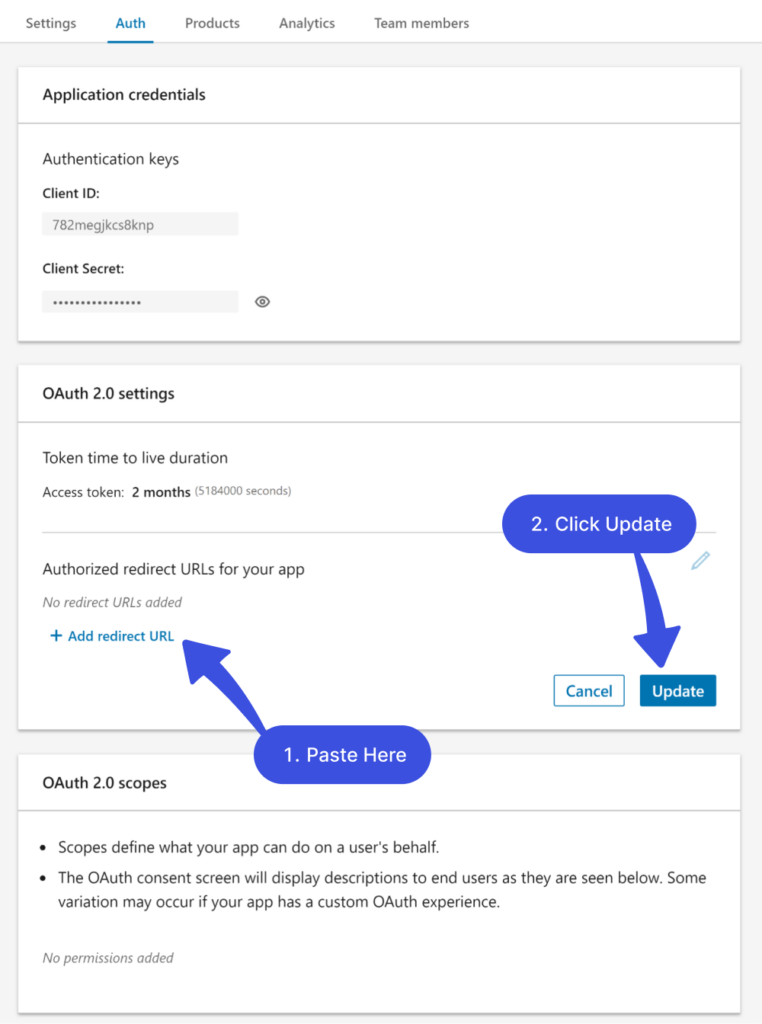
After submitting the form, Check out the Auth tab in your newly created App. Auth tab will have Redirect URLs and Credentials (i.e., Client ID and Client Secret).
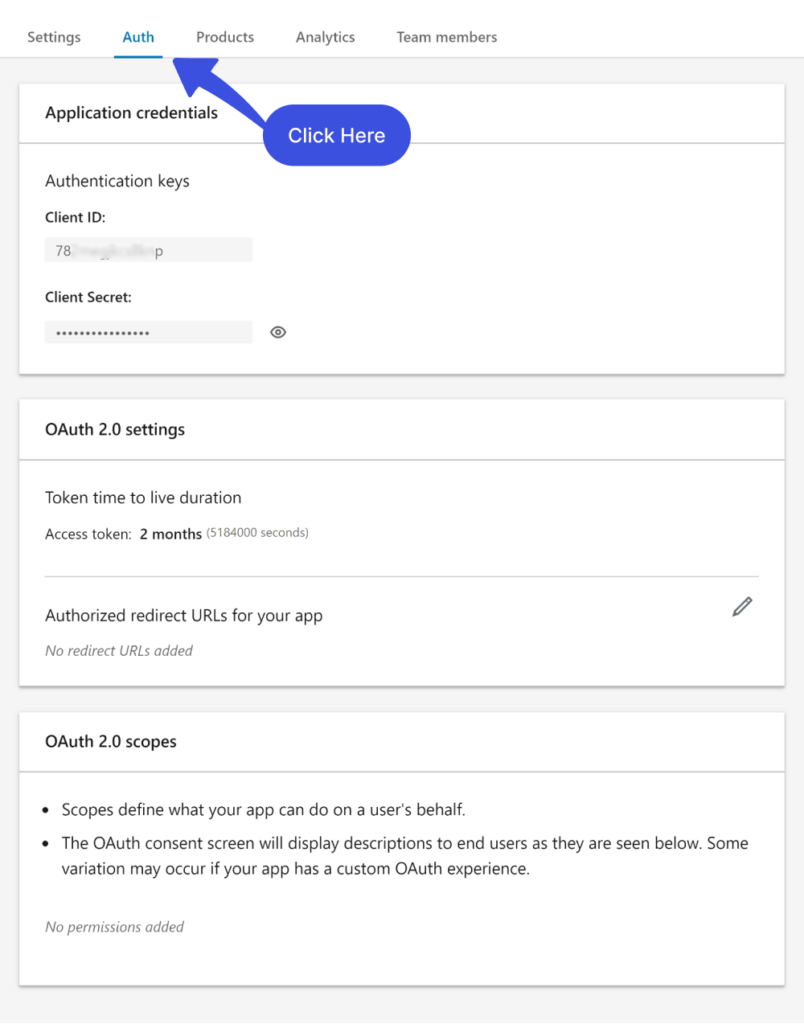
Now, copy this http://loginpress.local/wp-login.php?lpsl_login_id=linkedin_login link and paste it to Authorized Redirect URLs.
Click Update when you are done.
Next, you can copy the Client ID and Client Secret keys from Auth Tab.
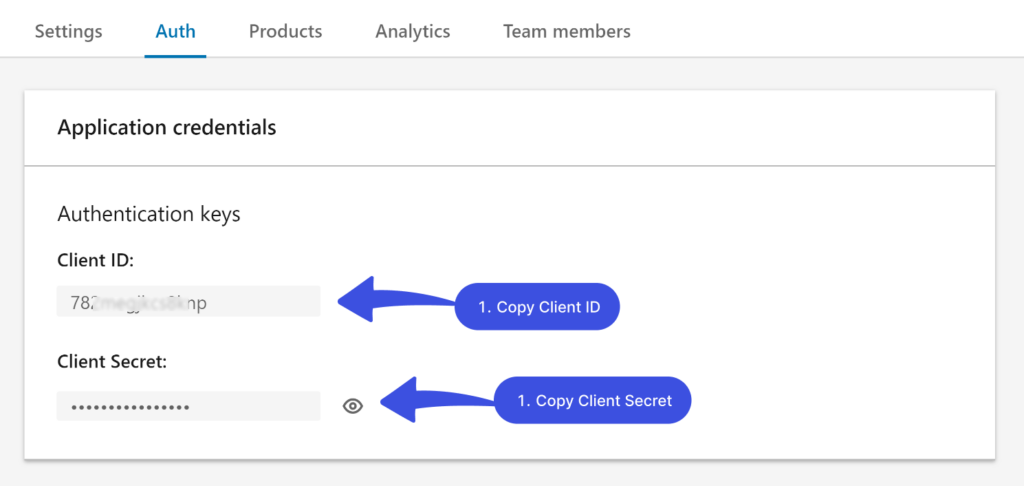
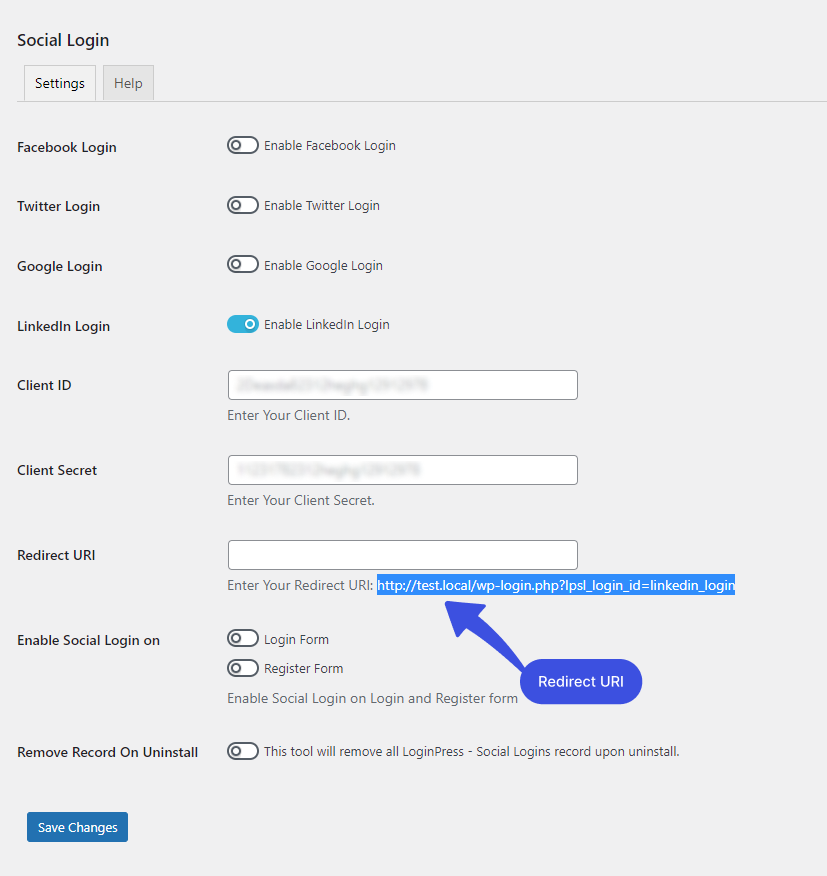
Paste the Client Id and Client Secret Keys right next to the LinkedIn Login in the Social Login Settings tab.
All done; you can now click the Save button to see LinkedIn social login on the login and registration form.

Redirect URI is given right under the Redirect URI field. Simply copy and paste it into the field.
Note: Change “/test.local/” to your domain name.
Conclusion: Social Login Plugin to WordPress
Adding Social Login for all users is a simple yet effective way to alleviate online registration headaches. While WordPress doesn’t offer this functionality as a part of the core features, the LoginPress Social Login add-on fills in the gap nicely.
Social login integration with the WordPress website is getting popular as it simplifies the registration and login process for users. Social login is also great for website owners as they get cleaner user data, resulting in better campaign ROI. So the social login plugin can be the best for you if you have a WordPress website.
We hope you’ll now understand how to add social login plugin to WordPress. Start using the LoginPress Social Login add-on and free your users of login headaches on your WordPress website.
That’s all! You can also check out How to Change or Reset a WordPress Password (2022) and How to Redirect Users After Successful Login in WordPress
Not using LoginPress yet?What are you waiting for?
Frequently Asked Questions
Can I enable the Facebook login feature with the LoginPress Social Login add-on?
Yes! You just need to go through the steps to enable the Facebook login option offered by the LoginPress Social Login add-on.
Do I need to use a separate plugin to add Google login on my website?
No! You don’t need to have another plugin to add Google login on your website as the LoginPress plugin’s Social Login add-on offers a Google login.


