How To Build a WordPress Website [The 2025 Way]
Are you wondering how to build a WordPress website on your own? If yes, you are on the right page.
Hold tight; we have curated a step-by-step guide to help you unlock the potential for creating a WordPress website from scratch. By the end of this article, you can create a WordPress site on your own. So, make sure to read this article till the end!
Let’s dive right in and learn how to build a WordPress website in less than an hour.
Table of Contents
What is WordPress?
WordPress is a popular open-source platform that enables you to build almost every type of website, including personal blogs, business websites, e-commerce stores, and more.
There are numerous renowned content management systems (CMS), i.e., Blogger, Drupal, Ghost, and more, but around 810 million websites use WordPress, which covers 43% of all the websites on the internet.
The key point is that you don’t require technical coding knowledge or hire a developer to make a website using WordPress. It also comes with a user-friendly interface.
See how a standard WordPress dashboard looks like:

WordPress.com vs WordPress.org
There are two main types of WordPress:
- WordPress.com
- WordPress.org
Both are different in terms of convenience and control.
WordPress.com offers convenience with less control, while WordPress.org gives you more control but requires more effort. It all depends on how much you want to manage yourself and how much freedom you need to make your website, just the way you want it.
Let’s see how they are different with the help of a comparison table:
| WordPress.com | WordPress.org |
|---|---|
| WordPress.com is hosted by WordPress itself. You don’t need a separate hosting service. | WordPress.org is not a self-hosted software. You have to buy hosting and domain separately. |
| You can get WordPress.com for free, but you cannot get hold of full functionality until you purchase a premium plan. | WordPress.org is the official website that lets you download open-source WordPress for free. |
| WordPress.com has limited free storage. | The storage varies according to your hosting provider. |
| WordPress.com provides little control over databases and files. | WordPress.org offers full control over databases and files. |
| You cannot install plugins for free. | You can install plugins for free. |
Why Should You Use WordPress?
We have gathered all the essential points that will help you know why you should use WordPress:
- User-Friendly Interface: WordPress provides a user-friendly interface that enables users to create, edit, and manage efficiently.
- No Coding Skills: WordPress enables you to build a website without writing a single line of code or hiring a developer.
- Themes: WordPress offers pre-designed themes for free that can be used to create a site that fits the brand’s identity, i.e., an academic website.
- Plugins: Plugins are the best way to uplift the site’s functionality. All you need to do is install and activate a plugin of desired functionality, i.e., login page customizer, SEO optimization, and more. Then, configure the plugin, and it’s ready to use!
- SEO-Friendly: WordPress has built-in features that support search engine optimization (SEO), making it easier for websites to rank well in search engine results.
- Responsive Design: Most WordPress themes have a responsive design that makes your website best fit all screen sizes, i.e., desktops, tablets, and smartphones.
How To Build A WordPress Website [Step-by-Step]
Before diving into the technical aspects, it’s really important to take a step back and think about what you want your website to do.
For example, are you considering starting up:
- Your own cozy personal blog?
- A cool online store where you can sell your awesome products?
- A place to show off your portfolio and let your creativity shine?
- Or a professional-looking website for your business?
In a nutshell, the possibilities are endless.! You’ve got to figure out who you’re trying to reach with your site, what kind of stuff you’ll be putting up there, and more.
When you have decided, follow these simple steps:
Step 1: Buy a Domain
Selecting a memorable domain name that reflects your website’s identity is the first step toward building your online presence.
A domain name acts as a website’s address on the internet, allowing users to access the website easily by typing in a recognizable and memorable name.
1.1. Tips for Choosing the Best Domain Name
It’s like the online signature for your place, so you want it to be spot on. Here are some tips to help you choose the best domain name:
- Your domain name should match your brand’s goals.
- Keep it short and simple. It’s better to use easy spelling and pronunciation.
- Avoid numbers and hyphens.
- You can use domain name generators for better ideas.
- You can purchase different variations, like .net and .org, to prevent competitors from using similar domain names.
- Avoid trendy words or phrases because they can fade quickly. Choose a timeless domain name that will remain relevant in the long run.
Step 2: Purchase Web Hosting
Once you have a domain name, it’s time to find a reliable hosting provider.
When you’re on the hunt for a hosting buddy, here are a few things to look for:
- Speed: Consider a hosting provider with a better speed.
- Scalability: A good hosting provider gives you more room to rank high.
Now, speaking of making things easy, some hosting providers offer this super cool feature called “one-click WordPress installations.” It’s like magic – you click a button, and your WordPress site is all setup and ready to roll. Here are a few names that do this trick:
Many hosting providers offer one-click WordPress installations, simplifying the setup process, like:
- Bluehost
- GoDaddy
- Hostinger
- SiteGround
- and more
Note: Here, we’ll choose Bluehost, as WordPress.org officially recommends it as a top hosting provider for WordPress websites.
Bluehost is a web hosting company that has gained popularity for providing various hosting services, including shared hosting, WordPress hosting, VPS hosting, and more.

Many individuals and businesses consider using Bluehost for several reasons:
- Free Domain Name: Bluehost provides a free domain name for the first year. It can benefit you if you are setting up a new website.
- Security Features: Bluehost offers features like SSL certificates, SiteLock security, and more. It reduces the chances of cybercrime on your site.
- Money-Back Guarantee: Bluehost offers a 30-day money-back guarantee on most hosting plans. You can claim a refund within the first 30 days if you are unsatisfied with their services.
Note: While Bluehost offers many advantages, we’ll still recommend comparing different hosting providers, their features, pricing, and user reviews to ensure that Bluehost is the right fit for your website or online project.
Let’s dive right into purchasing a domain name and hosting.
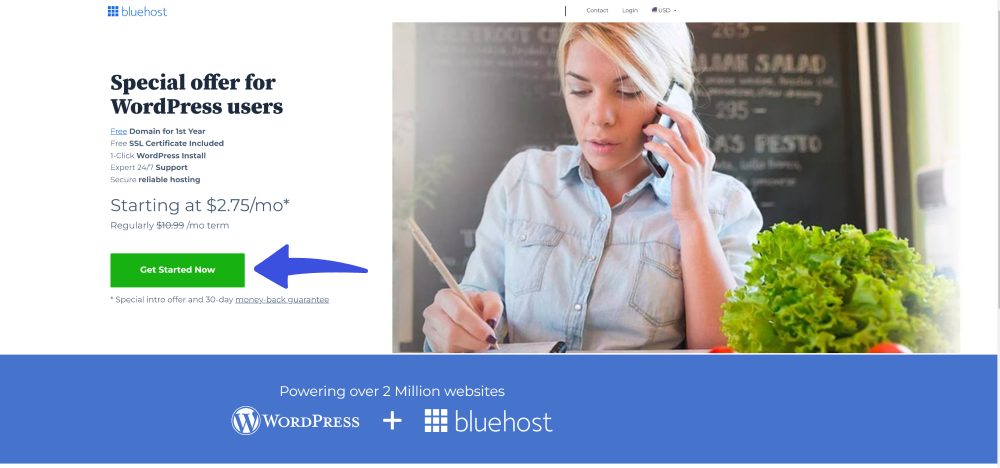
First, go to the Bluehost website and click on the Get Started Now button.
The pricing page will appear, where you’ll need to Select a hosting plan for your website.
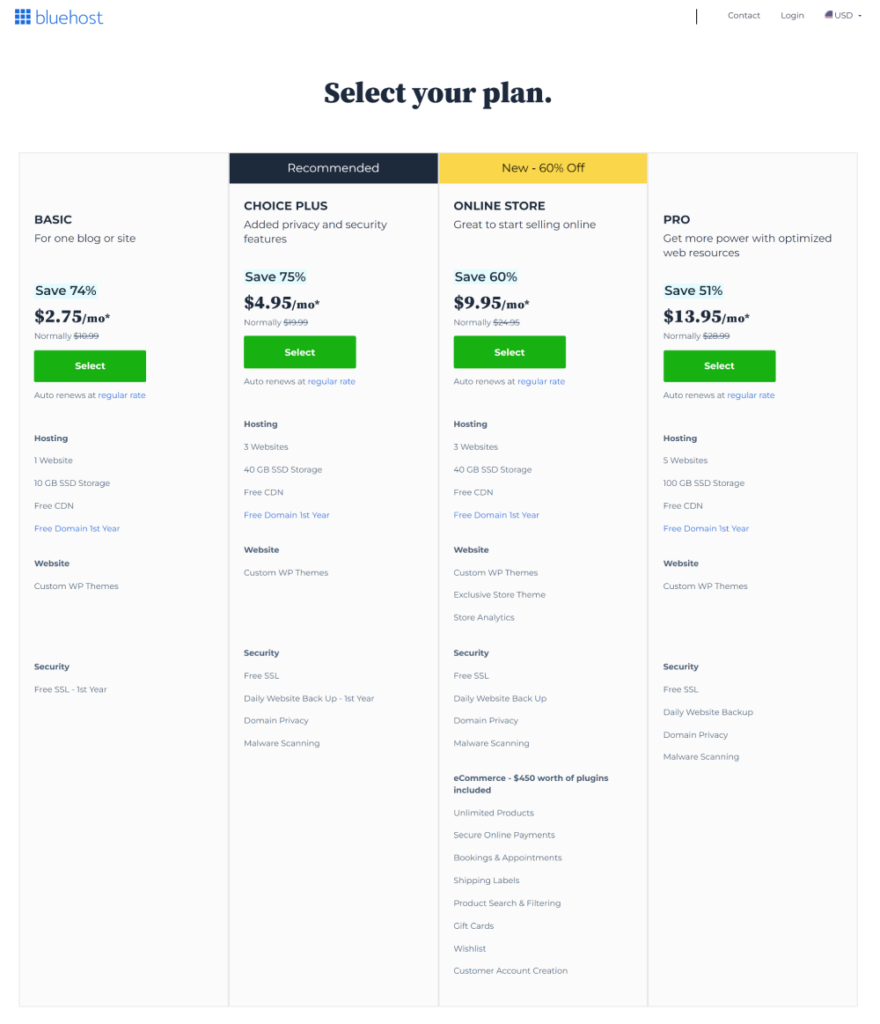
When you’ve decided on your pricing plan, click the Select button to proceed to the next step.
On the next screen, you’ll be asked to Create a new domain and Use a domain name you own.
Note: It’s better to use a .com domain name.
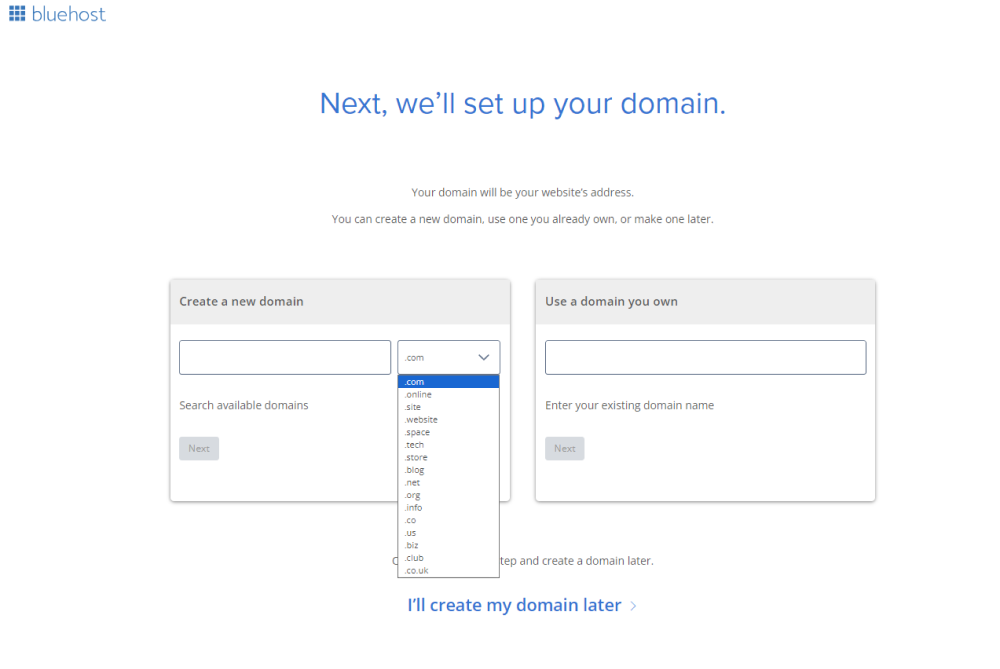
When done, click the Next button.
Next, you must provide your account information, including Account, Package, and Payment Information.
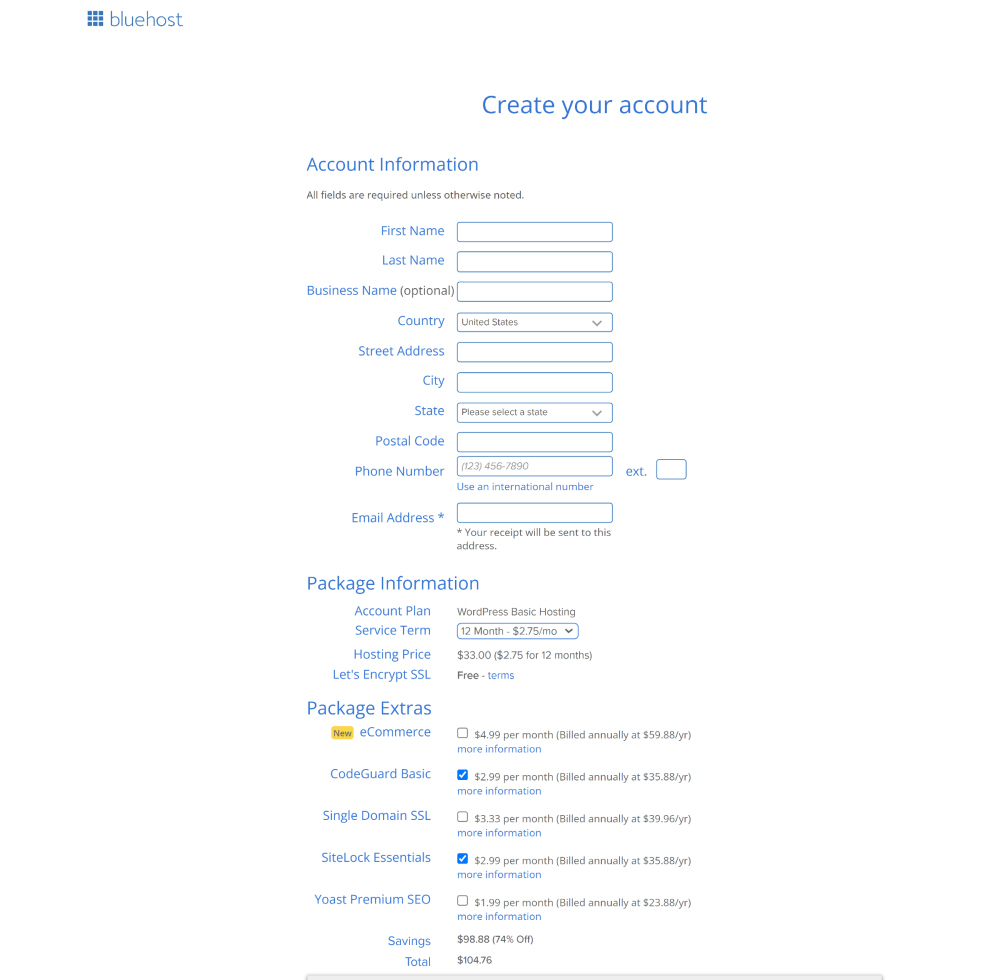
When done, click the Submit button to finish the purchase.

After this, you’ll get an email on your purchased email address. This email will have details for logging in to your web hosting control panel (cPanel).
Log in to your hosting account dashboard to manage everything related to your website, including getting support, setting up emails, and more.
Note: This is where you’ll install WordPress.
Step 3: Install WordPress
When you sign up for your domain name through Bluehost, it will automatically install WordPress for you.
All you’ll need to do is click on the Log into WordPress button, which will take you directly to the WordPress admin area.
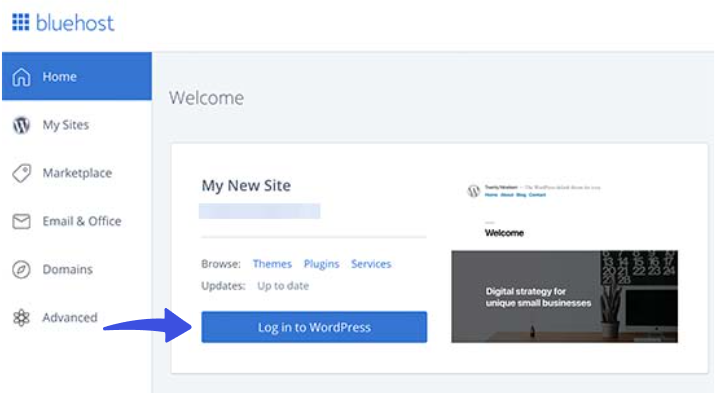
Easy right?
Now, you are ready to design your website exactly how you want it to appear!
Step 4: Choose A WordPress Theme
A WordPress theme helps you determine a WordPress website’s visual appearance, layout, and functionality with just a single click.
Over 1100 WordPress themes are available for free in the WordPress official repository. Every theme serves a specific purpose, i.e., cooking, business, academic, technical, and more.
All you need to do is select a theme that matches your brand, and it will change the design elements, such as colors, fonts, layouts, and styles, accordingly for you.
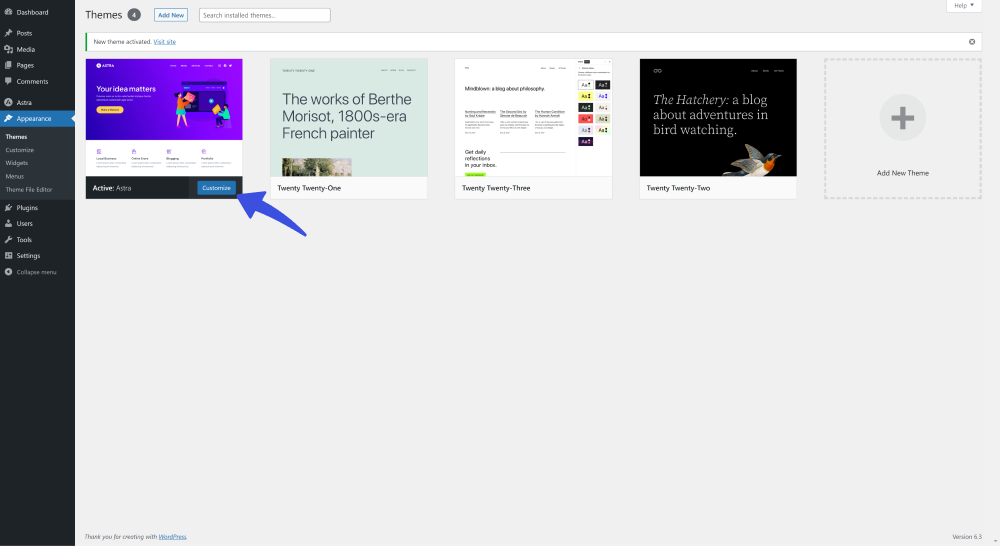
To choose a theme for your WordPress website, go to the left sidebar of the WordPress admin dashboard, navigate to Appearance, and click the Themes option.

On the Next screen, you can find the themes that come upon WordPress installation. But you are not dependent on these themes. Simply click the Add New button to access 11,000+ free WordPress themes straight from your WordPress dashboard.
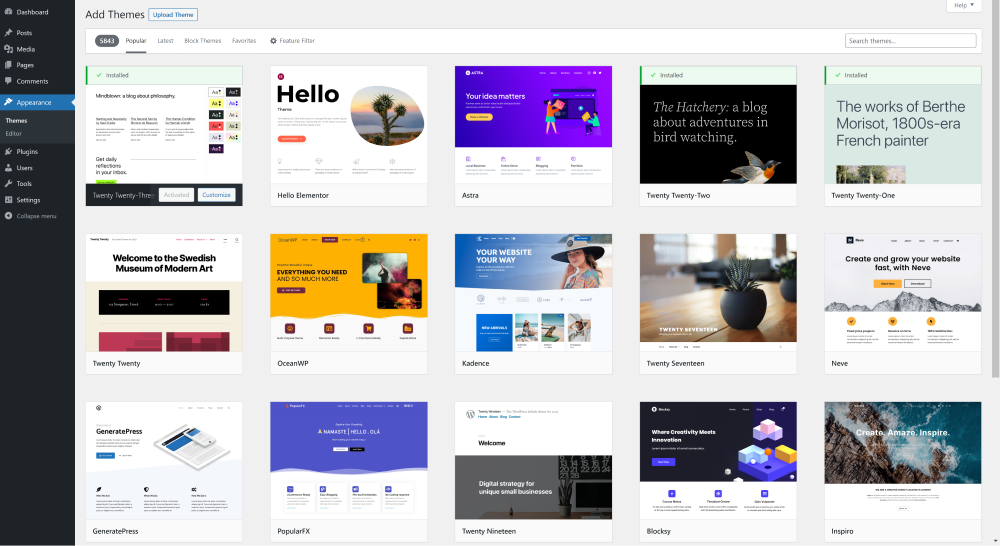
How to Install a Theme in WordPress
To install a WordPress theme, hover over the theme and then click on the Install button.
Note: Here, we are going to use the theme Astra.
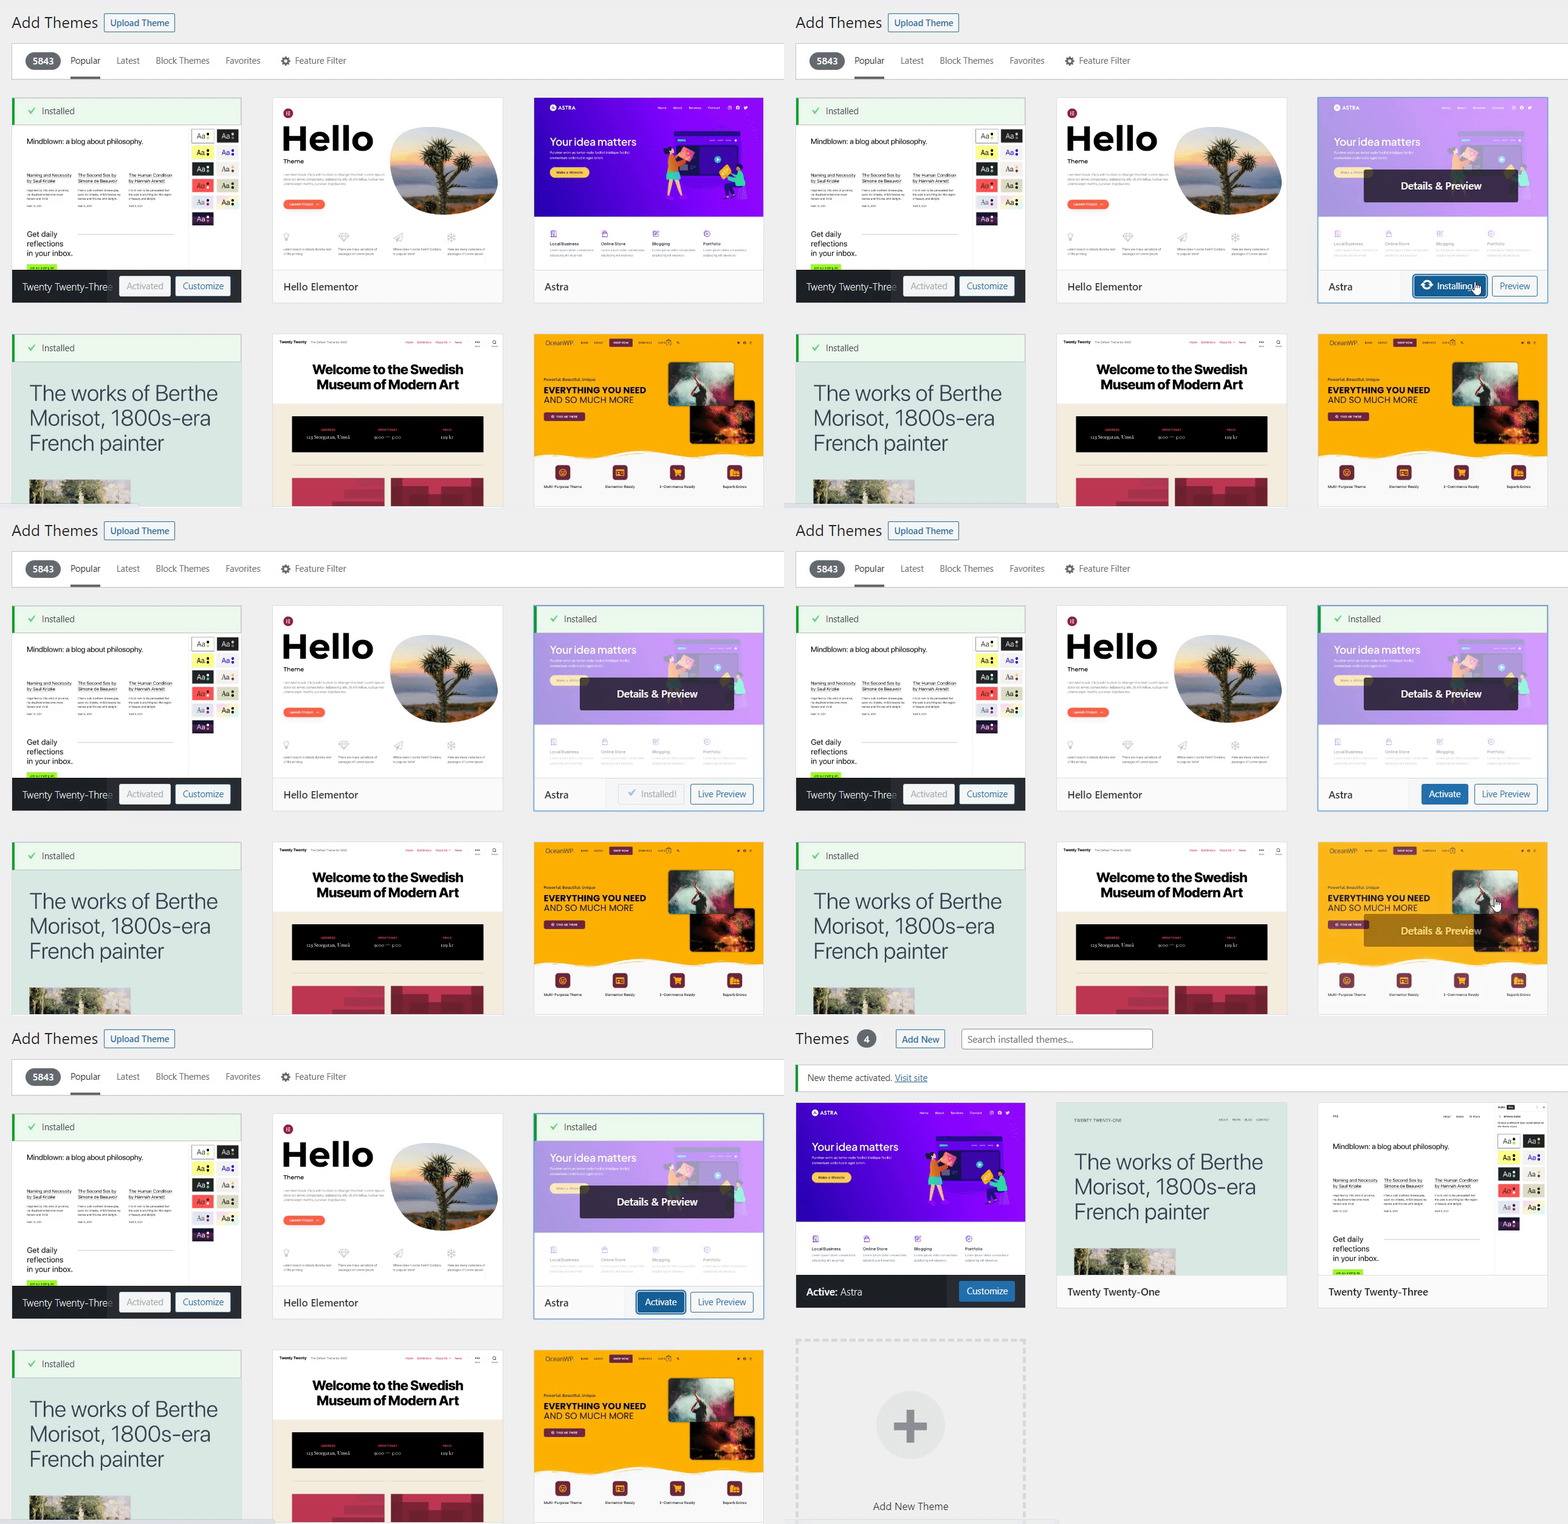
After installing and activating the theme, you can customize it according to your preferences.
For this purpose, hover over the activated theme and click the Customize button.
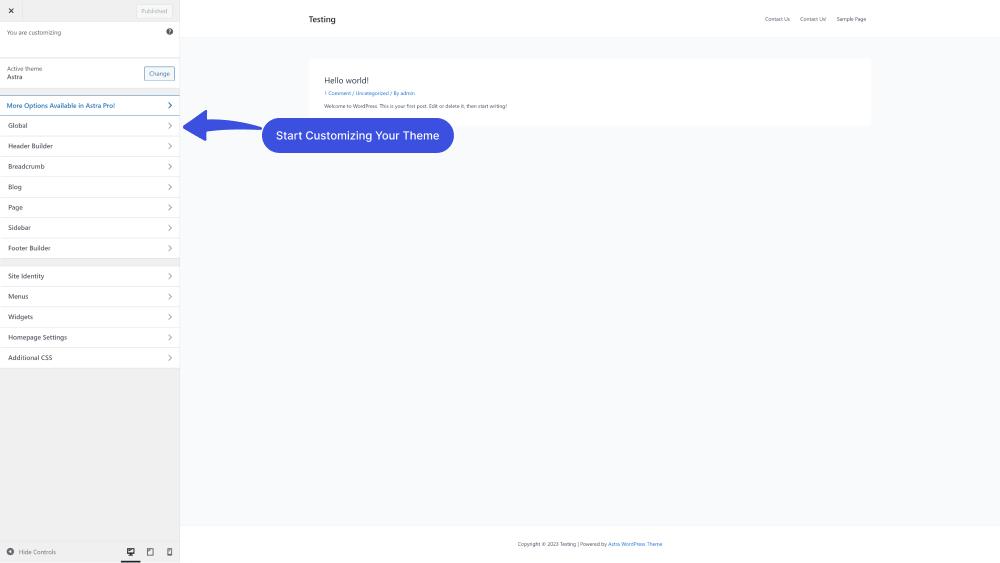
On the next screen, customize your theme inside the WordPress Customizer, and more from the left menu sidebar and track the changes in real-time on the right-hand side before making the changes live.
Note: You can switch themes later without losing your content. WordPress separates your content (text, images, posts, pages, etc.) from the theme’s design. When you switch themes, your content remains intact.
Step 5: Customize Your WordPress Site
Now, you can customize your website.
To do this, go to the left sidebar of the WordPress admin dashboard > Settings > General.

On the next screen, you can add the Title of your site, Tagline ( Use a few words to explain what your website is about), enable the register form, and edit other general settings.

When you are done, click the Save Changes button.
Remember, by default, WordPress uses a dynamic homepage. You can easily replace it with a static homepage.
To do this, go to the left menu of the WordPress admin dashboard > Settings > Reading.
On the reading Settings screen, select A static page (select below) option. Next, you’re required to click the dropdown menu to choose your new homepage from the list.
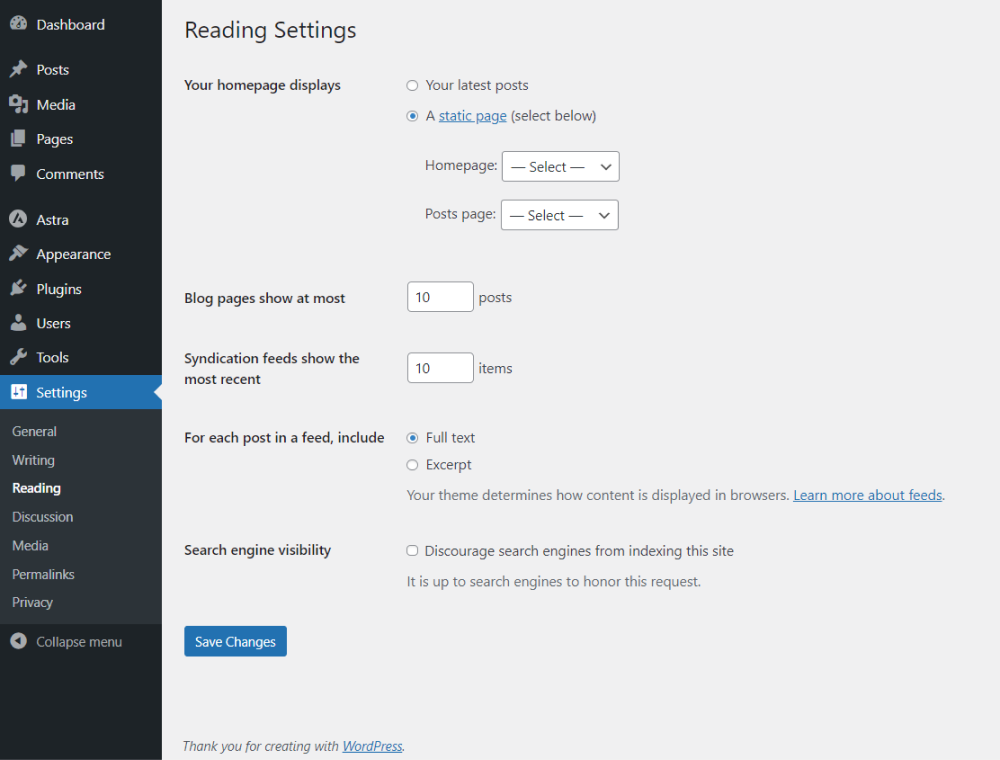
When you are done, click the Save Changes button. Now, it’s time to create posts and pages for your site!
Step 6: Create Pages and Posts
In WordPress, the Posts and Pages sections are two basic content types that allow you to create and manage different types of content on your website.
Each serves a specific purpose and is suited for different types of information.
Let’s find out how you can add content to your WordPress site!
Go to the left sidebar of the WordPress admin dashboard, navigate to Pages, and click the Add New option.

On the next screen, you can create a page for your website.
All you need to do is add a title that best suits your page, i.e., Homepage, About page, Contact page, Blog page, and more.
Next, add a block, i.e., text, images, videos, audio, and more, and add the content.
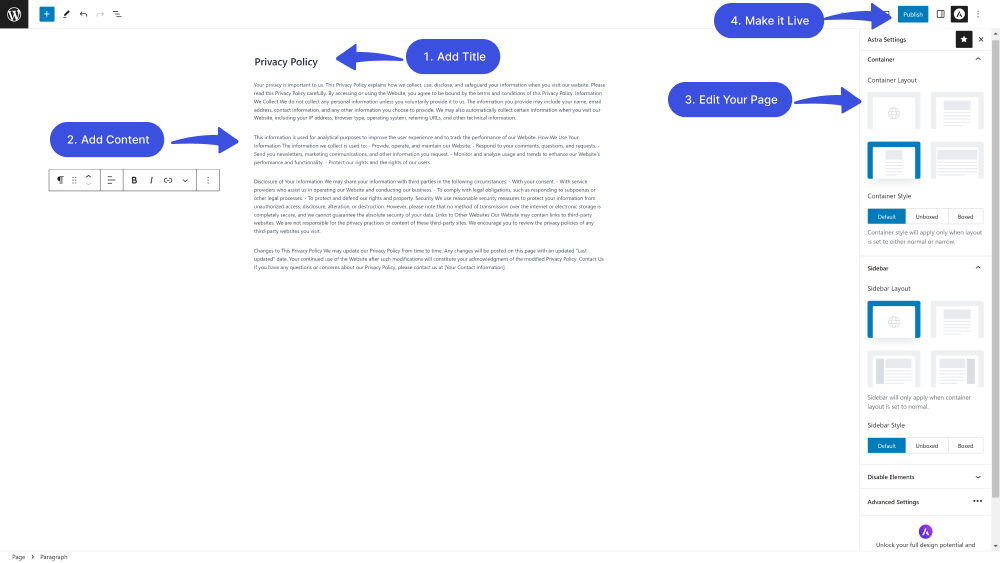
When you are done, click the Publish button to make it live on your website.
Next, you need to add posts to your site.
For this purpose, go to the left sidebar of the WordPress admin dashboard, navigate to Posts, and click the Add New option.

You can add the title and content in the visual post editor on the next screen. You can also adjust post formats, categories, and tags from the right sidebar menu.
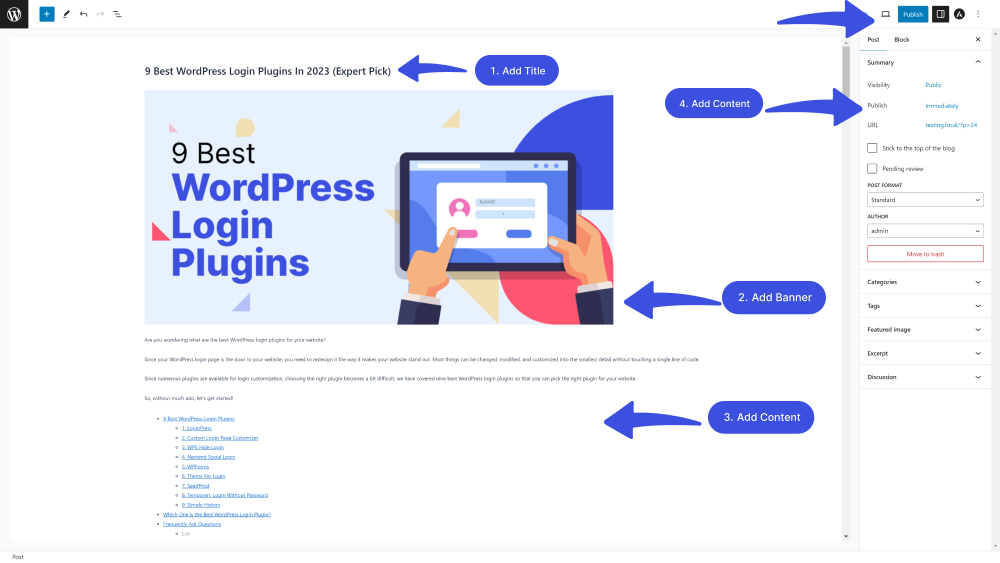
When you are done, click the Publish button on the top.
Step 7: Use Plugins to Improve WordPress Functionality
You’ve set all the basics for your WordPress site. It’s time to beef up your site’s functionality using plugins.
There are WordPress plugins to help you accomplish almost any task imaginable.
To add plugins to your site, go to the left sidebar menu of your WordPress admin dashboard, navigate to Plugins, and click the Add New option.

On the next screen, click search for specific functionality, i.e., login page customizer in the search field. See the results, and add a plugin simply by clicking the install and activate button.
Note: We will use LoginPress, the best login page customizer plugin.
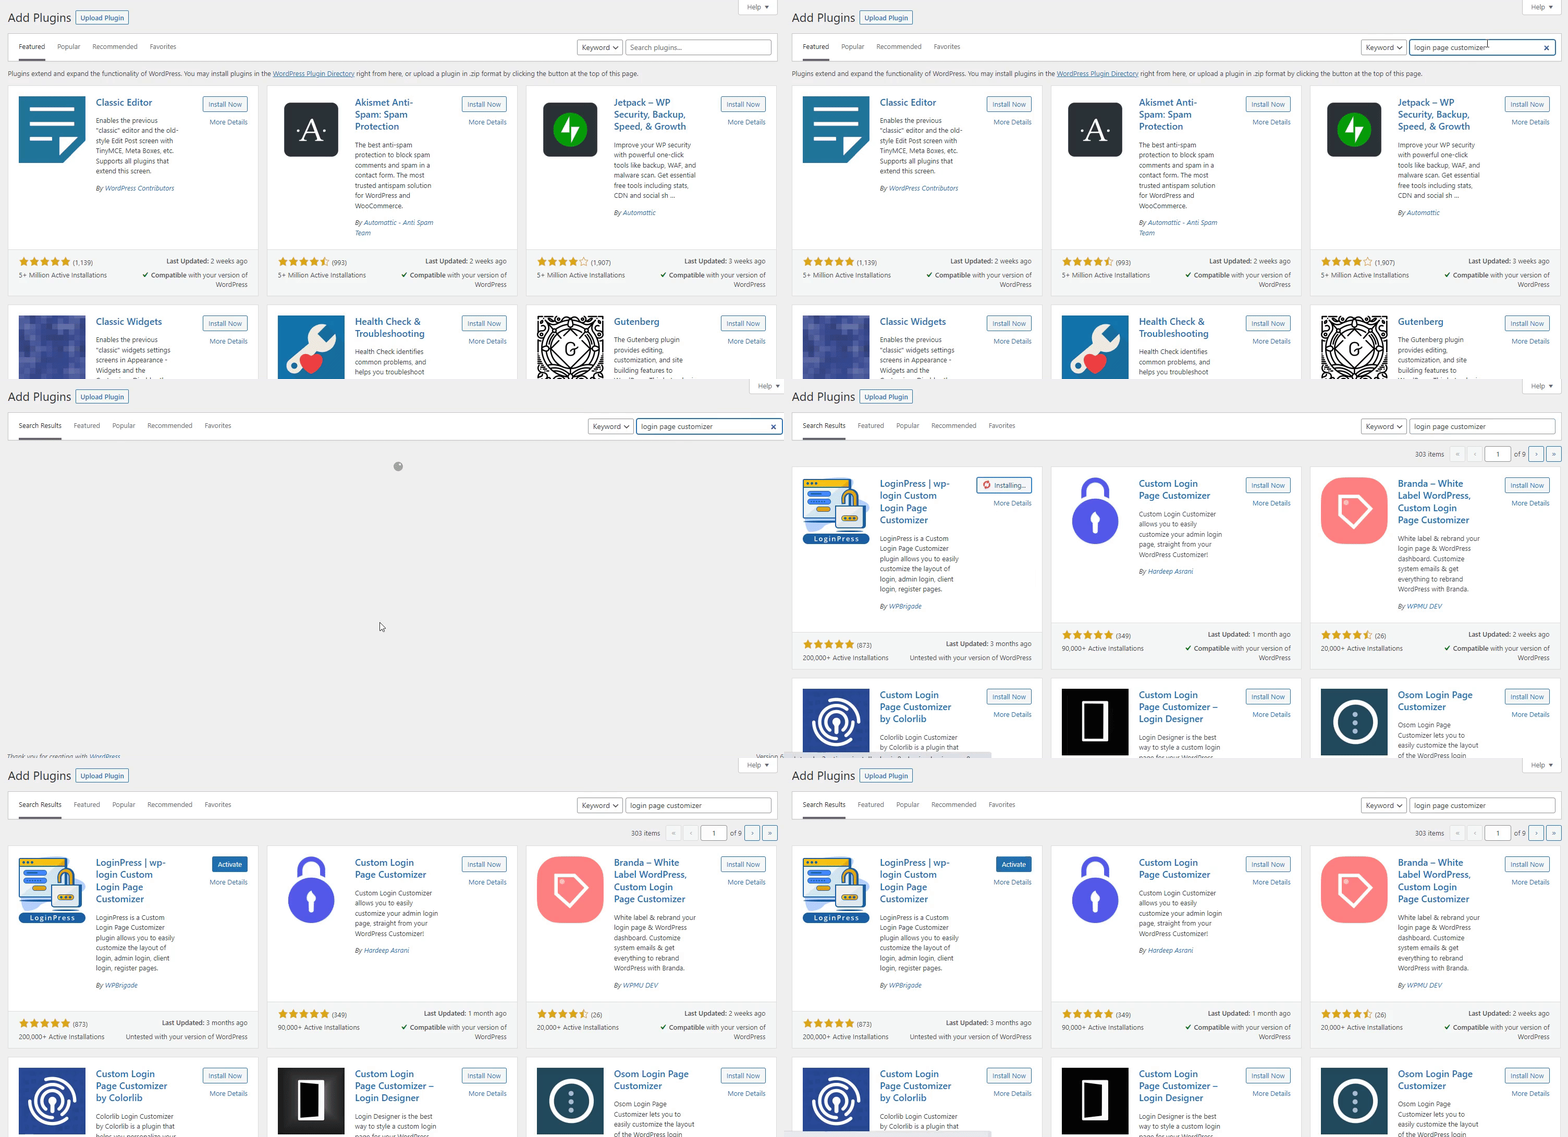
The plugin will help you customize the default WordPress login page.
You can search likewise for other functionalities, i.e., analytics, social share buttons, and more, and add the plugin as shown above.
Note: You may like to read about 15 Must-Have WordPress Plugins for Bloggers in 2025.
WordPress Website Examples
Now that you know how you can build a WordPress website from scratch, let’s have a look at some of the high-quality WordPress website Examples:
Design # 1: LoginPress
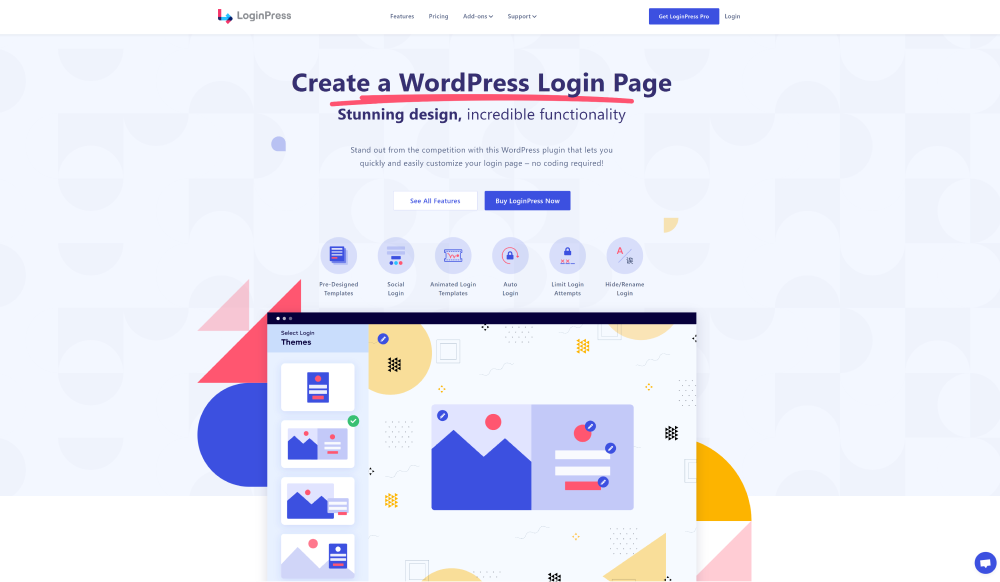
Design # 2: Analytify
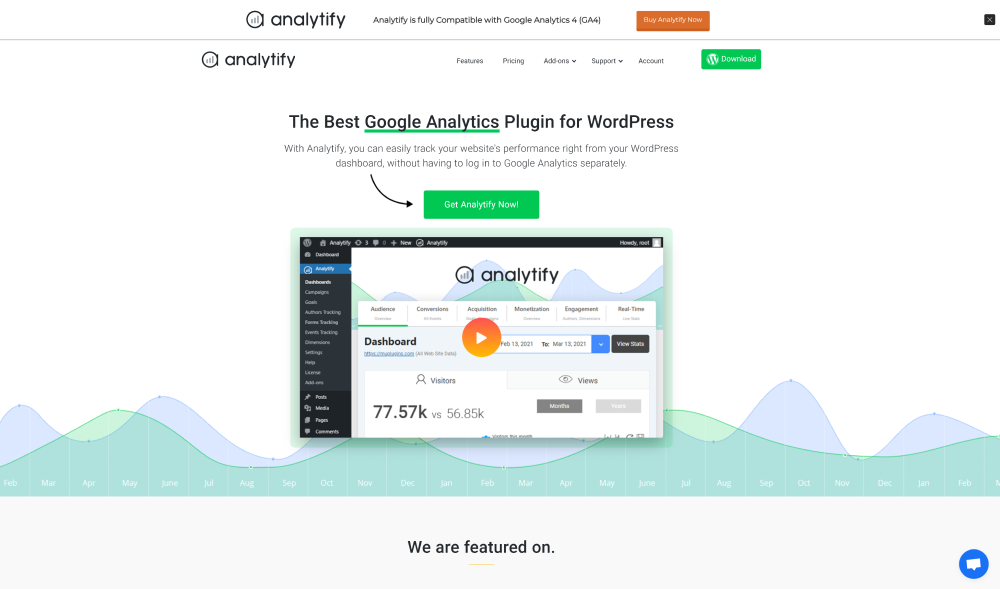
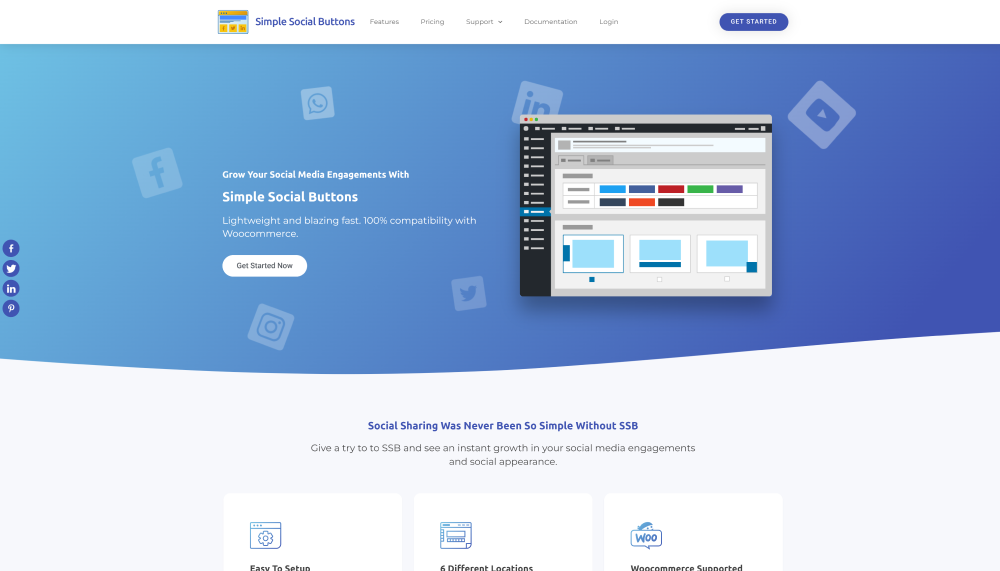
Design # 3: Simple Social Buttons
Explore more: 13 Best WordPress Login Page Design Examples guide.
8 Tips for Creating a WordPress Website
Creating a WordPress website can be an exciting project. Here are some tips and reminders to help you start and ensure a successful website launch.
- Essential Plugins: Install essential plugins, including LoginPress (for customizing and adding security to the WordPress login page), Analytify (for better analytics of your site), and Yoast SEO (for improving your site), to optimize your site for search engines, and more.
- Create Quality Content: Creating high-quality, engaging content presenting your product best is better.
- Mobile Responsiveness: Ensure your website is responsive and fits on all screen sizes, i.e., smartphones and tablets.
- Page Loading Speed: Improve your site speed with caching plugins like W3 Total Cache.
- Implement Security Measures: Keep your website secure by using strong passwords, updating plugins and themes, and considering a security plugin. LoginPress Pro best helps you gain security for your WordPress site through Hide Login, Limit Login, Session Expire, and other security features.
- Regular Backups: Set up automated backups to ensure you have a recent copy of your website’s data in case of any issues. You can use a backup plugin for the purpose, i.e., UpdraftPlus.
- Monitor and Improve: It is the best practice to monitor your website’s performance occasionally. You can use Analytify, the best Google Analytics plugin. It helps you monitor your website and make informed improvements.
- Stay Updated: Stay up-to-date with the latest WordPress, theme, and plugin updates to maintain security and functionality.
FAQs About How to Build a WordPress Website:
Is WordPress still free in 2025?
WordPress is available in 2 versions (WordPress.com and WordPress.org). WordPress.org is free, with just a need to purchase hosting and a domain. On the other hand, you can get WordPress.com for free, but you’ll still require a premium version to get more themes and third-party plugins.
Do I need coding knowledge to build a WordPress website?
No, you are not required to know any coding skills or hire a developer to build a WordPress site. Simply install and activate a suitable page builder plugin, start designing, and get the desired results.
Which is the best WordPress hosting provider in 2025?
Many popular WordPress hosting providers are best for WordPress in 2025, including Bluehost, GoDaddy, SiteGround, and WP Engine. These hosting providers offer all the essentials for the reliable performance of your WordPress website.
What makes a good WordPress web design?
Many factors are involved in making a good WordPress web design, i.e., consistency with your brand, color scheme, typography, simplicity, and fast load time.
What are some essential plugins for a WordPress website in 2025?
Many WordPress plugins help you create a well-defined site, including LoginPress, Analytify, Simple Social Buttons, Akismet, and more.
Why is mobile responsiveness vital for a WordPress website?
Many users prefer browsing websites from their mobile devices. That’s why creating a responsive WordPress site is practically a must. It will help you create a great user experience across all devices.
Conclusion
We’ve dedicated a significant amount of effort to this guide. We hope you understand how to build a WordPress website without writing a single line of code or hiring a developer.
Here is a quick recap on how to build a WordPress website:
- Buy a domain name and hosting.
- Install WordPress.
- Choose A WordPress Theme.
- Customize Your Site.
- Create Pages and Posts.
- Use Plugins to Improve WordPress’s Functionality.
Remember, building a successful WordPress website takes time and effort. Don’t worry if you’re required to explore and learn along the way. Don’t hesitate to seek help from online communities, forums, or professionals if you encounter challenges. It will help you grow in no time!
Try it now yourself!
You may also like to read our articles on:
WordPress Login Security: 13 Ways to Secure Login Page
5 Best Social Login Plugins for WordPress in 2025 (Free and Paid).
Build your WordPress site now and use LoginPress to customize every element on the WordPress login page with LoginPress. Add a custom logo, error, and welcome messages, redefine login orders, and more with LoginPress.
That’s all for this guide!
How has it helped you step towards your first WordPress website?
Let us know by leaving a comment below.


