How to Change Your WordPress Theme Without Losing Content
Are you planning to change the theme for your WordPress website without losing any content? If yes, you’ll get your answer here!
As the digital landscape evolves, so do WordPress themes’ design trends and functionalities. Changing your WordPress theme can breathe new life into your online presence.
When you first log into WordPress, you can see the default theme, Twenty Twenty-Three. Fortunately, you can change the theme of a WordPress website anytime. However, it would help to be mindful of several important factors affecting your website’s performance and functionality.
Don’t worry! This step-by-step tutorial will walk you through changing your WordPress theme smoothly and efficiently.
Change WordPress Theme (TOC):
Reasons to Change a WordPress Theme
A WordPress theme controls the appearance of a WordPress website. It manages design elements, image placement, and related visual elements and plays a role in the website’s functionality. All themes have HTML and CSS code, PHP and JavaScript files, and images (mostly placeholders). These elements combine to influence how blog posts and pages are rendered.
WordPress has a huge repository of free and paid themes. You can get free themes from the WordPress Theme Repository. If you need better design features, templates, and, more importantly, support, you need to buy premium themes. You can create a custom theme that fits your requirements if you have the required technical skills.
Here are some compelling reasons to consider changing your WordPress theme, such as:
- Outdated Design: It’s better to align your site with modern design trends, as this will attract more visitors and improve user engagement.
- Improved Functionality: Newer themes often offer enhanced features and functionality, so upgrading your theme can provide additional value to your visitors.
- Rebranding: If you’re going to rebrand your focus to a different niche, such as food or travel, changing your theme can help reflect these changes visually.
- Mobile Responsiveness: With the increasing use of mobile devices, a responsive design is necessary to ensure it functions well on all screen sizes, i.e., mobiles.
- Customization Options: If you find yourself limited by your current theme’s customization options, switching to a more flexible theme can give you greater control over the look and feel of your website.
Things to Do Before Changing a WordPress Theme
Changing the theme of your WordPress site is like giving it a new look and feel. It refreshes the appearance of your site and can make it more attractive to visitors.
The best part is that it is pretty simple and can be done anytime to keep your website looking fresh and up-to-date.
If you have a popular blog, a corporate website, or a WooCommerce store, you can streamline the process by keeping a few things in mind.
These steps simplify the process and ensure that most of the functionality you’re used to is preserved and available in the new theme.
1. Customization in Theme’s Code
Most of the customizations on your WordPress site result from code snippets added directly to the theme’s functions.php file.
If you are interested in saving these customizations, we recommend you make a copy of the functions.php and related files.
2. Test Load Time
Website speed is essential for a great user experience (UX). When shortlisting themes for your website, always check the load speed with GTmetrix or similar tools. The idea is to find the fastest loading themes so that they’d perform at their peak under live conditions.
3. Transfer Google Analytics Tracking To a Plugin
If you’re using Google Analytics to track website traffic, you should check how Google Analytics is integrated with your website. If the code is directly included in the files, you could lose the tracking capabilities when you switch themes.
We recommend using a plugin to connect your website with Google Analytics. This is a reliable way to ensure that you can use Google Analytics with your new theme.
Note: We recommend Analytify, a user-friendly WordPress Google Analytics dashboard plugin that brings all essential Google Analytics stats to your WordPress Dashboard.
4. Check the New Theme’s Sidebar and Widget Areas
If your current theme uses the sidebars and widget areas to deliver content and functionalities, such as user login, you should ensure the new theme supports these areas. This simple check will ease your transition. Your users will also have a great time because they’ll find most functionalities unchanged.
5. Back up the Website
We highly recommend you take a full site backup before initiating the theme change. This critical step results in an archive that contains everything from the content to the theme and plugin files.
If anything goes wrong, you can use the backup archive to restore your website.
How to Choose A WordPress Theme
Choosing a theme is essential if you’re planning to start a website or blog using WordPress. A theme determines the layout, design, and functionality of your website.
To choose a suitable theme, you must consider the purpose of your website, the features you require, your budget, and the level of customization you need.
- Determine the purpose of your website.
- Make a list of the features you need.
- Choose between free and premium themes.
- Consider the level of customization you require.
- Look for themes that are mobile-friendly and responsive.
- Check the reviews and ratings of the themes.
- Ensure the theme is compatible with the latest version of WordPress.
- Consider the support and documentation provided by the theme developer.
- Preview the theme to see if it meets your requirements.
- Make a final decision and install the theme on your WordPress website.
How to Change WordPress Theme Easily
Step 1: Backup Your Site
Before making any changes, it’s essential to back up your WordPress site. You can use plugins like UpdraftPlus or manually back up your files and database.
Note: If you need help choosing the best backup plugin, read our detailed guide, 10 Best WordPress Backup Plugins in 2024.
Step 2: Select a New Theme
After backing up your site, it’s time to select a new theme that matches your preferences.
Note: If the users are wondering how to choose a WordPress theme, see our guide on 25+ Best Free WordPress Themes – A Sneak Peak (2024).
Go to your WordPress dashboard.
- Navigate to “Appearance” and then “Themes.”
- Browse through available themes or click on “Add New” to explore and install a new theme.
See the GIF below:
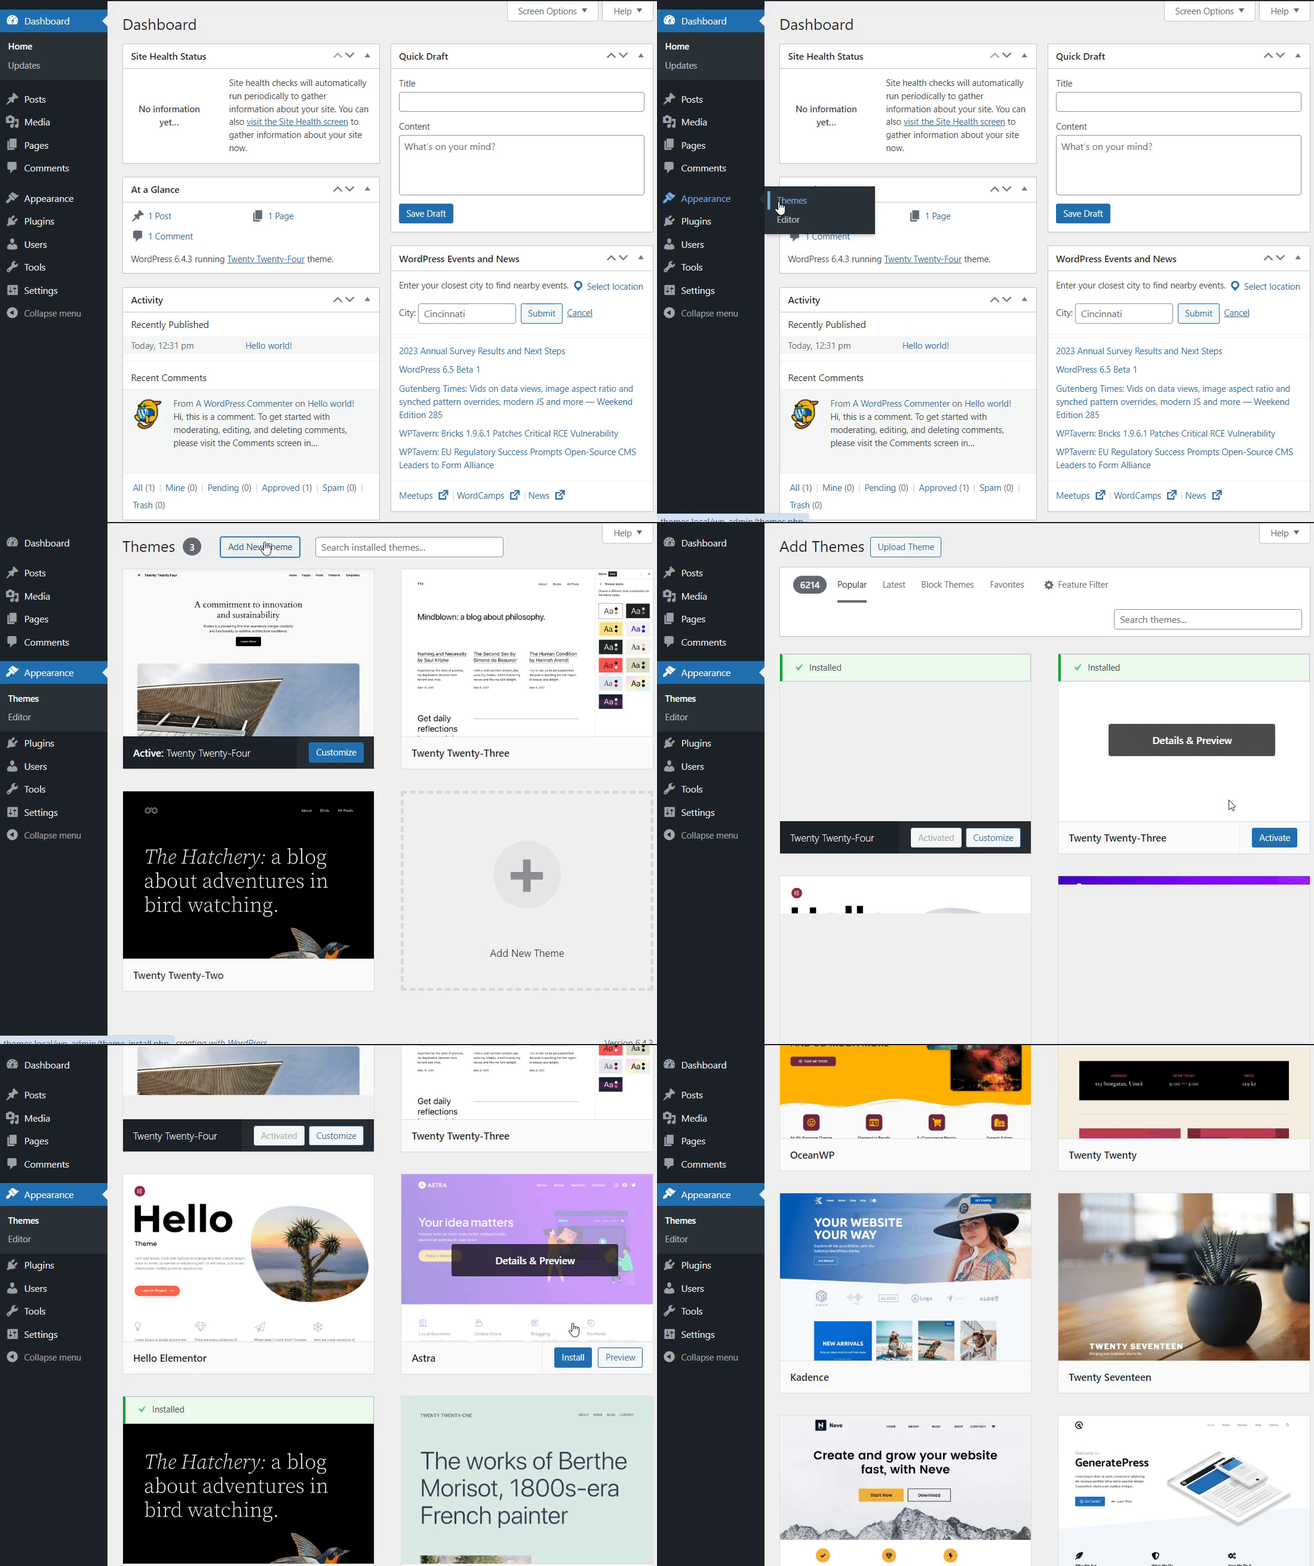
Note: We’ve covered a detailed guide 25+ Best Free WordPress Themes – A Sneak Peak (2024) for you that can help you easily select the desired theme.
Step 3: Install and Activate
Once you find a theme that matches your interest, click Install and then the Activate button to replace it with the current theme.
See the GIF below:

Customize Your Theme
Next, you can customize the theme to represent your brand.
To do this, click the Customize button.
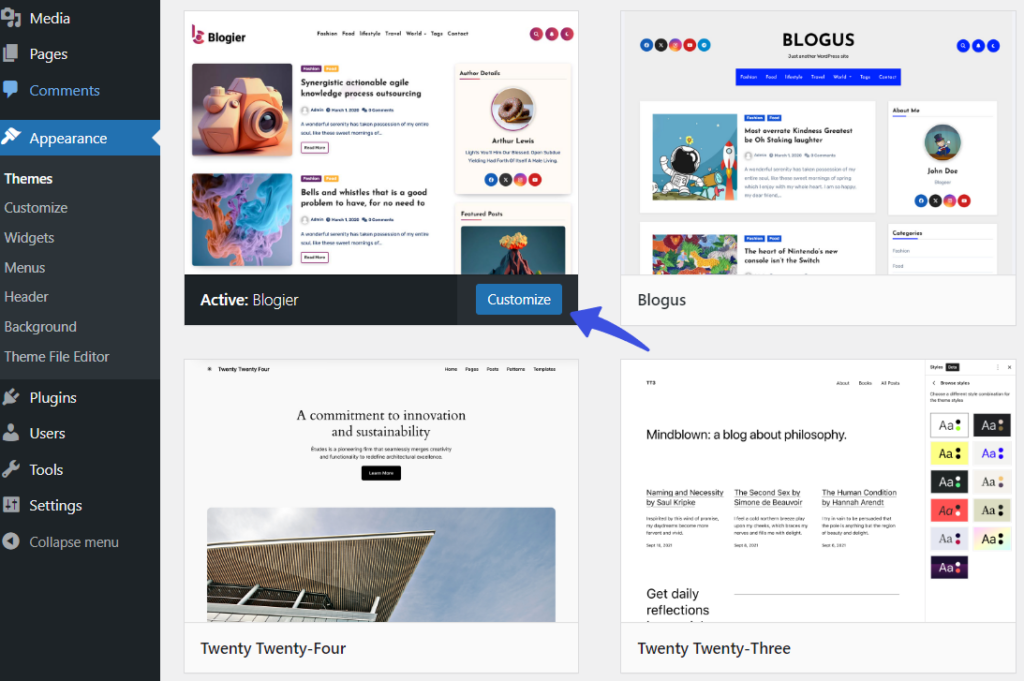
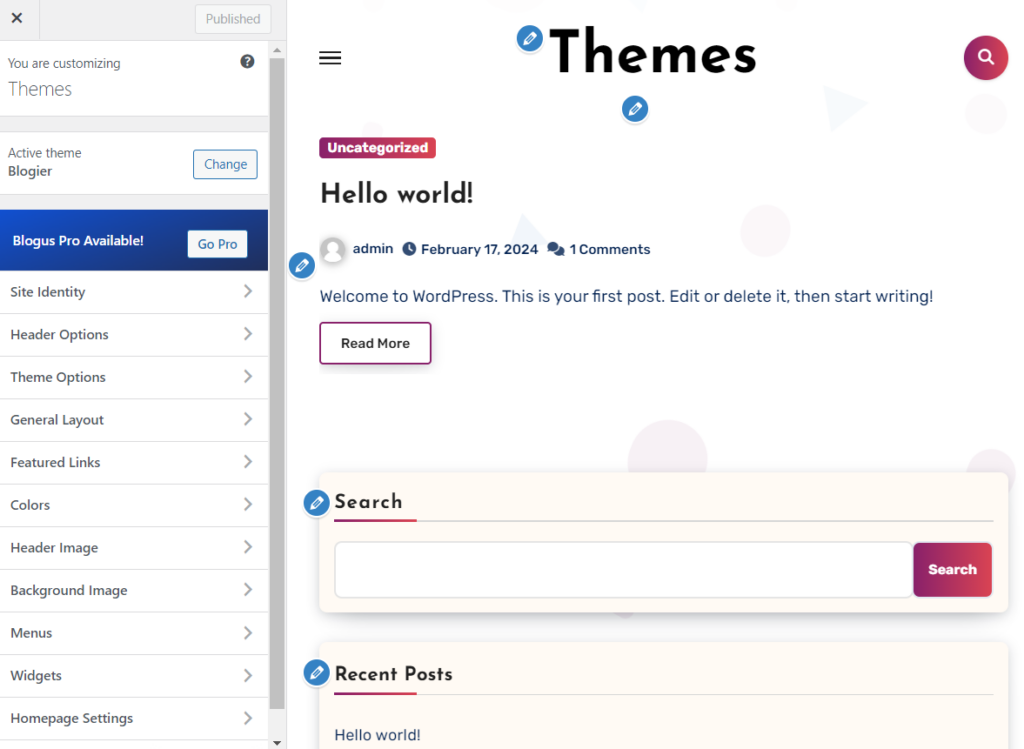
It will take you to the customizer screen where you can adjust settings like colors, fonts, and layout specific to your new theme.
Step 4: Test Responsiveness
Test if your newly added theme is mobile-friendly.
You can test its responsiveness on different devices, such as smartphones and tablets, to ensure that all content remains accessible and visually appealing across devices.
Step 5: Update Menus and Widgets
Now, check if your menus and widgets need adjustments to fit the new theme.
For this purpose, review your site’s navigation menus to ensure they are still easy to use with the new design. If necessary, rearrange menu items or add dropdowns for better organization.
Similarly, assess your widgets to ensure they complement your site’s new layout. You may need to resize or replace widgets to maintain consistency.
Step 6: Review and Tweak
Preview your site and make any additional tweaks to ensure everything looks fine as expected. So, take the time to carefully inspect each page, paying attention to details such as:
- Font styles
- Colors
- Spacing
- and alignment.
In addition, test interactive elements, including:
- Buttons
- Forms
- and sliders to verify they function correctly.
Step 7: Update Content
Depending on the theme, you might need to update content elements to align with the new design. Review your website’s text, images, and multimedia to ensure they reflect the tone of the new theme.
Additionally, update any outdated information or add new content to reflect recent developments or changes in your organization.
Overall, it’s better to regularly review and refresh your content to keep your WordPress site relevant for your visitors.
Things to Do After Changing Your Theme
Now that you’ve freshened up your WordPress site. Here are some things you might want to consider doing after changing your theme:
- Check Your Site’s Appearance: Firstly, check out all site elements with the new theme look as intended. This includes different devices’ fonts, colors, images, layout, and responsiveness.
- Test Load Times: Different themes can affect your site’s loading speed. So, it’s better to use tools like Google PageSpeed Insights or GTmetrix to test load times and make optimizations if needed.
- Check Plugins Compatibility: Sometimes, certain plugins may not work well with your new theme. So, check all activated plugins to ensure they function correctly.
- Optimize for SEO: It is recommended to look for meta tags, headings, and other SEO settings to ensure they’re still optimized for search engines.
- Ask for Feedback: Get opinions from your users about the new theme. They might notice things you overlooked and provide valuable insights for improvement.
Best Themes for WordPress
Here, we’ve curated some of the best WordPress free themes for you.
Note: Check this guide to find out which theme suits your requirements 25+ Best Free WordPress Themes – A Sneak Peak (2024).
Let’s get started!
1. Astra

Ratings: 5/5- Stars
Downloads: 1+ Million
Best For: WooCommerce Site
Price: FREE. The premium version starts at $39/ year.
Astra is the ultimate WordPress theme designed to empower your site’s speed, flexibility, and overall design. It is your gateway to building a beautiful, high-performance website with just a click.
3. OceanWP

Ratings: 5/5- Stars
Downloads: 700,000+
Best For: WooCommerce Site
Price: FREE. The premium version starts at $22/ year.
OceanWP offers a seamless design that helps you build stunning websites that captivate and engage your audience. This theme is the right choice for you in case you are looking for a solution to dynamic e-commerce platforms.
3. Hestia

Ratings: 5/5- Stars
Downloads: 100,000+
Best For: Business Websites
Price: FREE. The premium version starts at $39.60/ year.
Hestia is another free WordPress theme that lets you build a visually captivating and highly functional site in no time.
The theme offers a user-friendly interface and versatile features. Plus, it has multiple customization options to create responsive websites that resonate with your audience.
Do You Lose Any Customization if You Change WordPress Themes?
You may lose the code you have added to your customized theme’s functions.php file, templates, etc. but the real question is how to change WordPress theme without losing content?
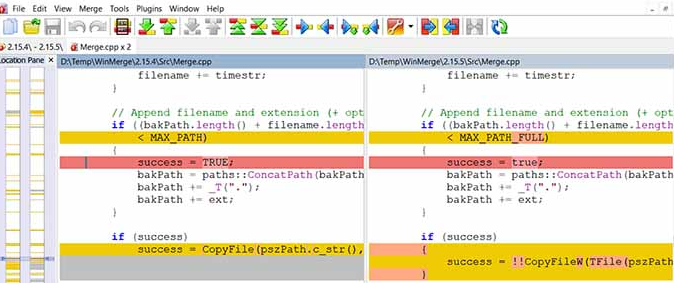
However, there is an easy way to help you create a child theme that can easily update your site’s theme without losing all your customization by creating a child theme. The child theme has the parent theme’s functionality, features, and style.
You only need to make the desired changes to the theme, export the customizer settings from the parent theme, and import them into the child theme.
See the image below:
Additional Methods to Change WordPress Theme
1. How to Change WordPress Theme Manually
You can also manually upload the theme to your WordPress website. You need to download the theme of your choice from external sources as a .zip file.
Note: We assume you’ve downloaded the theme from external sources as a .zip file.
First, go to the left sidebar of the WordPress admin dashboard, navigate to Appearance, and click the Themes option.

On the Add New screen, click the Upload Theme button. Two new options will open. You simply need to click the Choose File option.
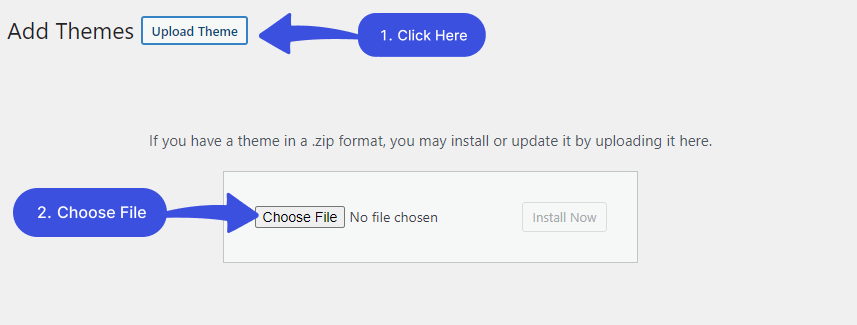
A popup screen will open up. From here, find and select the downloaded theme’s zip file. When done, click the Install Now button. Wait for a while for the uploading process to complete.
Once the theme is activated, you can see a Live Preview of what your website might look like. If you are satisfied, simply click Activate to use the theme immediately.
2. How to Upload the Theme via FTP
You can change the theme of your WordPress website by connecting via File Transfer Protocol (FTP). To use this method, you need an FTP client such as FileZilla.
Note: We assume that you are connected to your WordPress website via the FTP client of your choice.
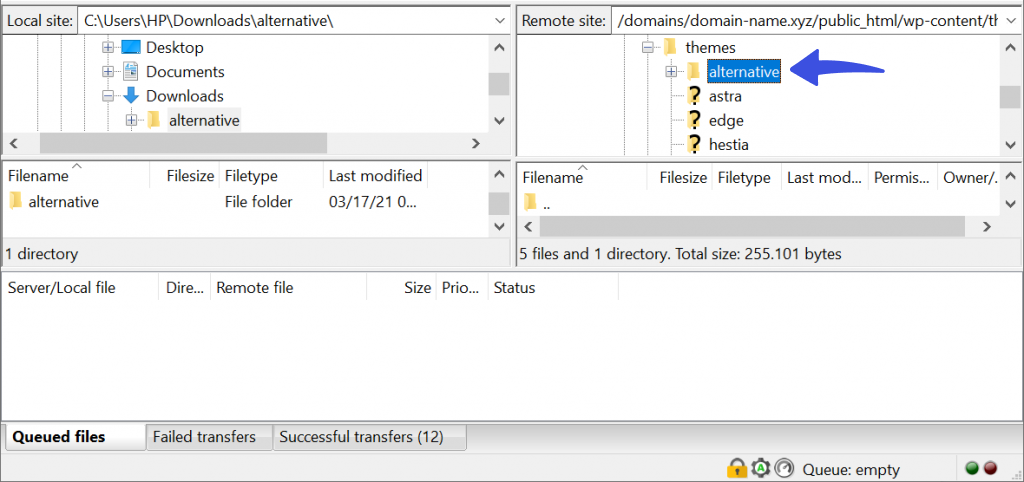
First off, locate and access the wp-content folder in your WordPress directory.
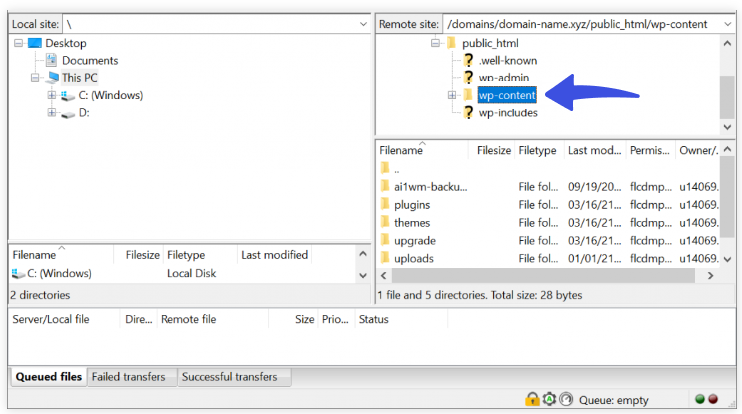
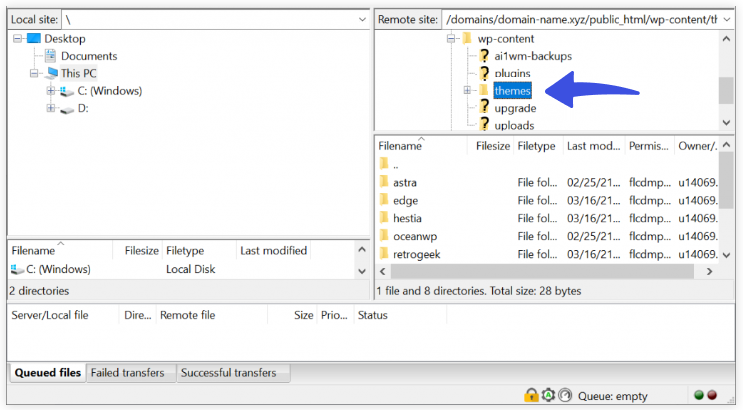
Navigate to the themes folder. Inside the folder, you will see all the installed WordPress themes.
Now go to your computer and unzip the theme archive. Make sure the folder has the same name as the new theme.
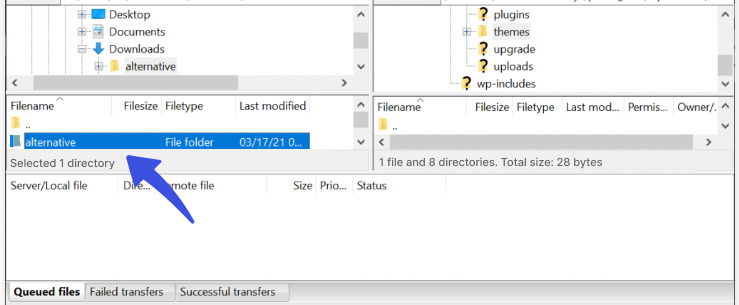
Next, select the theme folder on your local machine and drag-and-drop it into the themes folder. The new theme will appear in the WordPress themes.
Go to your WordPress Dashboard. Navigate to Appearance and choose themes. Look for the new theme in the installed themes.
Navigate to the new theme. You can see the live preview of your site by clicking Live Preview. Activate the theme and enjoy the new appearance.
Change WordPress Theme FAQs
Can I change my WordPress theme without losing content?
Yes, changing the theme typically doesn’t affect your content. However, it’s always wise to back up your site before making any changes.
Is it recommended to change themes frequently?
Choosing a theme that suits your needs for the long term is best. Frequent changes can be time-consuming and may lead to inconsistencies for your WordPress site.
Can I switch back to my old theme if I don’t like the new one?
Yes, you can switch back to your previous theme. Your content remains intact, but you might need to adjust some settings.
What should I do before changing my WordPress theme?
Backup your website: It’s essential to create a backup of your site before making any major changes, including changing the theme.
Will changing my WordPress theme affect my SEO?
Changing your theme can potentially affect your site’s SEO if it is poorly coded or lacks essential SEO features. Ensure that the new theme is SEO-friendly and maintains proper URL structures and meta tags.
Conclusion
Installing a new theme is always an important decision. First, you must carefully evaluate each theme to ensure it fits all your requirements. Once you have finalized a theme, you can install it using one of the three methods described in this article.
We hope you now understand how to change the theme for your WordPress. We recommend backing up your current site before changing the theme to quickly get back on your feet if anything goes wrong.
That’s all!
You may also like to read our articles about other useful WordPress guides, including:
- How to Boost Login UX with Custom Login User Interface Design
- Top 10 Customizable Login Page Templates in WordPress (2024)
- WordPress WooCommerce Tutorial (10 Step Easy Setup Guide)
- How to Sell on WordPress Without WooCommerce (2024)
- How to Monitor and Analyze WordPress User Login Activity
- How to Add Social Login Plugin to WordPress Website (Easy Guide)
- How to Customize the WordPress Login Page (Easy Guide)
How was your experience when you changed the theme on your WordPress site:
Let us know by leaving a comment in the comment section below:


