How to Disable XMLRPC.PHP in WordPress
Are you looking for ways to disable xmlrpc.php in WordPress? If yes, you do not need to look any further.
XML-RPC functionality in WordPress is enabled by default, allowing a wide range of functions, such as publishing posts, managing comments, and updating categories remotely.
However, this file solution becomes a vulnerability instead of a perfect solution. Some WordPress users choose to disable the XML-RPC protocol altogether.
In this article, we’ll explore the purpose of xmlrpc.php, its benefits and drawbacks, and how you can manage it on your WordPress website.
Let’s get started!
Table of Contents
What Is Xmlrpc.php?
XML-RPC is a protocol that allows software applications to communicate with each other over the internet. In WordPress, the XML-RPC functionality is implemented through a file called xmlrpc.php.
This file is an endpoint that allows external applications to interact with WordPress and perform various tasks, such as creating and editing posts.
XML-RPC is a powerful feature that enables developers to build external applications that interact with WordPress. For instance, mobile apps can use XML-RPC to communicate with a WordPress website, allowing users to manage their content from their phones.
Why Do You Need to Disable Xmlrpc.php?
Since XML-RPC is a remote access protocol, it can also be a security risk. Malicious users can use it to perform brute-force attacks, exploit vulnerabilities, and gain unauthorized access to WordPress websites. This is why some WordPress users prefer to disable XML-RPC or limit access to specific IP addresses.
The main reason for disabling the XML-RPC file on your WordPress website is that this file introduces different vulnerability attacks. Now, you can protect your WordPress website with strong passwords and different security plugins. But the best website protection mode is simply disabling this feature on your WordPress site.
You should disable xmlrpc.php on your WordPress website for several reasons, including:
1. Brute Force Attack
Each time, the xmlrpc.php file creates a request to authenticate the User name and password, but other APIs don’t. The other APIs send a token for authentication instead of a username and password.
Because the xmlrpc.php sends a request for the authentication of information every time, hackers can use this information to access your website. Because a brute force attack helps to insert, delete, and modify the website code or damage your website database.
If a hacker sends enough requests for different usernames and password pairs, they can easily hit on the right one and get access to your WordPress website.
That’s why if you use an up-to-date or latest version of WordPress on your website and use different Authentication APIs to communicate with external systems, you have to disable this option on your website.
2. DDoS Attack (Pinbacks)
DDoS (Distributed Denial of Service) is a second attack if your site is xmlrpc.php enabled, and your site will be taken down/offline. Because Pingback and trackback are features of xmlrpc.php.
If your site is enabled, xmlrpc.php, a hacker can send many pingbacks to your WordPress site quickly. This attack could overload your server and put your website out of action or down.
An attacker, first of all, identifies a vulnerable WordPress site with an enabled pingback feature. Then, they start using a botnet or other means to send many pingback requests to the targeted website (usually with a spoofed IP address). It makes blocking the requests difficult, resulting in a massive flood of traffic. It overwhelms the target website’s server and ended up potentially crashing the server.
How to Disable xmlrpc.php in WordPress
Now that you know why you need to disable xmlrpc.php, let’s dive into different methods to do this:
Method 1. Disable xmlrpc.php With WordPress Plugin
WordPress plugins are one of the easiest methods to disable the xmlrcp.php in the WordPress website. There are many such plugins available in the WordPress directory. Here, we are going to use LoginPress Pro Plugin for this purpose.
Note: Here, we assume that you have already installed and activated LoginPress Pro; if not, see our guide on the topic.
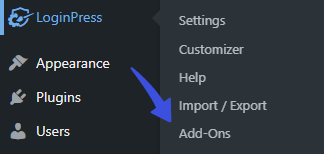
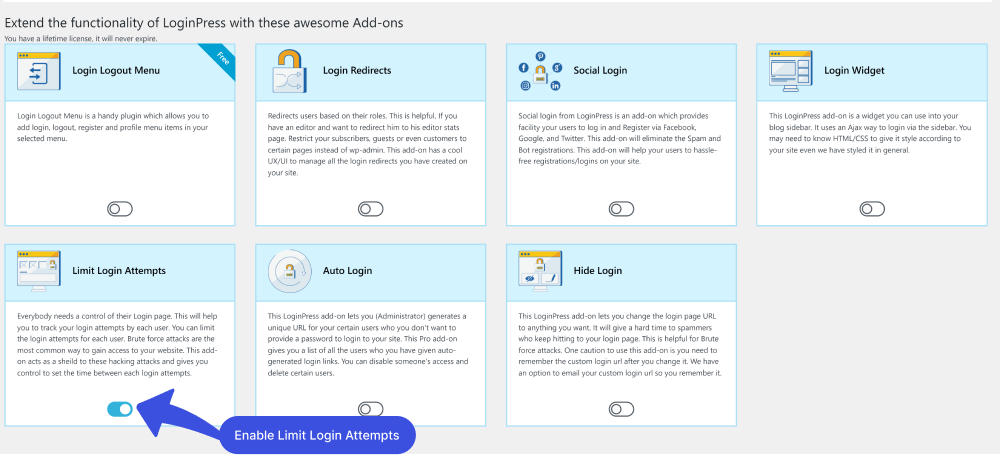
Once LoginPress Pro is installed and activated, you’ll have to enable the Limit Login Attempt Add-on. To do this, go to the left sidebar of the WordPress admin dashboard, navigate to LoginPress, and click the Add-Ons option.
On the next screen, enable the Limit Login Attempts Add-on.
Next, go to LoginPress on the left sidebar of the WordPress admin dashboard, navigate to LoginPress, and click the Settings option.
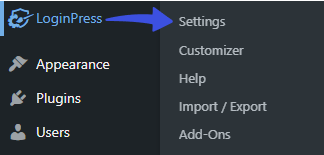
You can see the Limit Login Attempts tab next to the Settings tab.
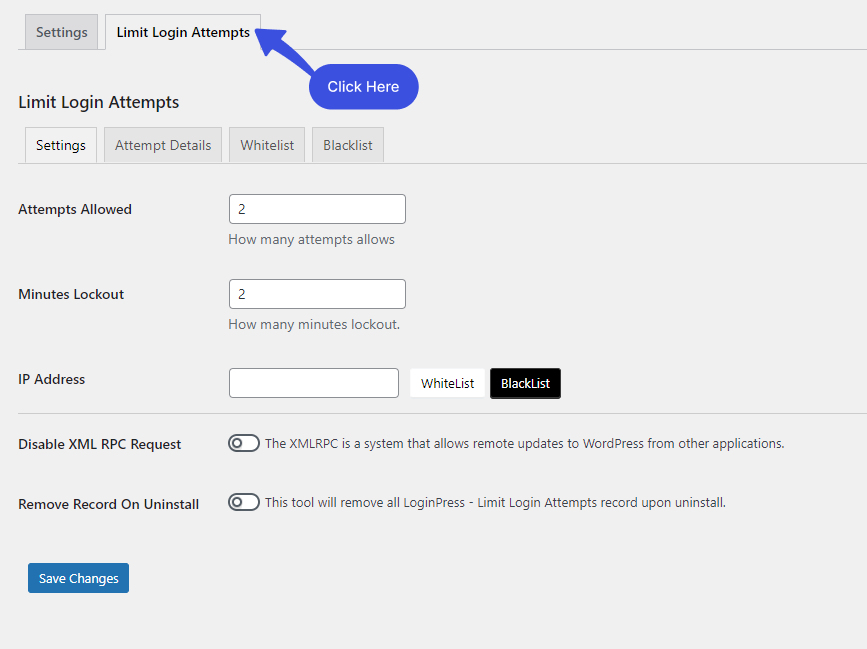
In the Limit Login Tab, you will have an option to Disable XML RPC Request. Simply click the toggle button to disable the XML RPC option and click the Save Changes button.
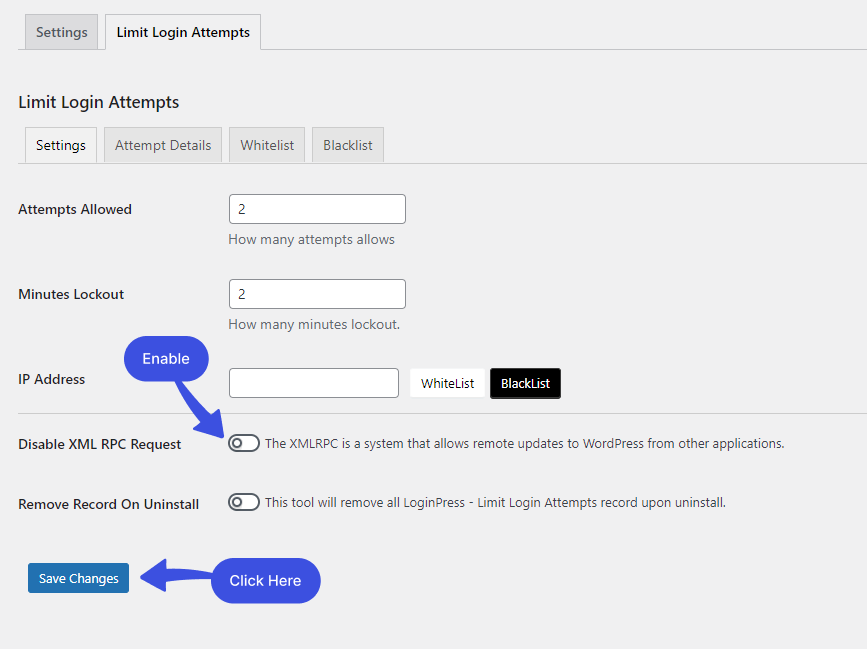
This will disable the XML-RPC on your WordPress website.
Method 2: Disable xmlrcp.php Manually
If you don’t want to use any plugin to disable the xmlrcp.php, then you can disable XML-RPC manually through the .htaccess file of your website.
Note: You’ll need to create a .htaccess file in case you don’t have it.
If one already exists on your web space, you can edit that one.
First, log in to your Control Panel and open File Manager. Next, click Create, choose File, and then the Other option.
Name the file .htaccess and press Enter on your keyboard. Now, simply select the .htaccess file and click Edit.
On the next screen, you’ll have to paste the following code to your .htaccess file:
# Block WordPress xmlrpc.php requests
<Files xmlrpc.php>
order deny,allow
deny from all
allow from xxx.xxx.xxx.xxx
</Files>
Once done, it will disable the XML-RPC on your WordPress website.
Method 3: Disable xmlrcp.php From the Theme
If you want to disable the XMLRPC on the complete site, use this filter in your theme’s functions.php file.
Note: It’s recommended to use a child theme to edit the functions.php file instead of the parent theme. There are chances to lose the modified code when you update your theme. It might cause some adverse effects on your website.
To do this, go to the left sidebar of your WordPress admin dashboard, navigate to Appearance, and click the Theme File Editor option.
On the next screen, click the Theme Functions on the right-hand side. Scroll down to the bottom of the functions.php file and add the filter.
Here is the filter:
add_filter( 'xmlrpc_enabled', '__return_false' );Once you’ve added it, click the Update File button to save your changes.
This filter will disable the XML-RPC on your WordPress website.
Final Thoughts
The XML-RPC was created for WordPress website communication with external systems and applications. But due to its functionality means the authentication process, different security issues have occurred, which means hackers can easily attack your WordPress website.
But now, current APIs help you communicate with external systems & Applications, which use a token for authentication instead of a username and password. Now you can disable the xmlrcp.php in WordPress files for safe communication; you just need to follow the above methods to disable the XML-RCP. By disabling it, you will improve the level of your website security.
That’s all! You can also check out How to Find the WordPress Login URL (Easy Guide) and How to Easily Change the Login Logo in WordPress.
Not using LoginPress yet? What are you waiting for?
Frequently Asked Questions
Why is xmlrpc.php important in WordPress?
Xmlrpc.php is important in WordPress because it enables remote connection to WordPress. For example, publishing posts, updating pages, and managing comments, using the XML-RPC protocol. Moreover, some plugins and services require xmlrpc.php to function properly, such as WordPress mobile app.
Should I disable xmlrpc.php?
The xmlrpc.php is a remote access protocol; it can also be a security risk. Malicious users can use it to perform brute-force attacks, exploit vulnerabilities, and gain unauthorized access to WordPress websites. This is why some WordPress users prefer to disable XML-RPC or limit access to specific IP addresses.


