How to Personalize LearnDash Login Page Customization with LoginPress
How can you unlock LearnDash login page customization in WordPress?
Your LearnDash login page sets the tone for the user’s entire learning experience.
If the login page feels dull, confusing, or insecure, it can instantly affect user trust and engagement.
So while your course content might be polished and professional, the default LearnDash login page often falls short.
It’s functional but lacks personalization, branding, and advanced security features. These features are all key to delivering a modern learner experience.
If you are looking for an easy way to customize the LearnDash login page effectively, LoginPress is the top choice.
With the LoginPress LearnDash integration, you can fully customize the LearnDash login page and create a beautifully branded, secure, and user-friendly login experience that welcomes every learner with confidence.
LearnDash Login Page Customization (TOC):
Why You Should Customize Your LearnDash Login Page
Customizing your LearnDash login page is more than just a design choice. It is an investment in your learners’ experience and your brand identity.
Here’s why you should customize your LearnDash login page:
- Stronger Branding: A branded LearnDash custom login page reflects your organization’s professionalism and builds credibility among users.
- Better User Experience: A clean, well-designed LearnDash login design improves usability and reduces login friction.
- Enhanced Security: Protect your learners with CAPTCHA, hCaptcha, or Cloudflare Turnstile to prevent unauthorized access.
- Higher Engagement: Personalized logins and welcome messages create a sense of belonging and encourage students to return.
- Faster Access: Integrating LearnDash social login lets users sign in quickly, reducing the frustration of forgotten passwords.
Customizing online course login directly improves your platform’s security, usability, and learner satisfaction.
How to Customize the LearnDash Login Page with LoginPress (Step-by-Step)
With LoginPress, you can create a fully customized, secure LearnDash login page without writing any code or worrying about technical details.
I will guide you through the setup process step by step.
Step 1: Install and Activate LoginPress
In the plugins directory, search for LoginPress, then install and activate the pro version.

Step 2: Enable the LearnDash Integration
First, you need to enable the LearnDash integration. For that, navigate to LoginPress >> Integrations.
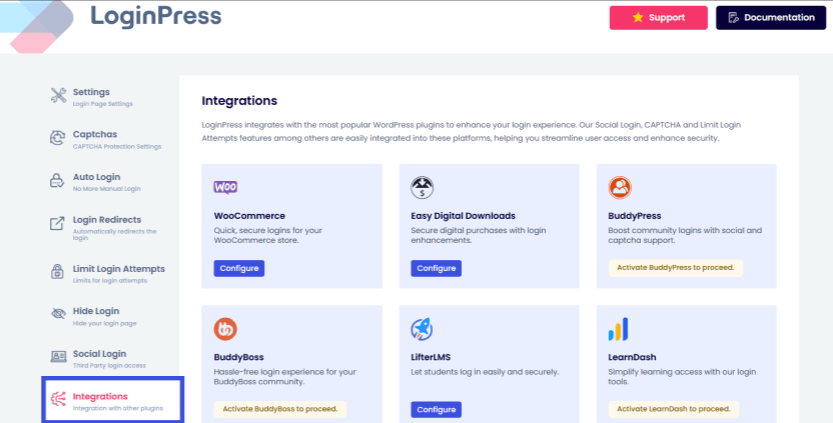
The integration panel shows you a variety of providers.
Find LearnDash and click on the Configure button to activate the integration.
Also, make sure that your LearnDash plugin is activated beforehand.
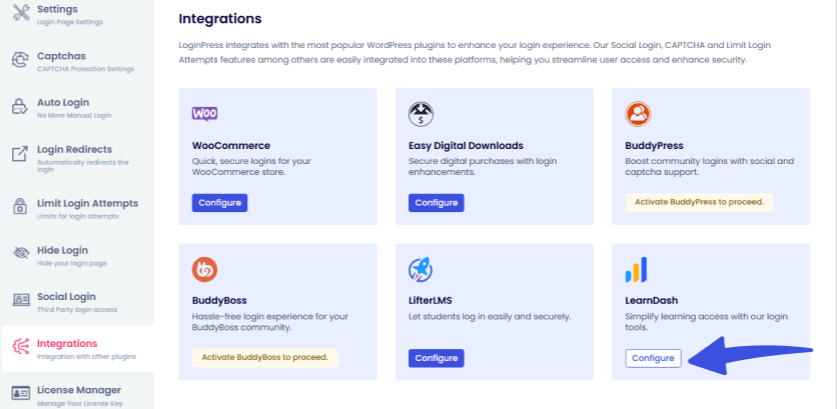
LoginPress automatically integrates with LearnDash, so all your course login pages inherit your custom login design.
After the configuration is complete, you will be redirected to the LearnDash integration dashboard.
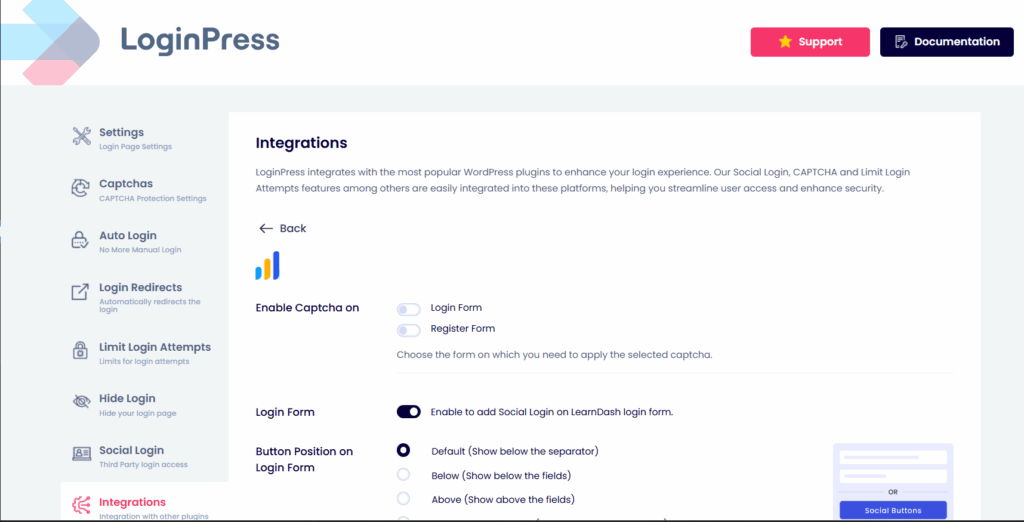
From here, you can utilize other options to customize and secure your LearnDash login form, such as:
- Click on Enable Captcha for login and register forms. This helps secure your forms from bots and brute-force attacks.
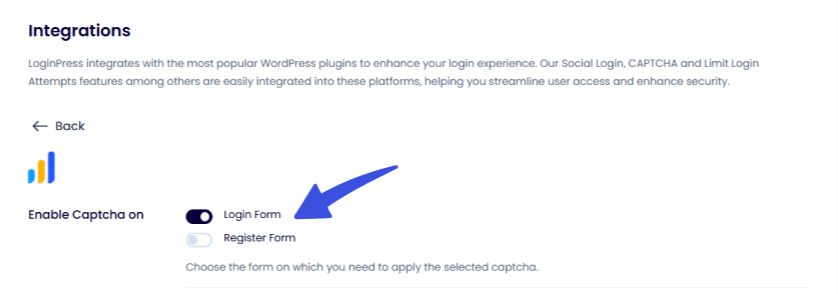
- Then toggle the Enable Login Form option to add social login on the LearnDash login form. Social login enhances login UX and builds trust.

- Position buttons on the login and register forms, and use options like Default, Below, Above, and Above Separator to place them at the desired location on the LearnDash login form.
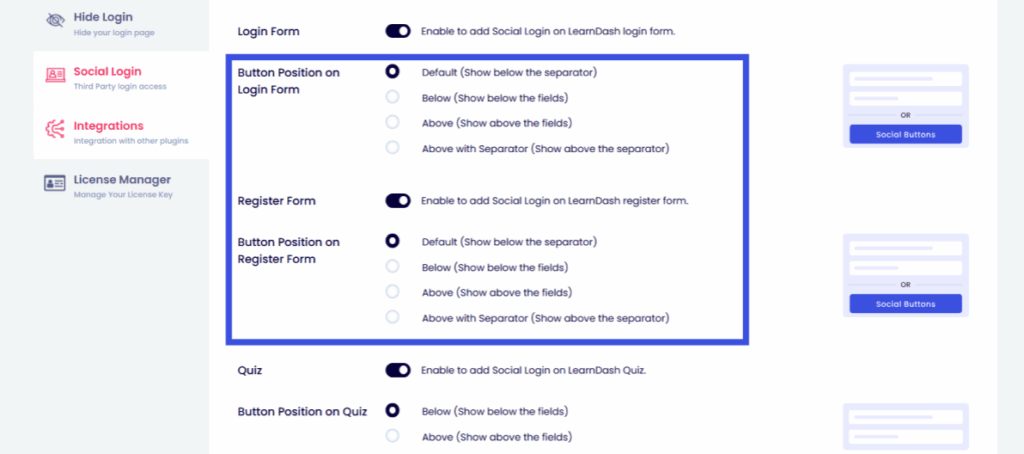
- Enable the Quiz option to add social login to LearnDash quizzes as well, so students can quickly access quizzes using their social accounts without the hassle of remembering passwords.

This LoginPress LearnDash integration ensures a consistent, branded, and secure experience for all learners on your platform.
Step 3: Customize the Look of Your LearnDash Login Page
Now it’s time to design your LearnDash custom login page in even more detail using the LoginPress Customizer.
To do that, navigate to LoginPress >> Customizer. From here, you can:
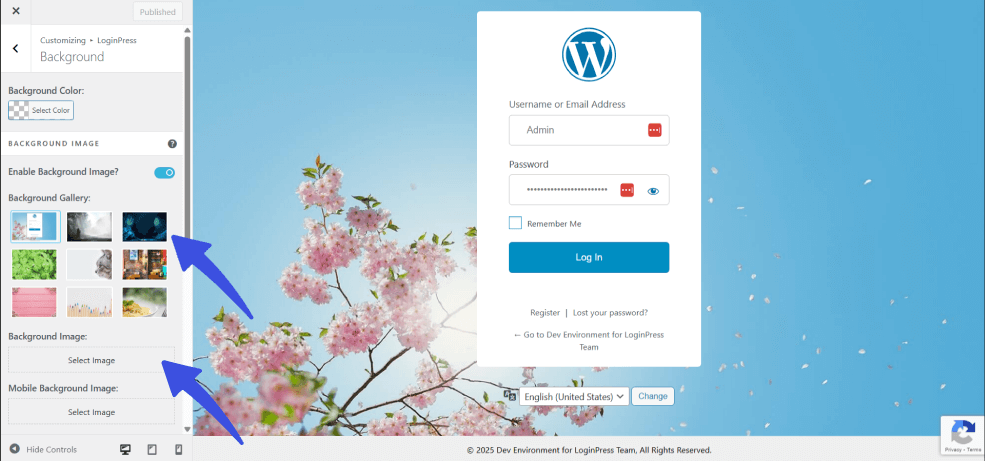
- Select the Background option.
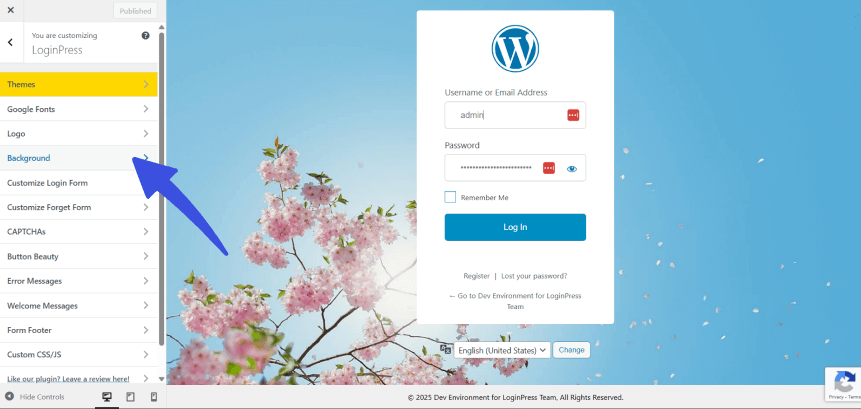
Choose from LoginPress’s collection of designed, pre-built background images or upload your own custom image to match your brand or course theme.
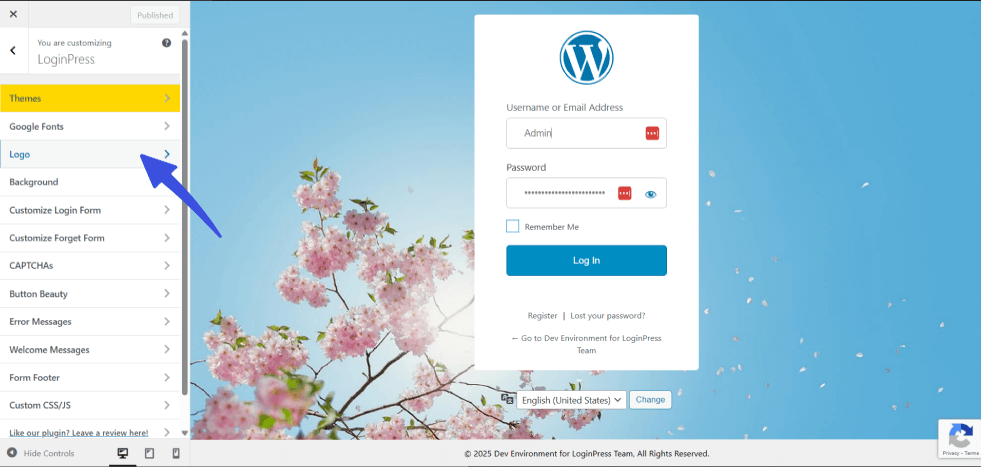
- Make your platform feel truly on brand by adding your custom logo. To do that, go to the Logo option.
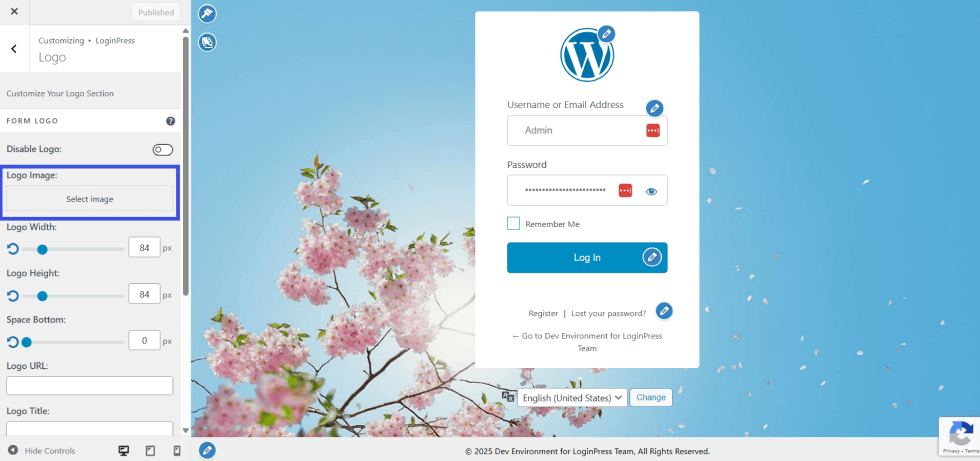
Upload your own logo by selecting the Select Image option to personalize your login experience.
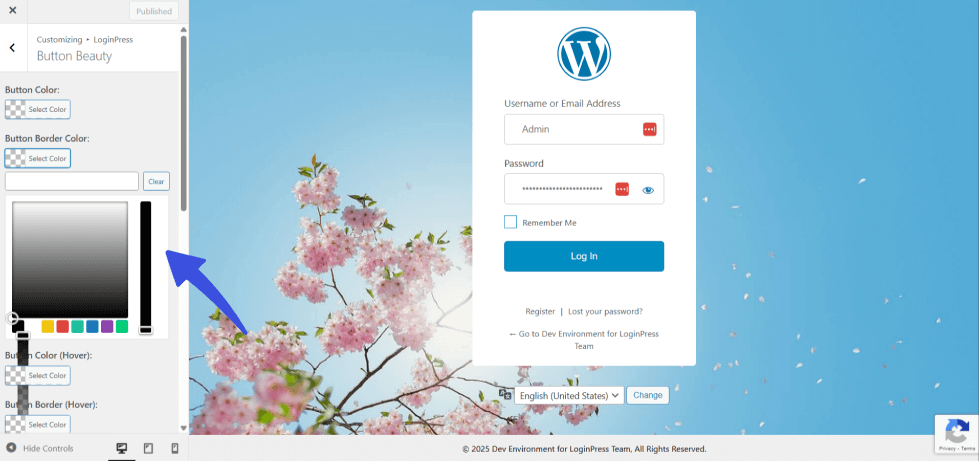
- Next, customize button color and styles under the Button Beauty section.
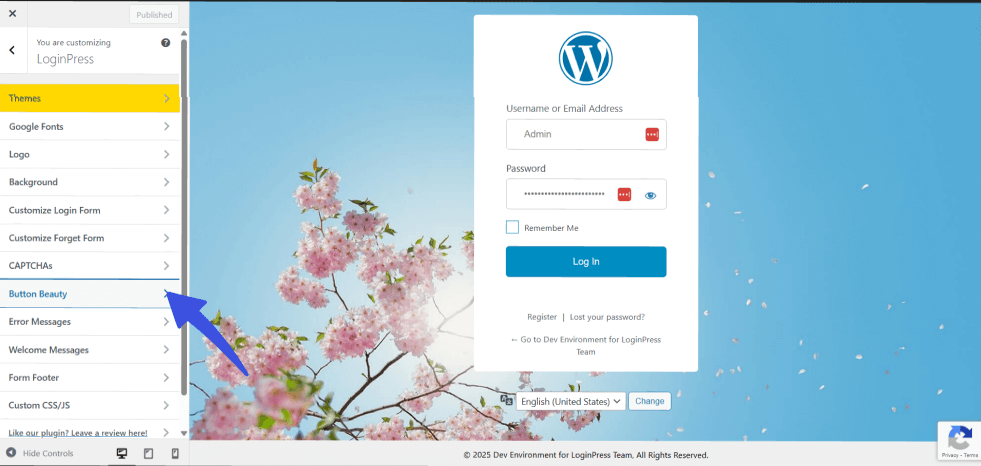
Easily change your login button’s color, shape, and hover effects. Match it with your brand palette to create consistent branding.
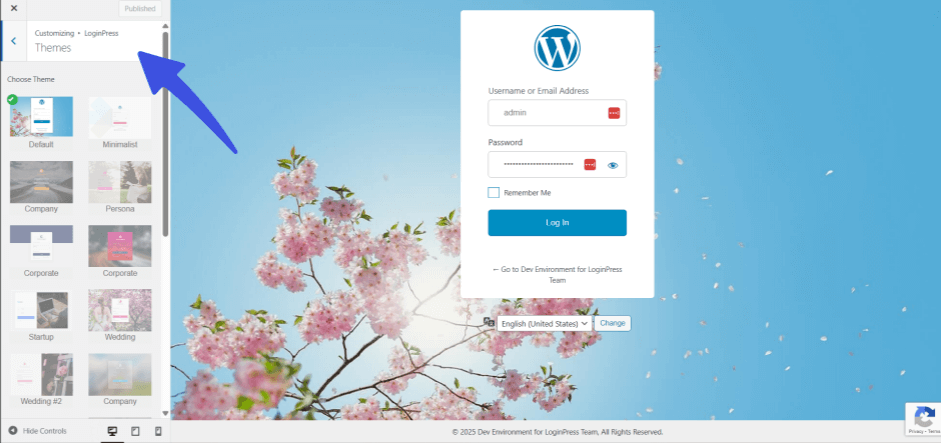
- To change the theme of your login page, navigate to the Themes option.
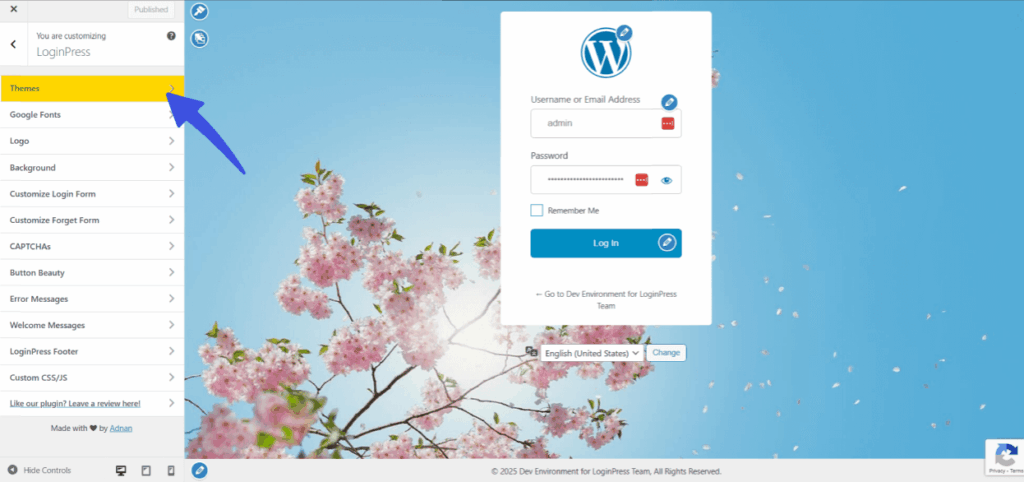
LoginPress provides a variety of pre-built themes, from sleek, minimalist designs to vibrant, colorful layouts. Just pick a theme that fits your course style and adjust it to your preference.
- To preview every change instantly, select the device icons underneath the customization settings. This lets you preview your design and check for device optimization.
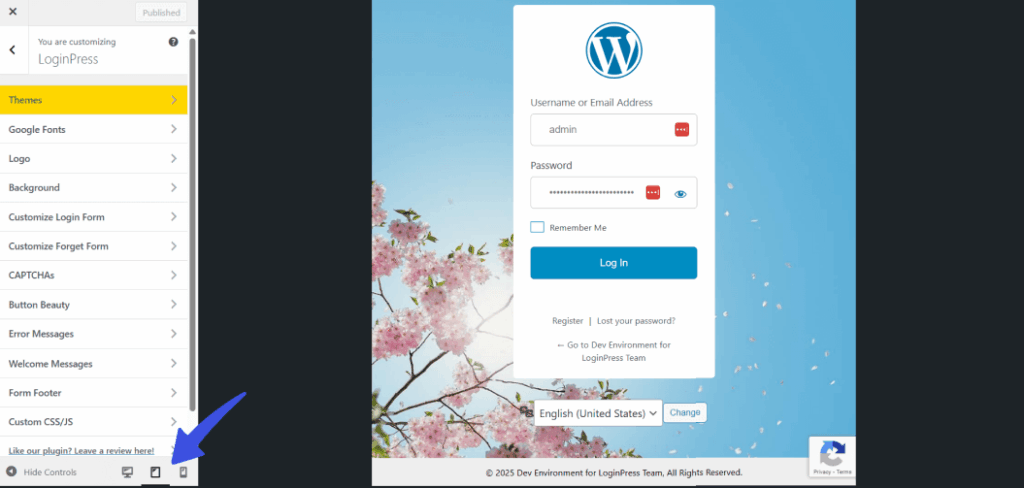
This customization helps to create a consistent look that reassures learners they’re in the right place.
Step 4: Personalize the Learner Login Experience
LoginPress doesn’t stop at design, but it also lets you personalize the login experience for your learners.
- Add Custom Welcome Messages
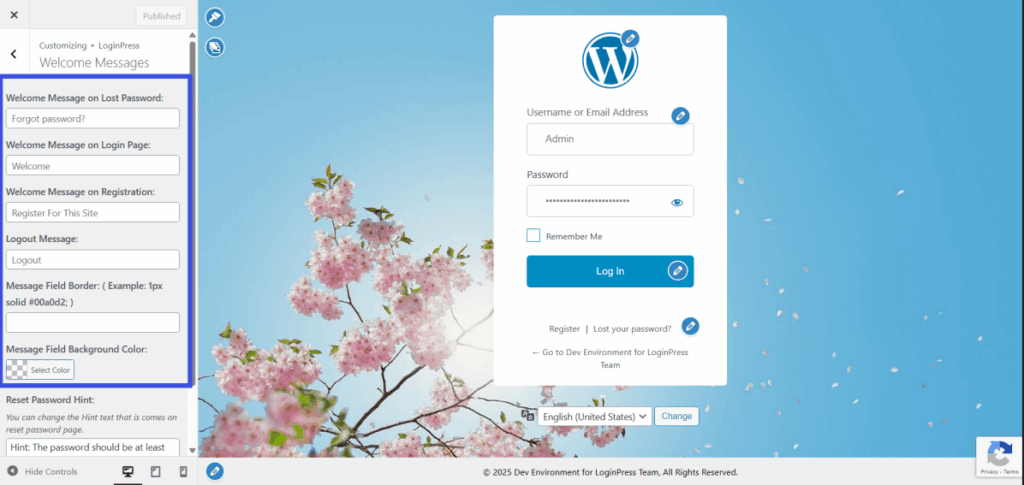
To do that, select the Custom Welcome Messages option.
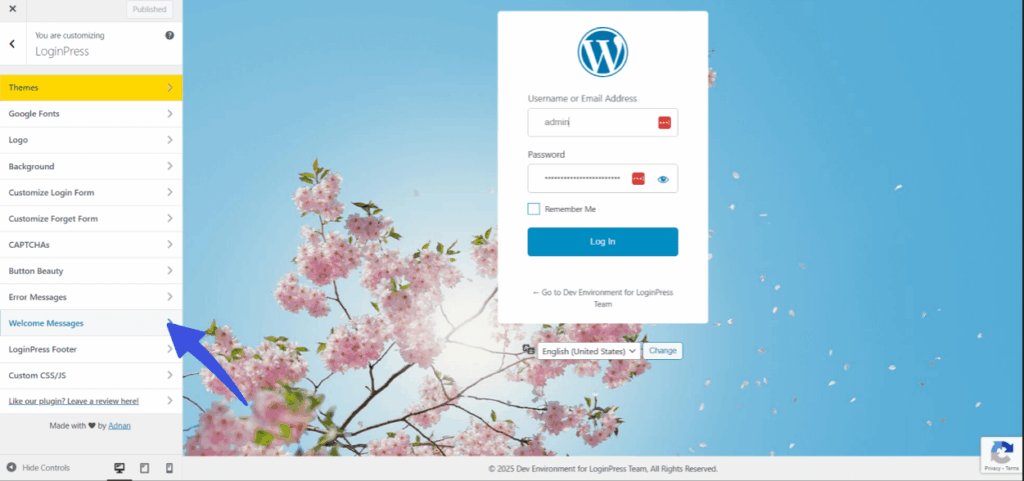
Add personalized messages such as “Welcome back, ready to continue your learning journey?” to make returning students feel valued.
- Add Custom Error Messages
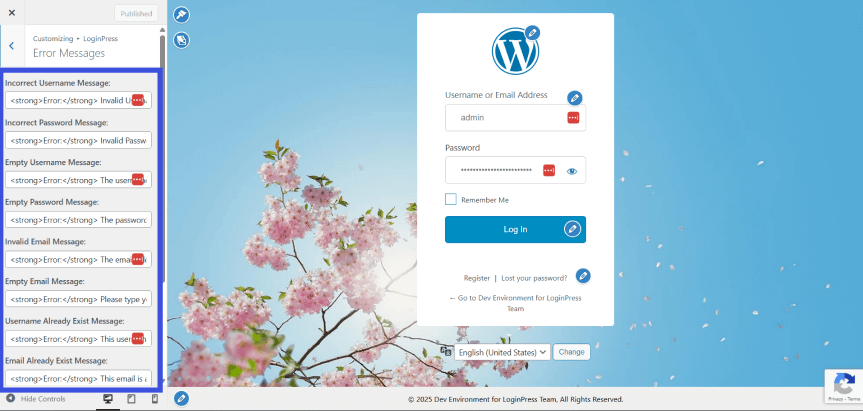
To add custom error messages, navigate to the Error Messages option in the customizer.
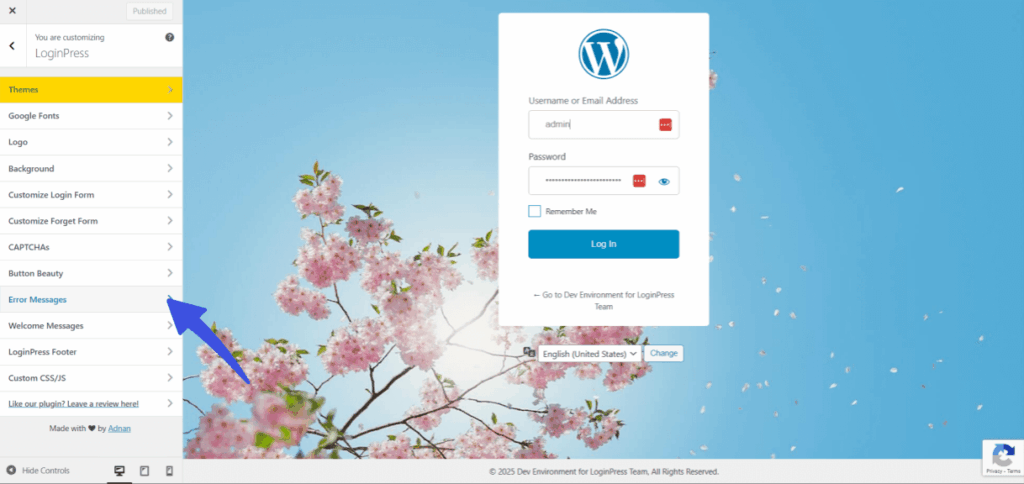
Replace generic error texts like “Invalid Username or Password” with friendly, branded alternatives.
- Multilingual Login Support: If your courses cater to a global audience, you can localize your login page to support multiple languages.
A thoughtful LearnDash login design creates a welcoming environment that encourages repeat engagement and builds long-term loyalty.
Step 5: Add Social Login for Instant Access
Remember that not every learner wants to create a new account or remember another password.
With LoginPress Social Login, you can enable students to log in using their preferred social networks.
In your WordPress dashboard, go to LoginPress and open the Social Login option.
This is where you’ll manage all your social login options and configurations.
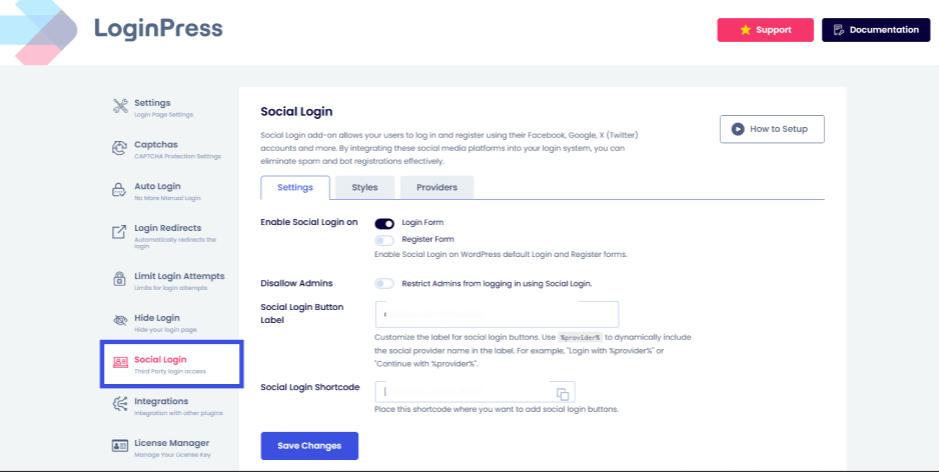
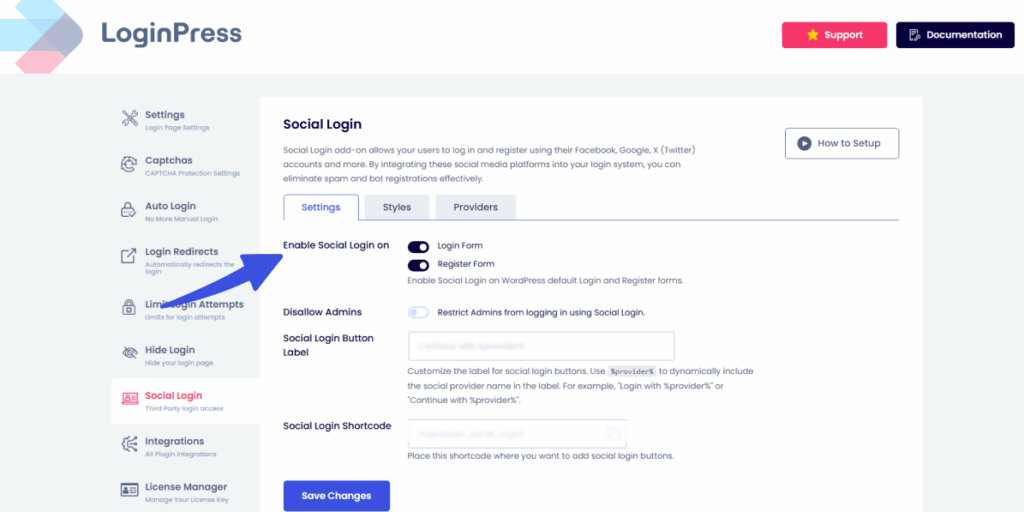
Then toggle Enable Social Login on for the forms where you want social login buttons to appear. The options given are the Login and Register forms.
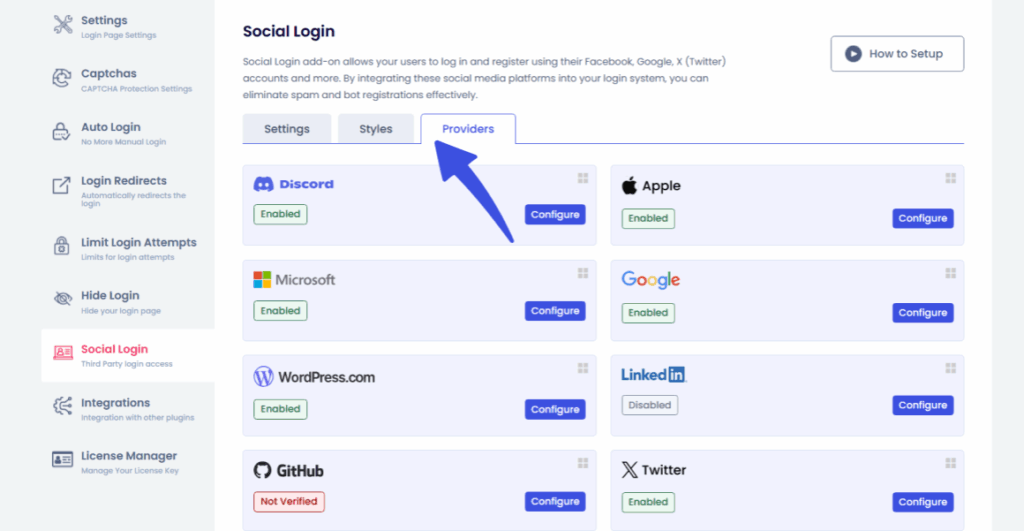
Once social login is enabled, you can choose which networks to add to the login form. This can be done by navigating to the Providers tab.
For each selected social platform, enter your Client ID and Client Secret Key, which are provided by the developer account. You can generate these by following the detailed documentation we provide for each social network.
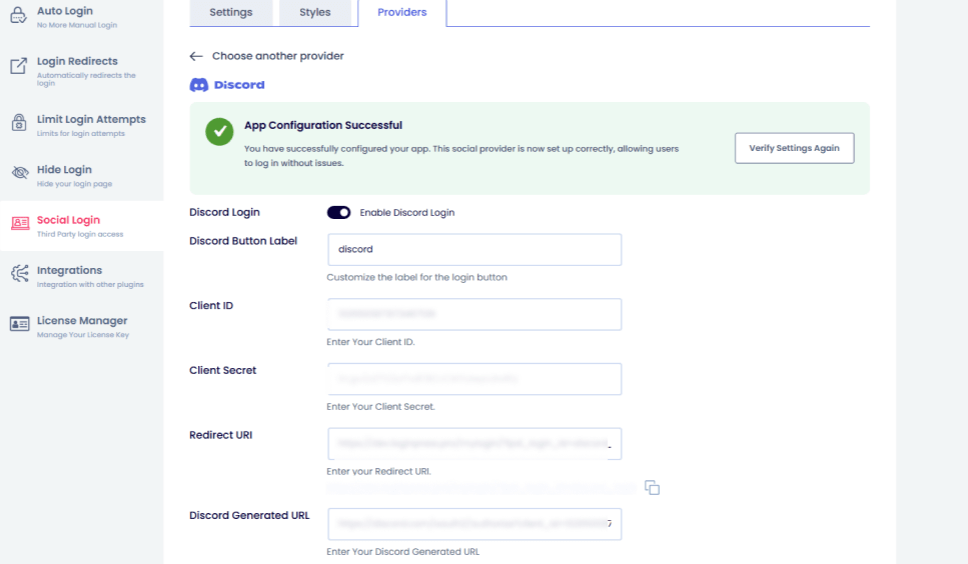
Once connected, your learners will see the familiar Google Login or Facebook Login buttons directly on the LearnDash login page.
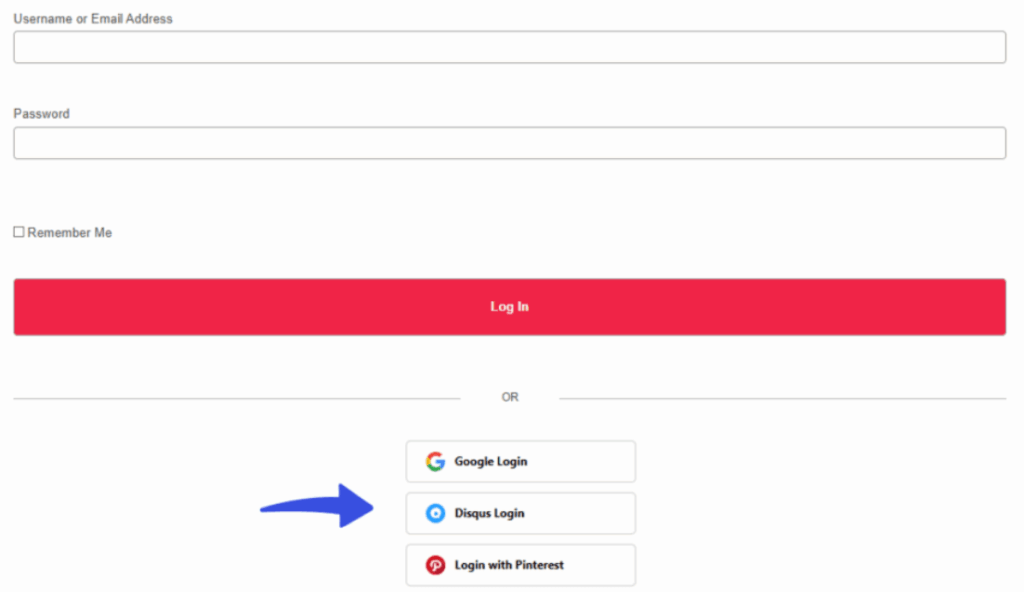
Adding LearnDash social login not only improves user flow but also aligns your platform with the modern expectations of online learners.
This way, the students will enjoy:
- Faster Access
- Fewer Support Requests
- Higher Engagement
Step 6: Strengthen Security for LearnDash Student Accounts
Security should always be a top priority for any WordPress e-learning login system. With LoginPress, you can easily enhance your LearnDash login security with powerful anti-spam and protection tools.
- Add CAPTCHA Protection:
Go to LoginPress >> CAPTCHA and toggle the Enable Captcha option.

LoginPress provides all types of CAPTCHA from reCAPTCHA, hCaptcha, and Cloudflare Turnstile to secure your login form.
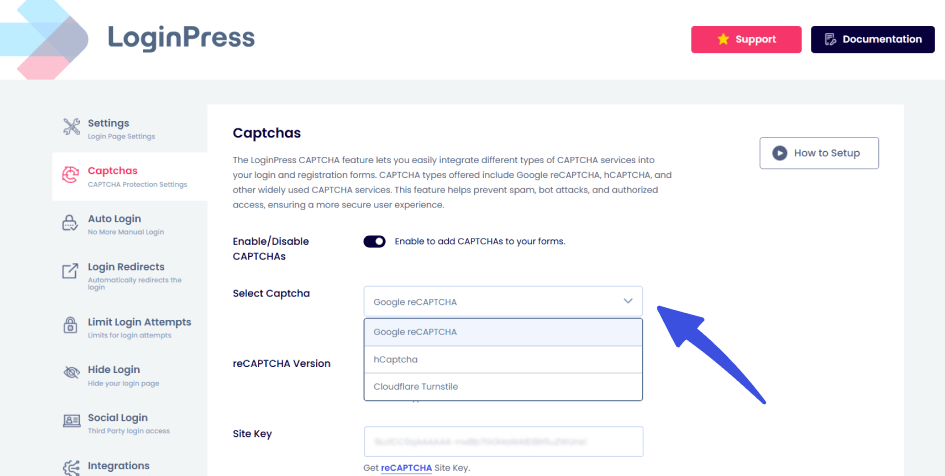
This prevents bots or brute-force attacks from gaining unauthorized access to your learners’ data.
- Limit Login Attempts:
Protect user accounts by limiting repeated failed login attempts.
This stops hackers from guessing passwords.
To enable limit login attempts, navigate to LoginPress >> Limit Login Attempts.
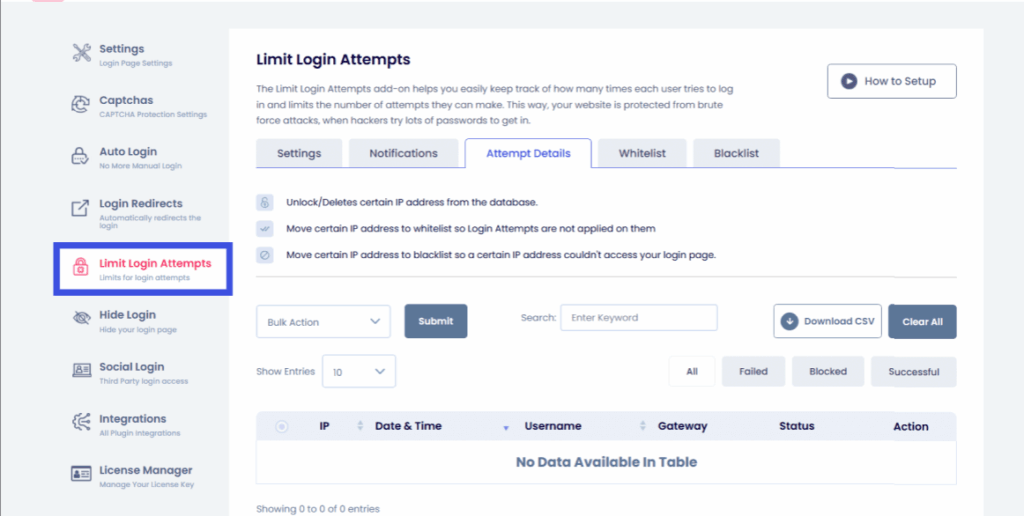
From here, you can receive Notifications of login attempts, view Attempt Details, and even Whitelist or Blacklist certain users.
These settings are available in the tabs above:
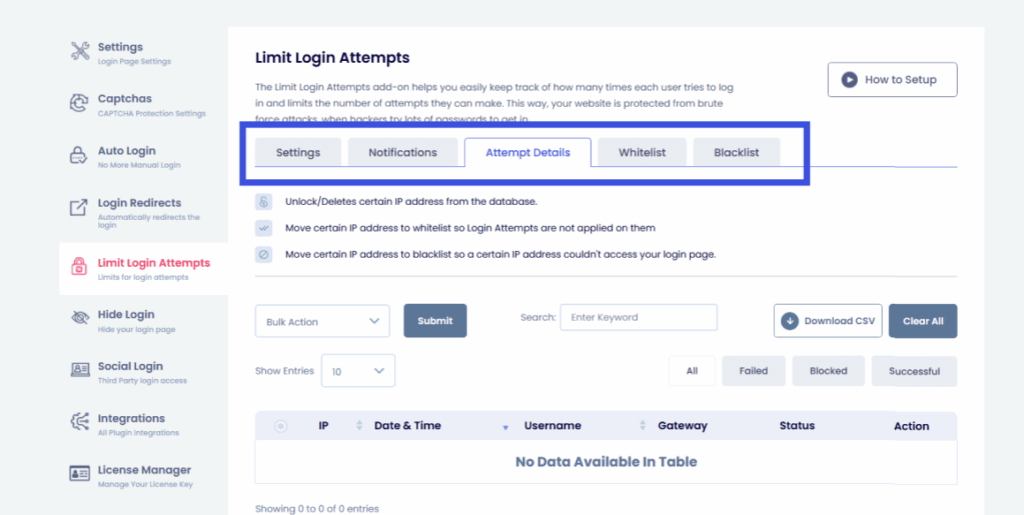
For more information on the Limit Login Attempts add-on, check our detailed documentation on How to Limit Login Attempts with LoginPress (Easy)
- Redirect After Login/Logout:
Using the Login Redirects Add-On, you can automatically send students to their course dashboard after they log in, ensuring a smoother experience.
To enable this, navigate to LoginPress >> Login Redirects.
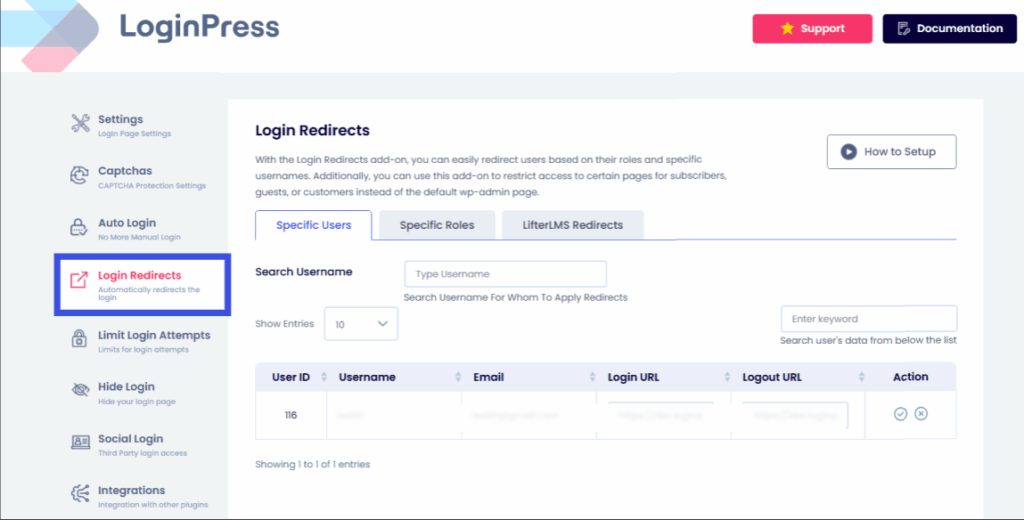
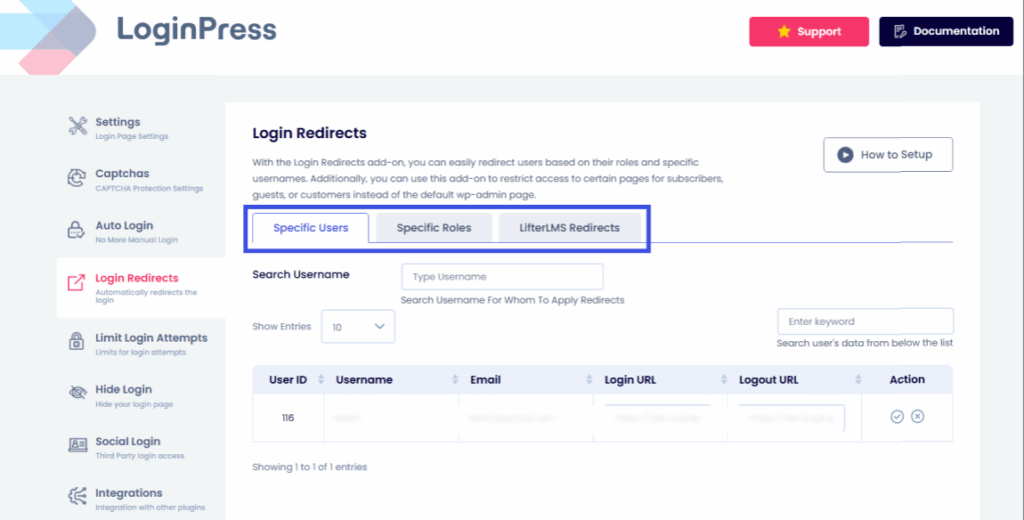
From here, you can choose to redirect based on Specific Users, Specific Roles, or even LifterLMS Redirects to send students to their dashboard.
All options are available in their respective tabs as highlighted below:
These features work together to create a secure LearnDash login system that protects both your site and your learners.
FAQs on LearnDash Custom Login Page
Can I customize my LearnDash login page without coding?
Yes. With LoginPress, you can perform a complete LearnDash login page using the WordPress Customizer —no coding required.
Is the LoginPress LearnDash integration compatible with all WordPress themes?
Absolutely! The loginpress LearnDash integration works seamlessly with almost all WordPress themes and page builders.
Can I use LoginPress to customize the LearnDash registration and password reset pages?
Yes. LoginPress allows you to design consistent, branded registration and password reset pages to maintain a cohesive user experience.
Does LoginPress support multilingual login pages for international learners?
Yes, LoginPress supports multilingual compatibility, perfect for wordpress e-learning login websites serving a global audience.
How can I make my LearnDash login more secure?
Enable CAPTCHA (reCAPTCHA, hCaptcha, or Turnstile), limit login attempts, and configure redirects for tighter control and a secure LearnDash login.
Conclusion: LearnDash Login Page Customization
Your learners judge your site’s credibility by a smooth, branded, and secure experience that reflects your eLearning platform’s professionalism. With LoginPress LearnDash integration, you can transform your default login into a customized, user-friendly, and secure LearnDash login page that strengthens trust and engagement.
From LearnDash login page customization to social logins, personalized messages, and anti-spam protection, LoginPress gives you complete control over how students access your online courses.
A polished, secure login experience doesn’t just protect your learners; it also enhances their confidence and encourages them to keep learning. That is all for this article. For more related posts, check:
- Boost Your eLearning Site with LifterLMS Login Customization using LoginPress
- Customize Your Easy Digital Downloads Login Page with LoginPress
How will you personalize your LearnDash login page customization to make your learners feel instantly connected and inspired to continue their journey? Let us know in the comments below!


