A Complete Guide on WordPress Comments (2025)
Do you want to learn about the WordPress comments system? If yes, you’ve landed on the right page.
WordPress is a leading content management system for bloggers and businesses. Its commenting system boosts interaction between the admin and site users.
In this article, we’ll explore WordPress comments in detail and see how to access and manage them by trying different settings.
WordPress Comments (TOC):
What are Comments in WordPress?
WordPress comments are a feature where site visitors can share their opinions and feedback on your content, such as blog posts.
WordPress offers a small comment box under each post and page to let the visitors comments on WordPress. This eliminates the need to install additional plugins to enable, manage, and respond to comments from your site visitors.
The WordPress comments section is typically found at the bottom of the post or page, where users can add their comments along with their name and email address.
See the image below:
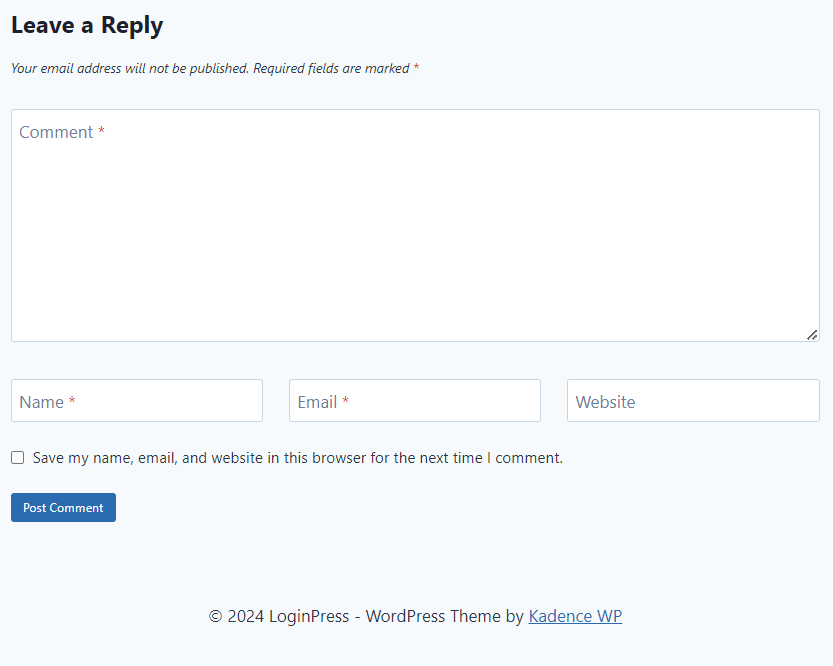
WordPress comments are best for interaction between authors and readers. They add a sense of community and engagement.
Site administrators can fully control these comments. For example, they can approve or delete them to maintain the quality and relevance of discussions.
Why Should You Add a Comment Section in WordPress?
A comment section is more than just a feature; it’s a platform that allows readers to interact with your content. Adding a comment section to your WordPress site can bring numerous benefits.
Here are some reasons to include a comment section in WordPress:
- Community Building: WordPress comments play an essential role in building a community.
- Valuable Feedback: Readers can provide feedback on your posts, share their opinions, and ask questions. This feedback helps you improve your content.
- Building Trust and Credibility: Your comment section showcases your openness to feedback, which is important in building trust and credibility among your readers.
- Encourages Return Visits: Those who comment on your site are likely to return to see responses to their comments. It increases the number of return visits to your site.
- Content Ideas: Comments help you understand what your audience is interested in. You can use this information to generate new content ideas.
A comment section is undoubtedly the best way to create a more engaging and interactive WordPress site that benefits both you and your readers.
How to Access WordPress Comments
All comments on a WordPress site are displayed on the Comments menu option in your WordPress admin area.
To access WordPress comments, go to the left sidebar of the WordPress admin dashboard and click the Comments option.
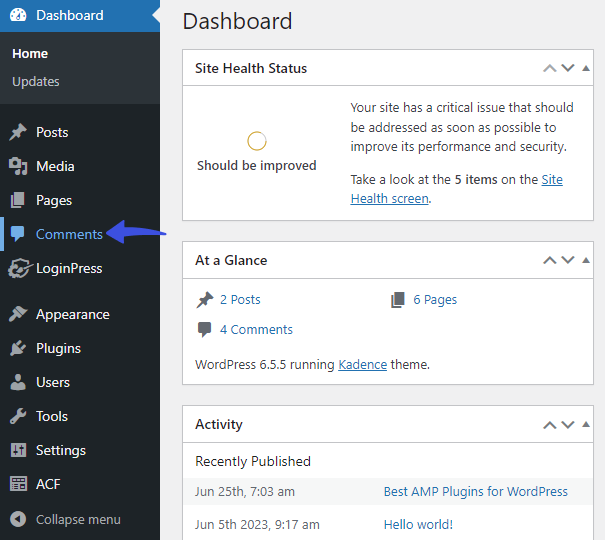
On the next screen, you can see all the comments visitors share on your site.
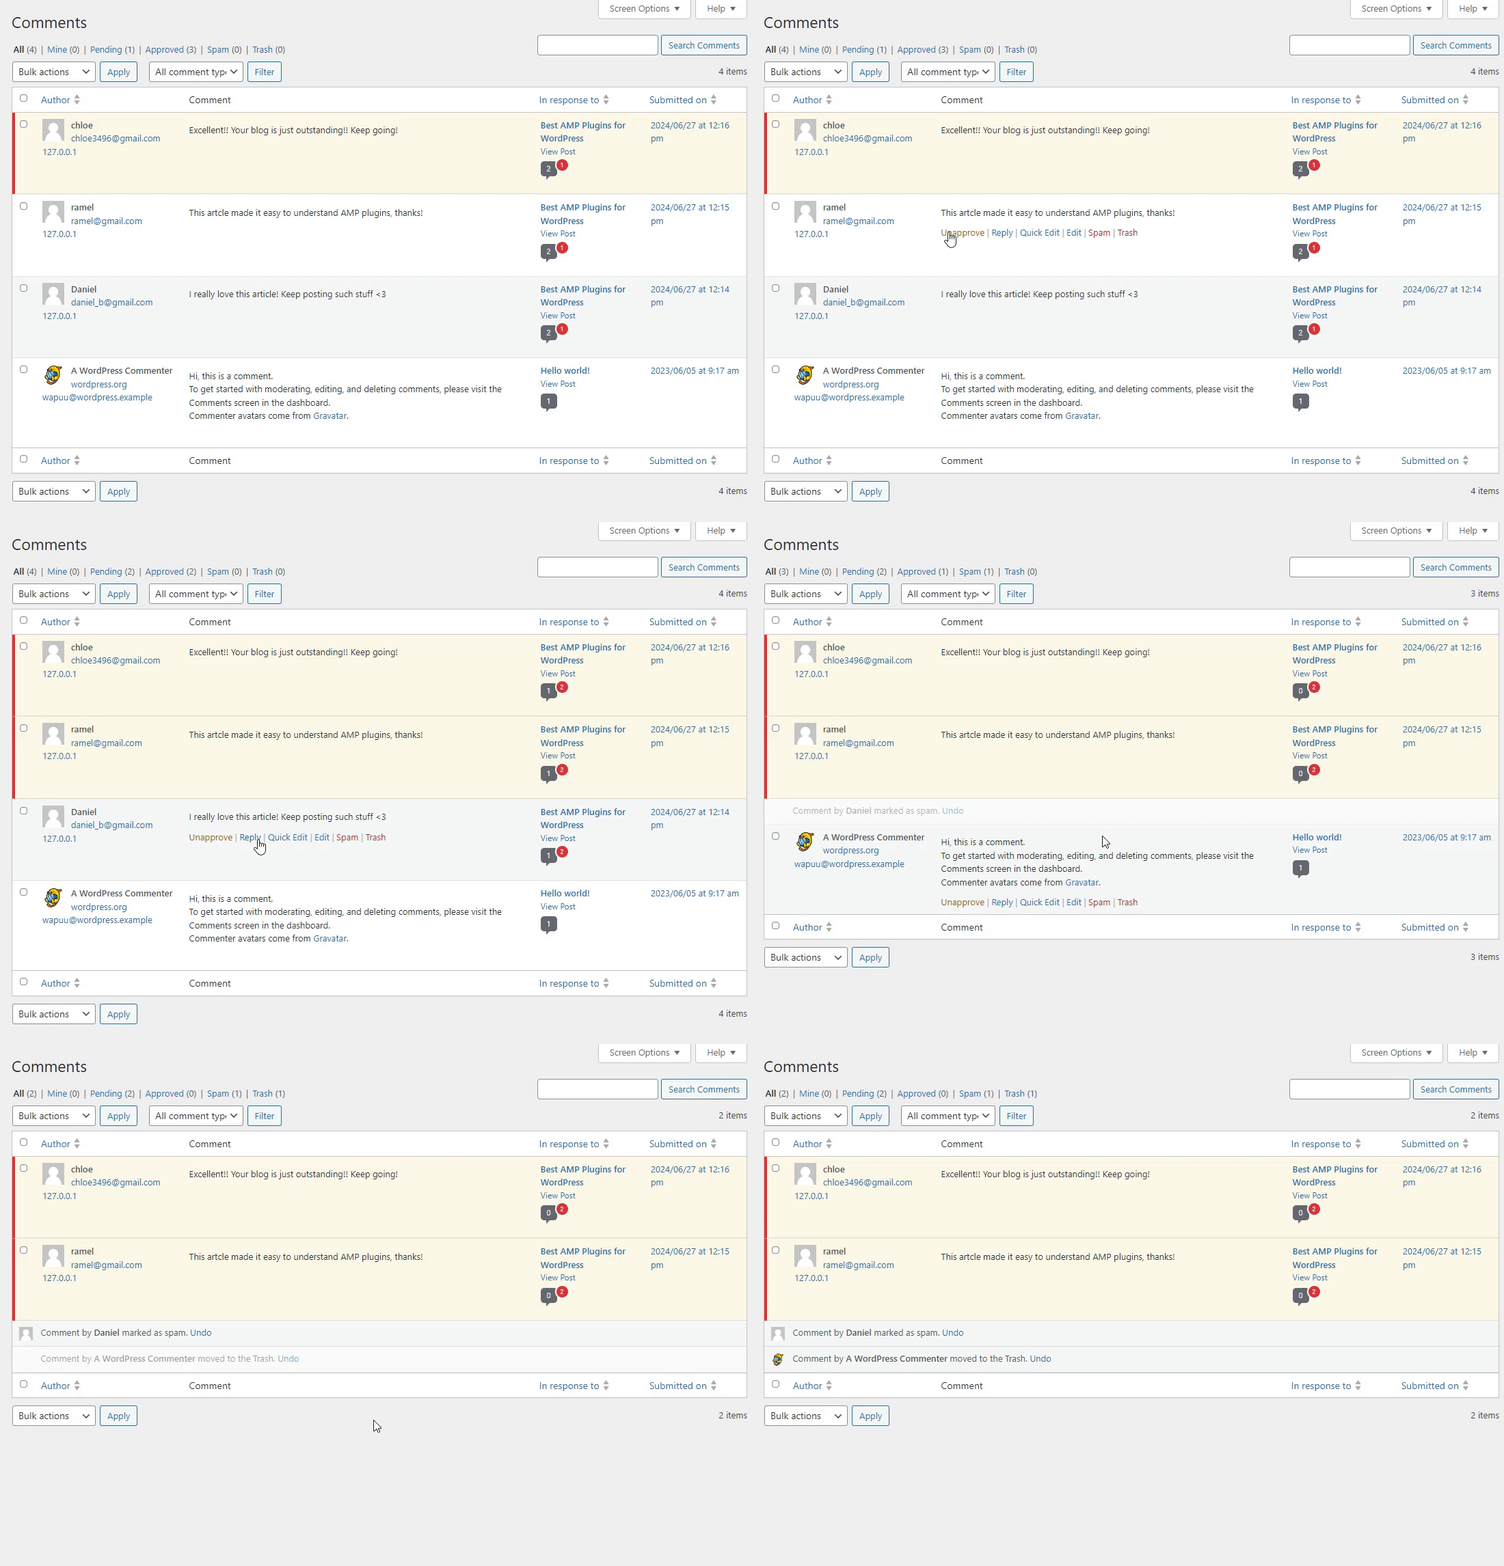
From here, you can categorize them as:
- Approve the pending comments
- Reply to comments
- Edit comments
- Mark them as spam
- Move comments to the trash
See the GIF below:
How to Manage WordPress Comments
WordPress comments can be highly beneficial, but they require some work. For example, you must respond to some comments or prevent spam comments.
Let’s have a look at how you can manage your comments on WordPress.
Comment Status in WordPress
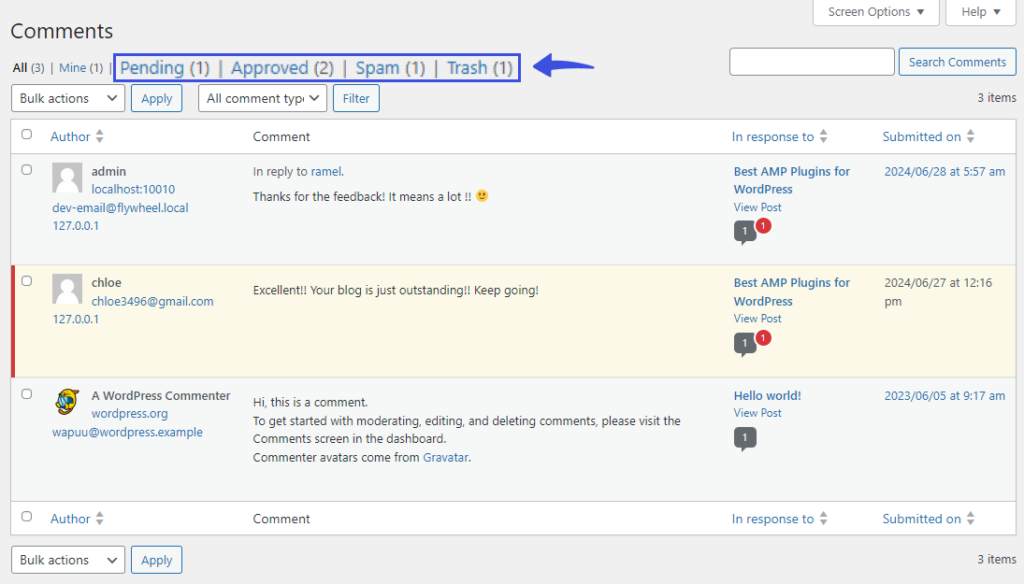
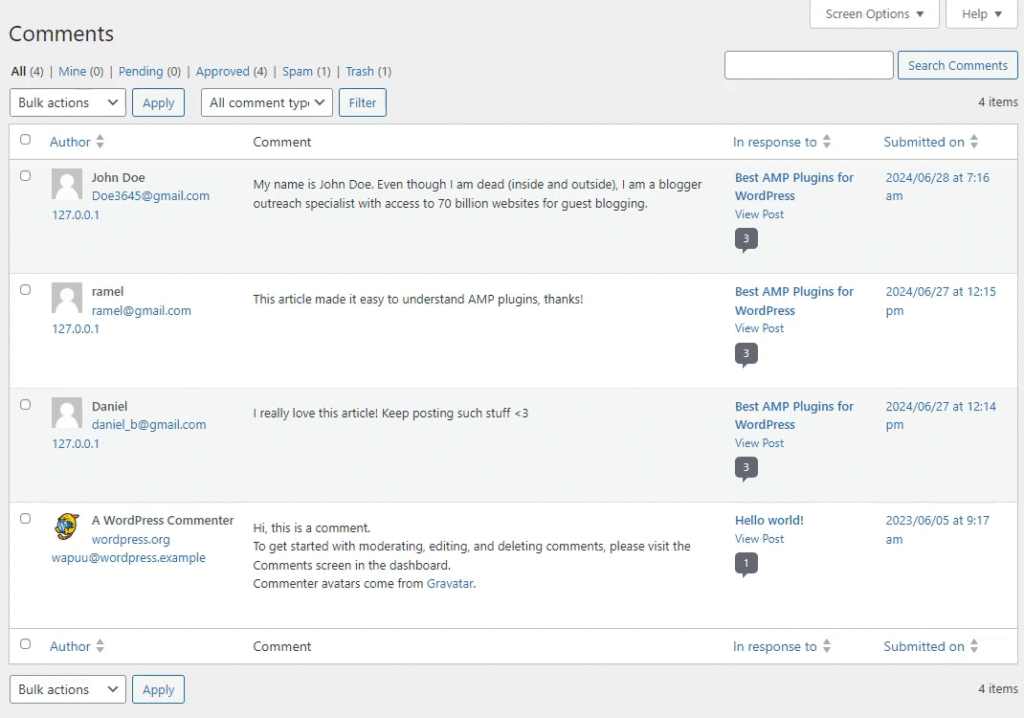
On the Comments screen, you can quickly see and sort the comments based on their status, like:
- Pending Comments: These are comments submitted by visitors. Unless you approve, no one can see them on your WordPress blog posts.
- Approved Comments: Approved comments are the ones you’ve given permission to be added to your blog posts. Anyone can see them.
- Spam Comments: You can mark unwanted or irrelevant messages as spam. When done, they’ll no longer be visible to your audience.
- Trash Comments: The admin can send unwanted comments to the Trash section. Trashed comments are automatically deleted after 30 days, but you can also delete them manually whenever you want.
See the image below:
Editing WordPress Comments
You can easily edit the comments for WordPress posts. For example, if someone has added spam links to the comments, you can edit and remove them before approving those comments.
To do this, go to the Comments screen, navigate to the desired comment, and select Edit or Quick Edit link from the actions menu.
See the image below:
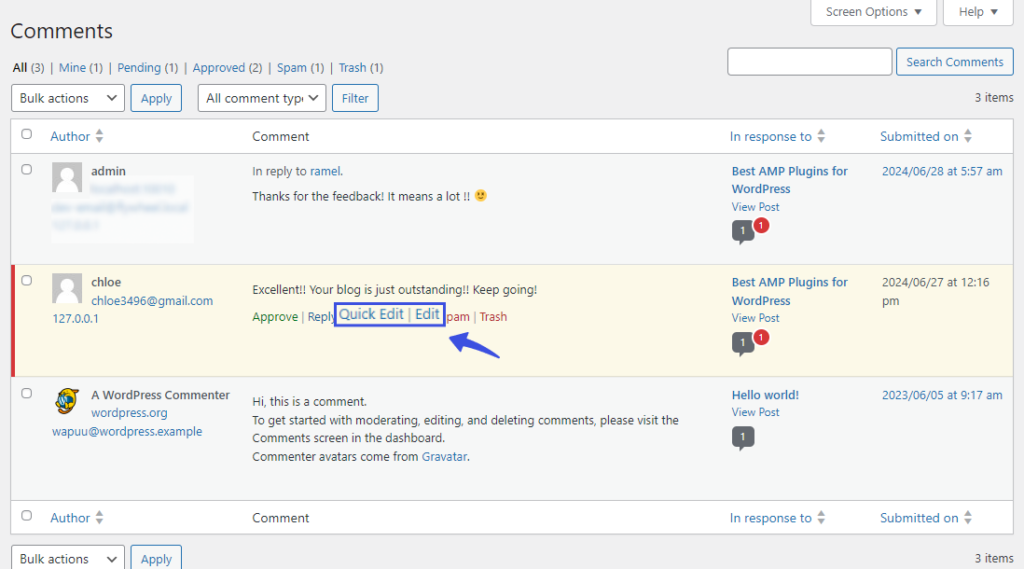
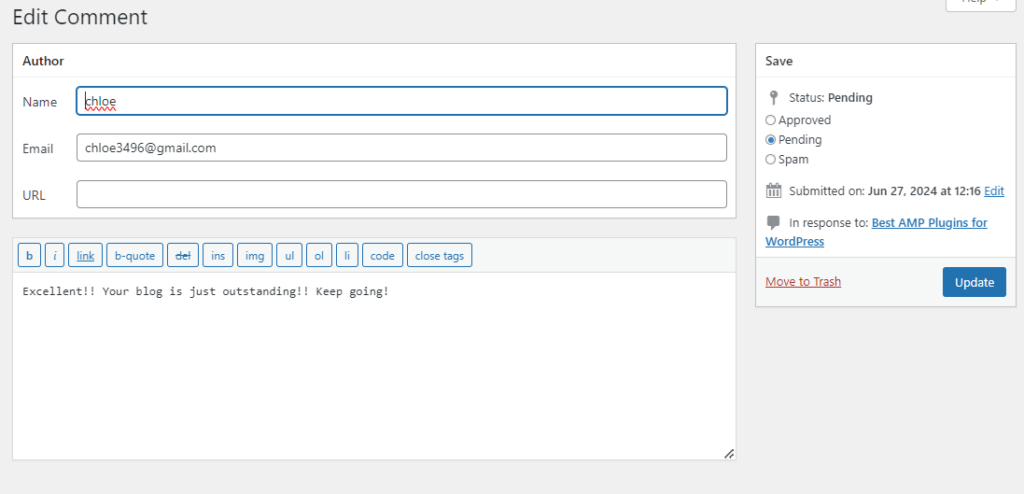
If you click the Edit link, a new page will open up where you can change:
- Author’s Name
- Author’s Email
- Author’s site URL
- Body of the Text
- Status (Approved, Pending, Spam)
When you’re done, click the Update button.
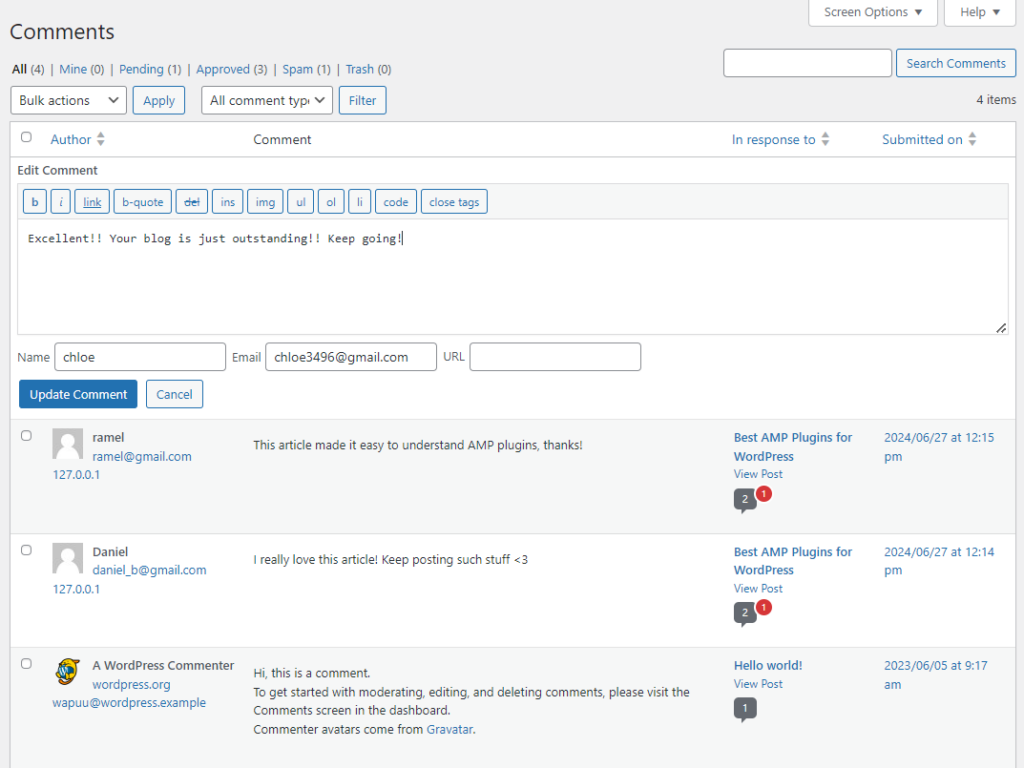
Quick Edit link lets you change the author’s information and the body of the text on the same page. Unlike the Edit screen, you cannot change the status, i.e., Approved, Pending, Spam, from this section.
Restoring Comments on WordPress
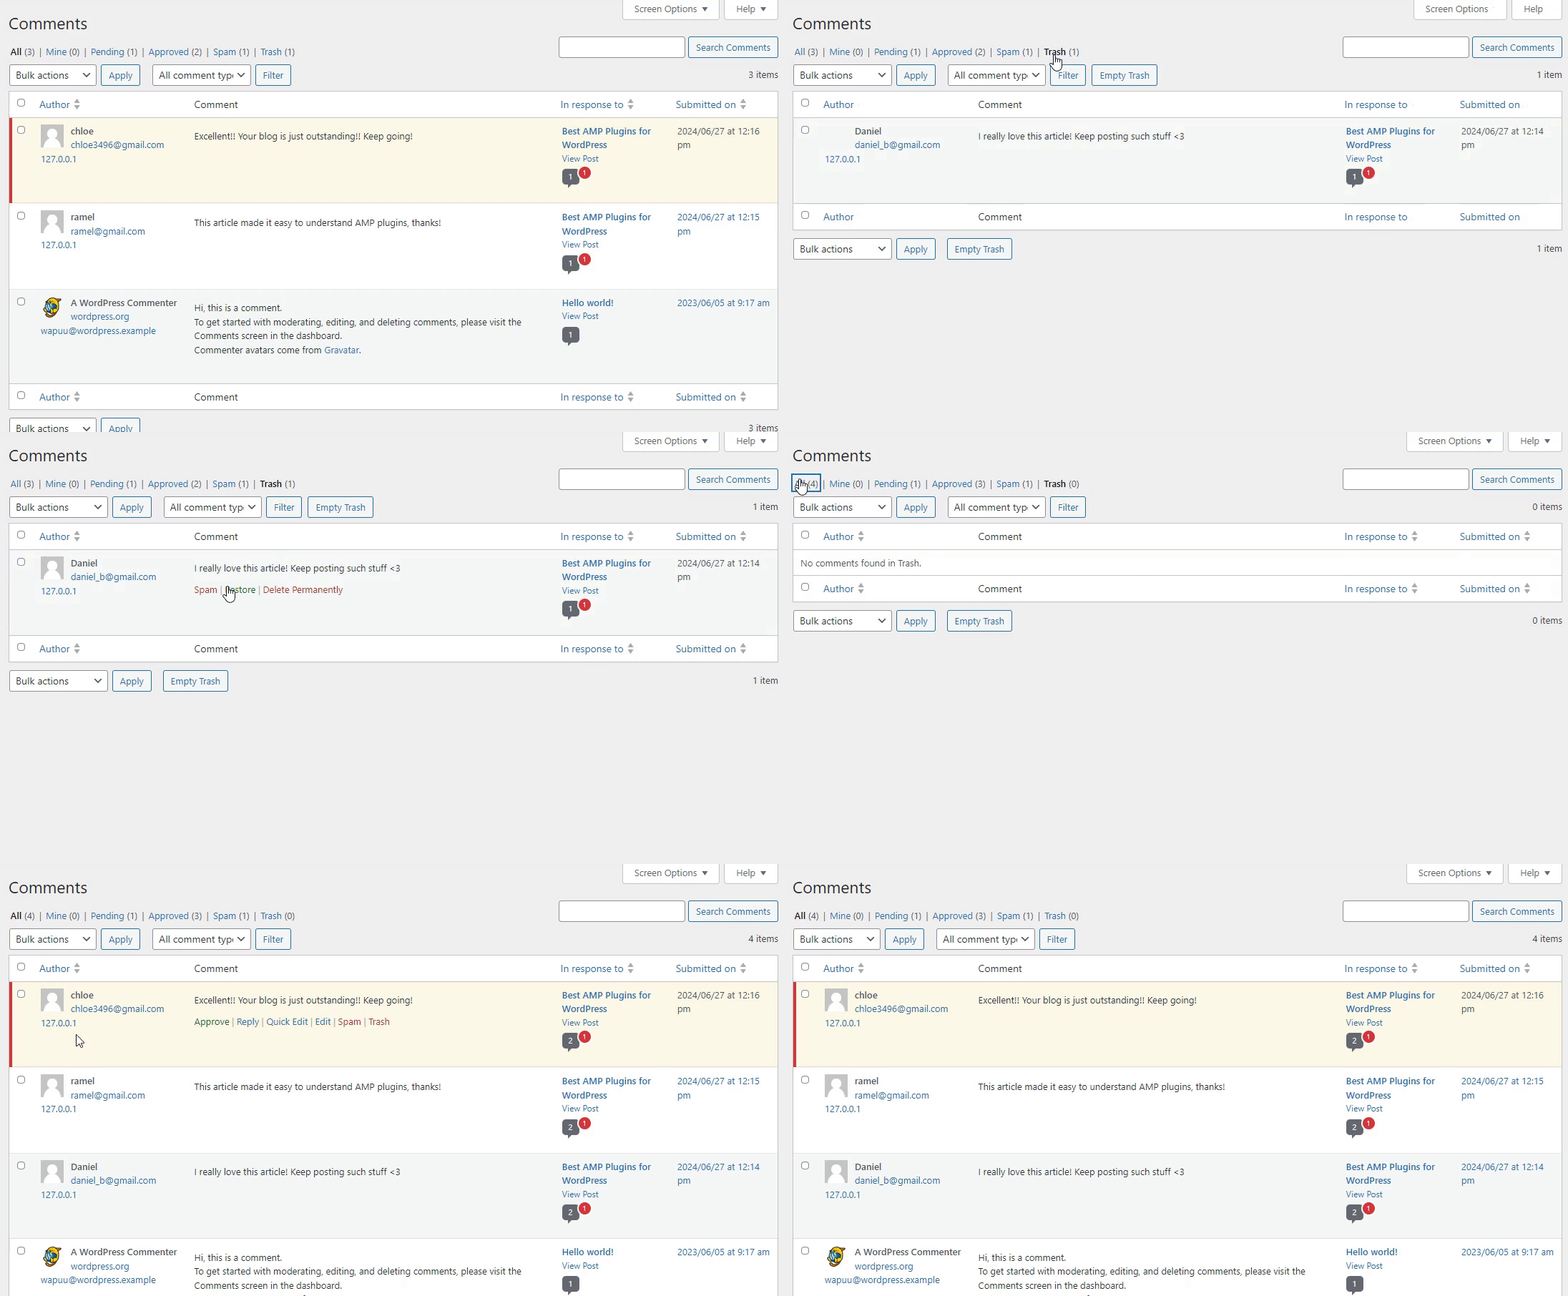
You can see a Restore link under each comment. It helps you to restore the trashed comment easily.
You can restore a comment by going to the Trash screen, navigating to the comment you want to get back, and clicking the Restore link.
See the GIF below:
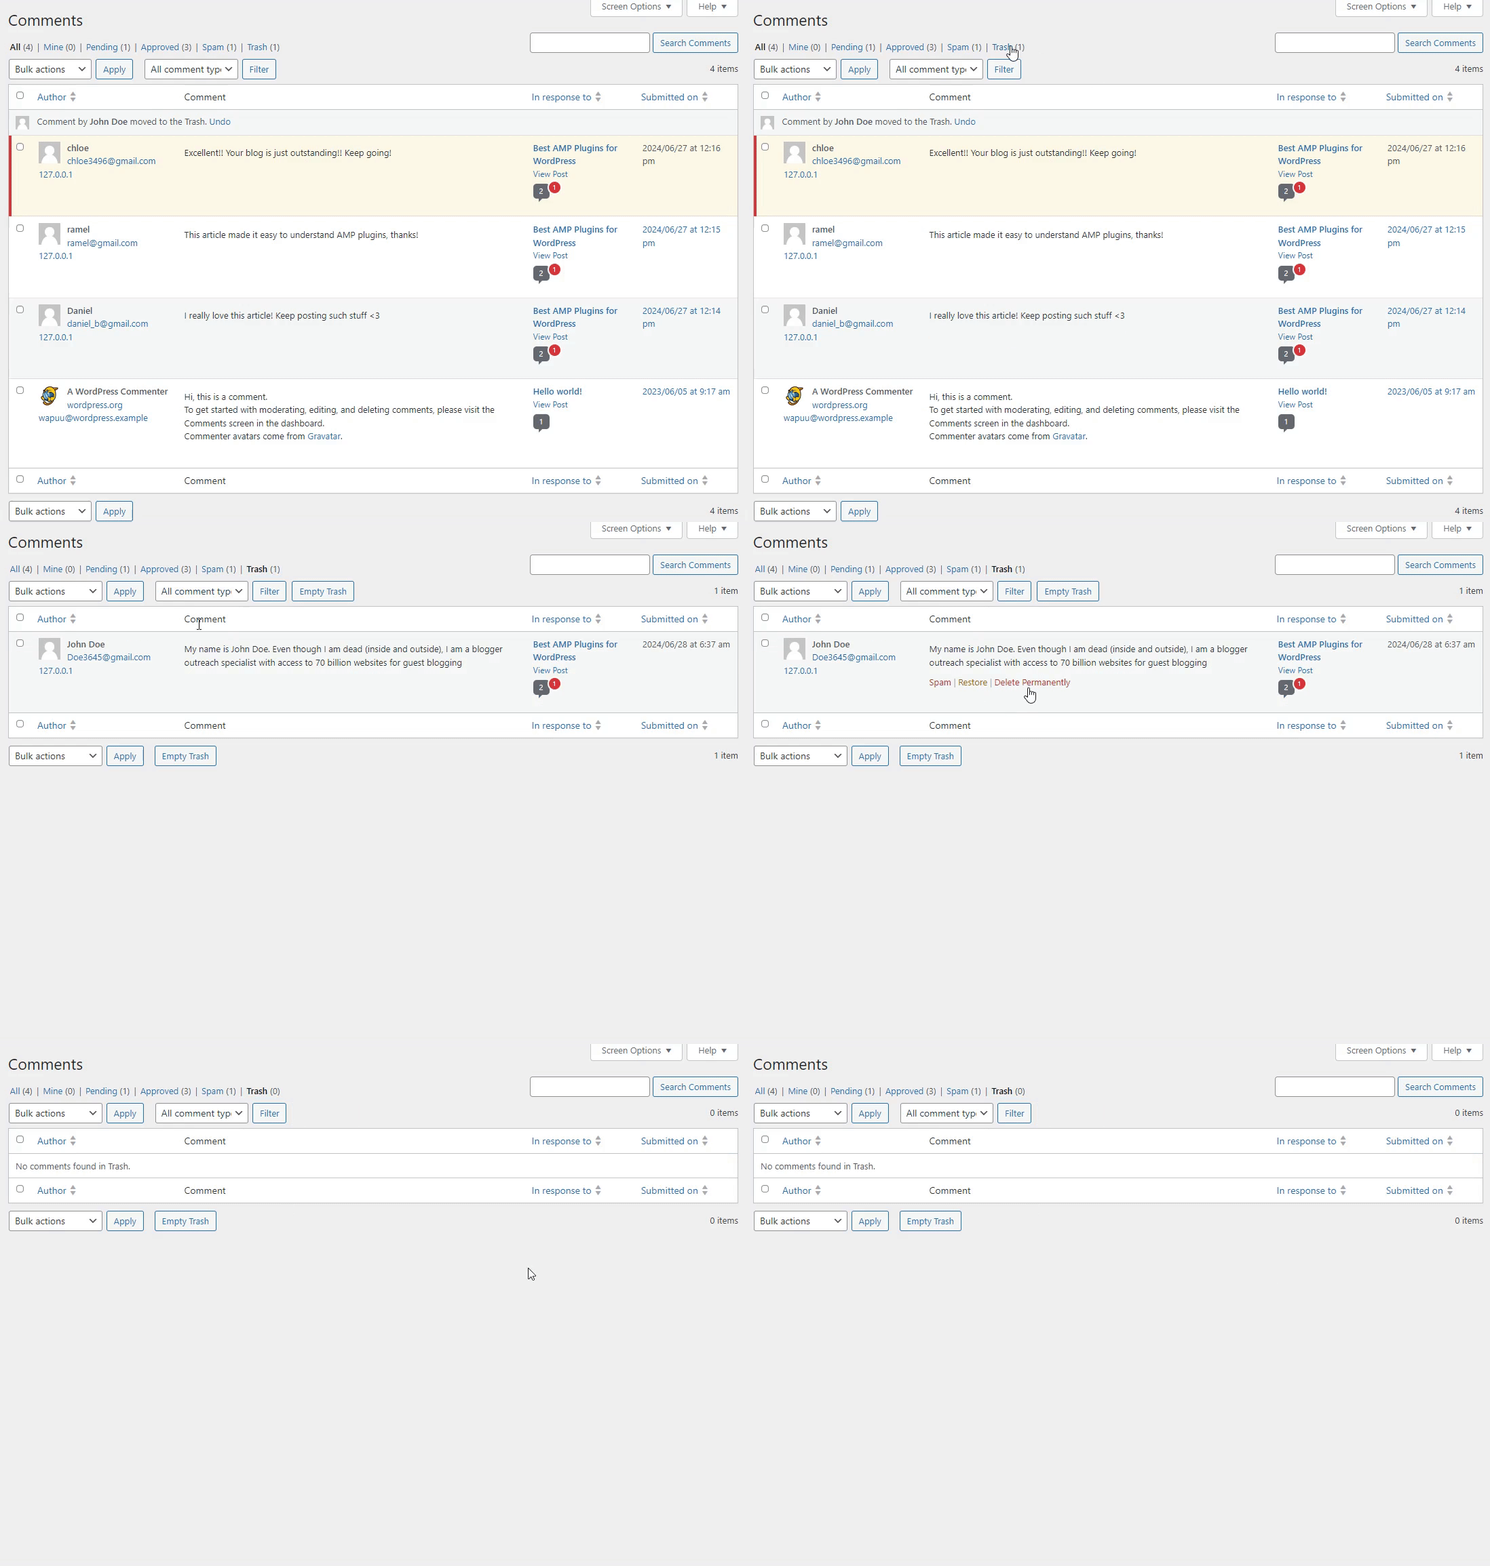
Deleting Comments on WordPress
WordPress allows you to delete trashed comments permanently.
To do so, click the Trash link in the actions menu of a desired comment. This will move the comment to the Trash page, which will remain for 30 days (by default).

If you’ve decided to permanently delete the comment immediately, click the Trash status.
On the next screen, click the Delete Permanently link under the comment you want to remove permanently.
See the GIF below:
Bulk Actions for Comments
WordPress Comments offer a helpful feature: Bulk actions.
It brings ease for you to select multiple comments at once and perform a desired action for them, like:
- Unapprove
- Approve
- Spam
- Trash
It will help you when you are struggling with many comments.
See the GIF below:
Understanding WordPress Discussion Settings
The WordPress Comment section comes with many options, such as the Discussion page settings. From here, you can change the overall behavior of the WordPress comment section.
You can configure these options straight from the WordPress admin dashboard > Settings > Discussion page.
Let’s learn what you can do with these options.
Default Post Settings
This section is there to help you make changes to the default post settings, such as:
- Attempts to notify any blogs linked to the post: This option is there to Enable/ Disable notifications for a site or article you have linked to in your post.
- Allow link notifications from other blogs (pingbacks and trackbacks): You can use this option for enabling/ disabling comments from other sites that may reference your site or an article on your site.
- Allow people to post comments on new articles: This option allows comments on your posts. It can be overridden for individual articles.
Note: The settings inside this section will be applied to all your WordPress posts, pages, attachments, and custom post types.

Other Comment Settings
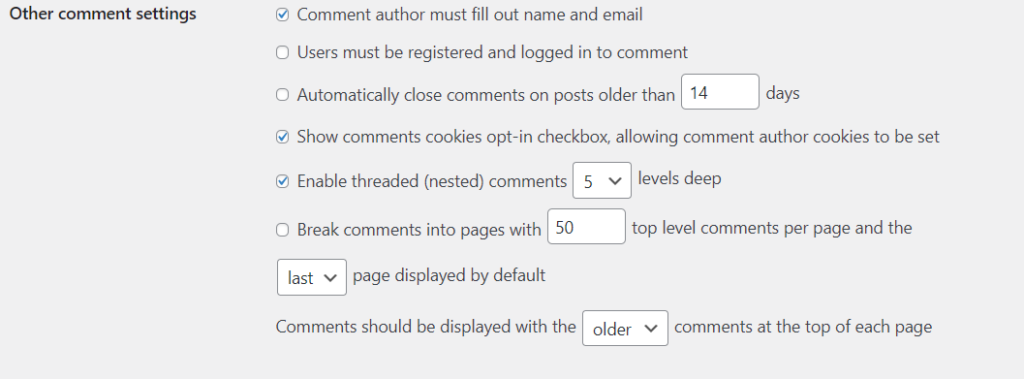
The following section, Other comment settings, allows you to set rules for the comment, i.e., adding name and email options for authors.
Other than this, you can now control comments that will appear on your WordPress site, such as:
- Closing time
- Cookies opt-in checkbox
- Enable/ disable threaded comments
- Breaking comments into pages
- Older comments at the top of the page
See the image below:
Email Me Whenever
WordPress offers an “Email me whenever” section to let you control WordPress notifications on your administrative email.
There are two options available:
- Anyone posts a comment: If you enable this, WordPress will inform you whenever a user submits a new comment on your posts.
- A comment is held for moderation: This option notifies you if a comment is awaiting approval. You can review it and take necessary action, such as approving, spamming, trashing, etc.

Before a Comment Appears
Other than this, you can find the Before a comment appears section. It controls the actions that will be applied to a comment approval.
There are two options for it, including:
- Comment must be manually approved: This option enables the admin to manually review and approve every new comment. After this, the comment will be shown on the post.
- Comment author must have a previously approved comment: You can enable this option to automatically approve comments from users whose comments you’ve approved earlier.

Comment Moderation
WordPress offers a Comment Moderation section within the Comments Settings page. It is there to cope with spam comments.
Spambots or spammers post spam comments on a site. These comments contain unsolicited advertisements.
Remember, spam comments can negatively impact your search engine optimization (SEO) as they can add irrelevant keywords to your site’s web pages.
Mostly, spam comments have multiple hyperlinks. WordPress lets you restrict the comments on your site if they have two or more links.
Note: You can change the number of links of your own.
Next time, whenever a comment is submitted to your site, WordPress will check if it contains two or more links.
If the comment exceeds the number, it will be moved to the Pending Comment section.

Disallowed Comments Key
You can also add a specific word inside Disallowed Comment Keys. It will prevent a comment from being added to your post if it has the Disallowed word within its content, author name, URL, email, IP address, or browser’s user agent string.
The comment will be sent to the Trash within the Comments section.

Avatars
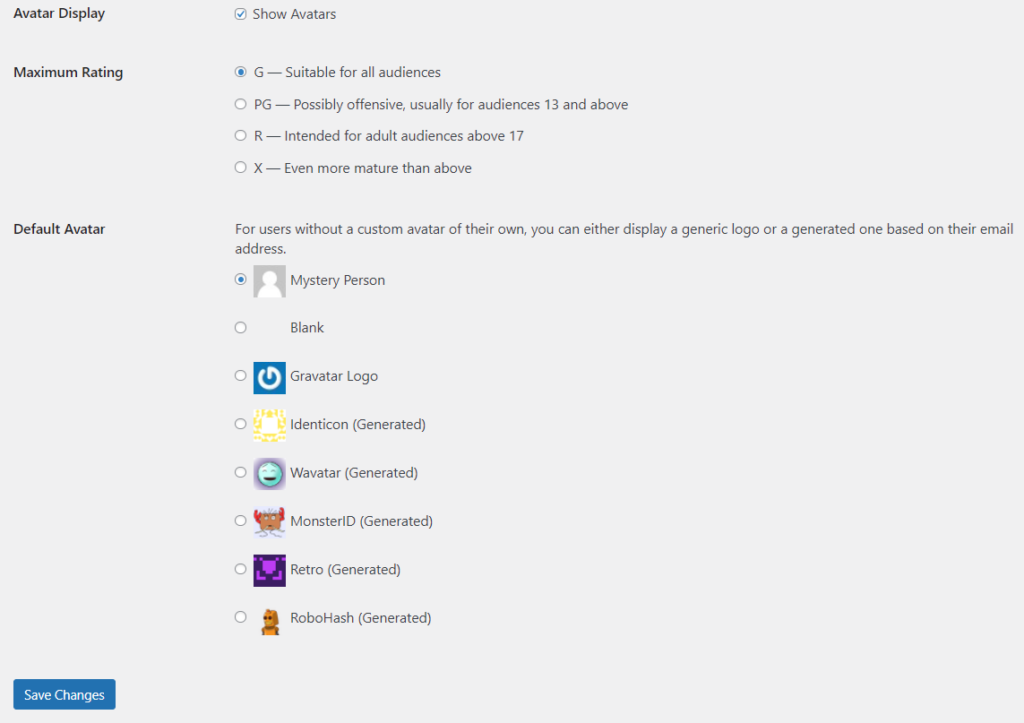
WordPress lets you make changes to the Avatar (user profile picture) in forums and discussions.
In the Avatars section, you can enable or disable an avatar. You can also select a suitable avatar icon, such as a mystery person, blank, Gravatar logo, and more.
Comment Settings for Individual Posts and Pages
The settings mentioned in the previous sections apply to all posts and pages on your WordPress site. You can also make changes to individual posts and pages.
To control comments for individual posts, go to the left sidebar of the WordPress admin dashboard, navigate to Posts, and select the All Posts option.
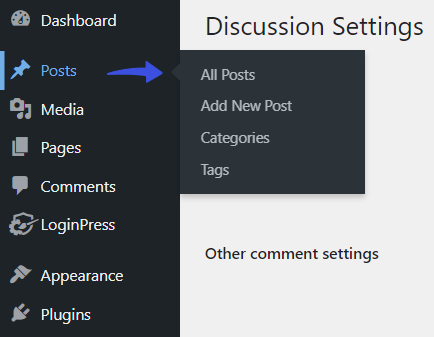
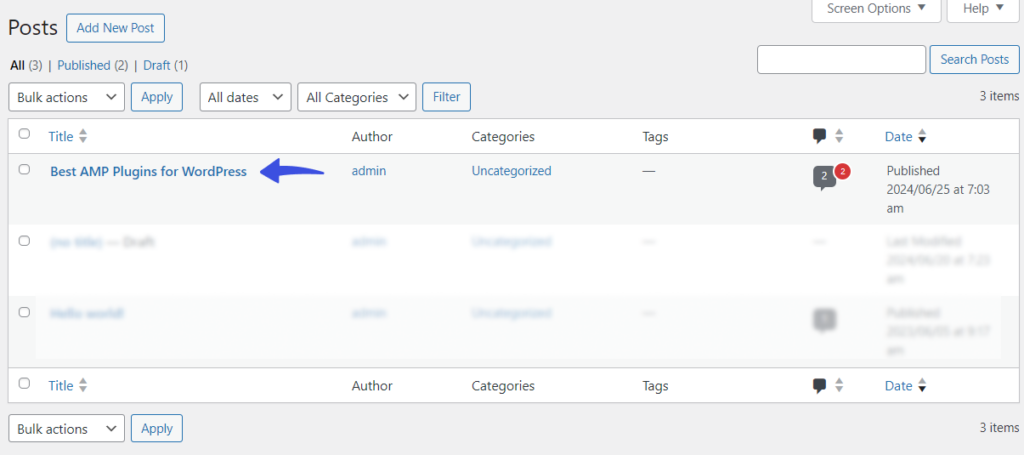
On the next screen, click on any post.
On the next screen, click the settings icon at the top right corner, navigate to Settings, and click the Discussion drop-down menu.
See the GIF below:
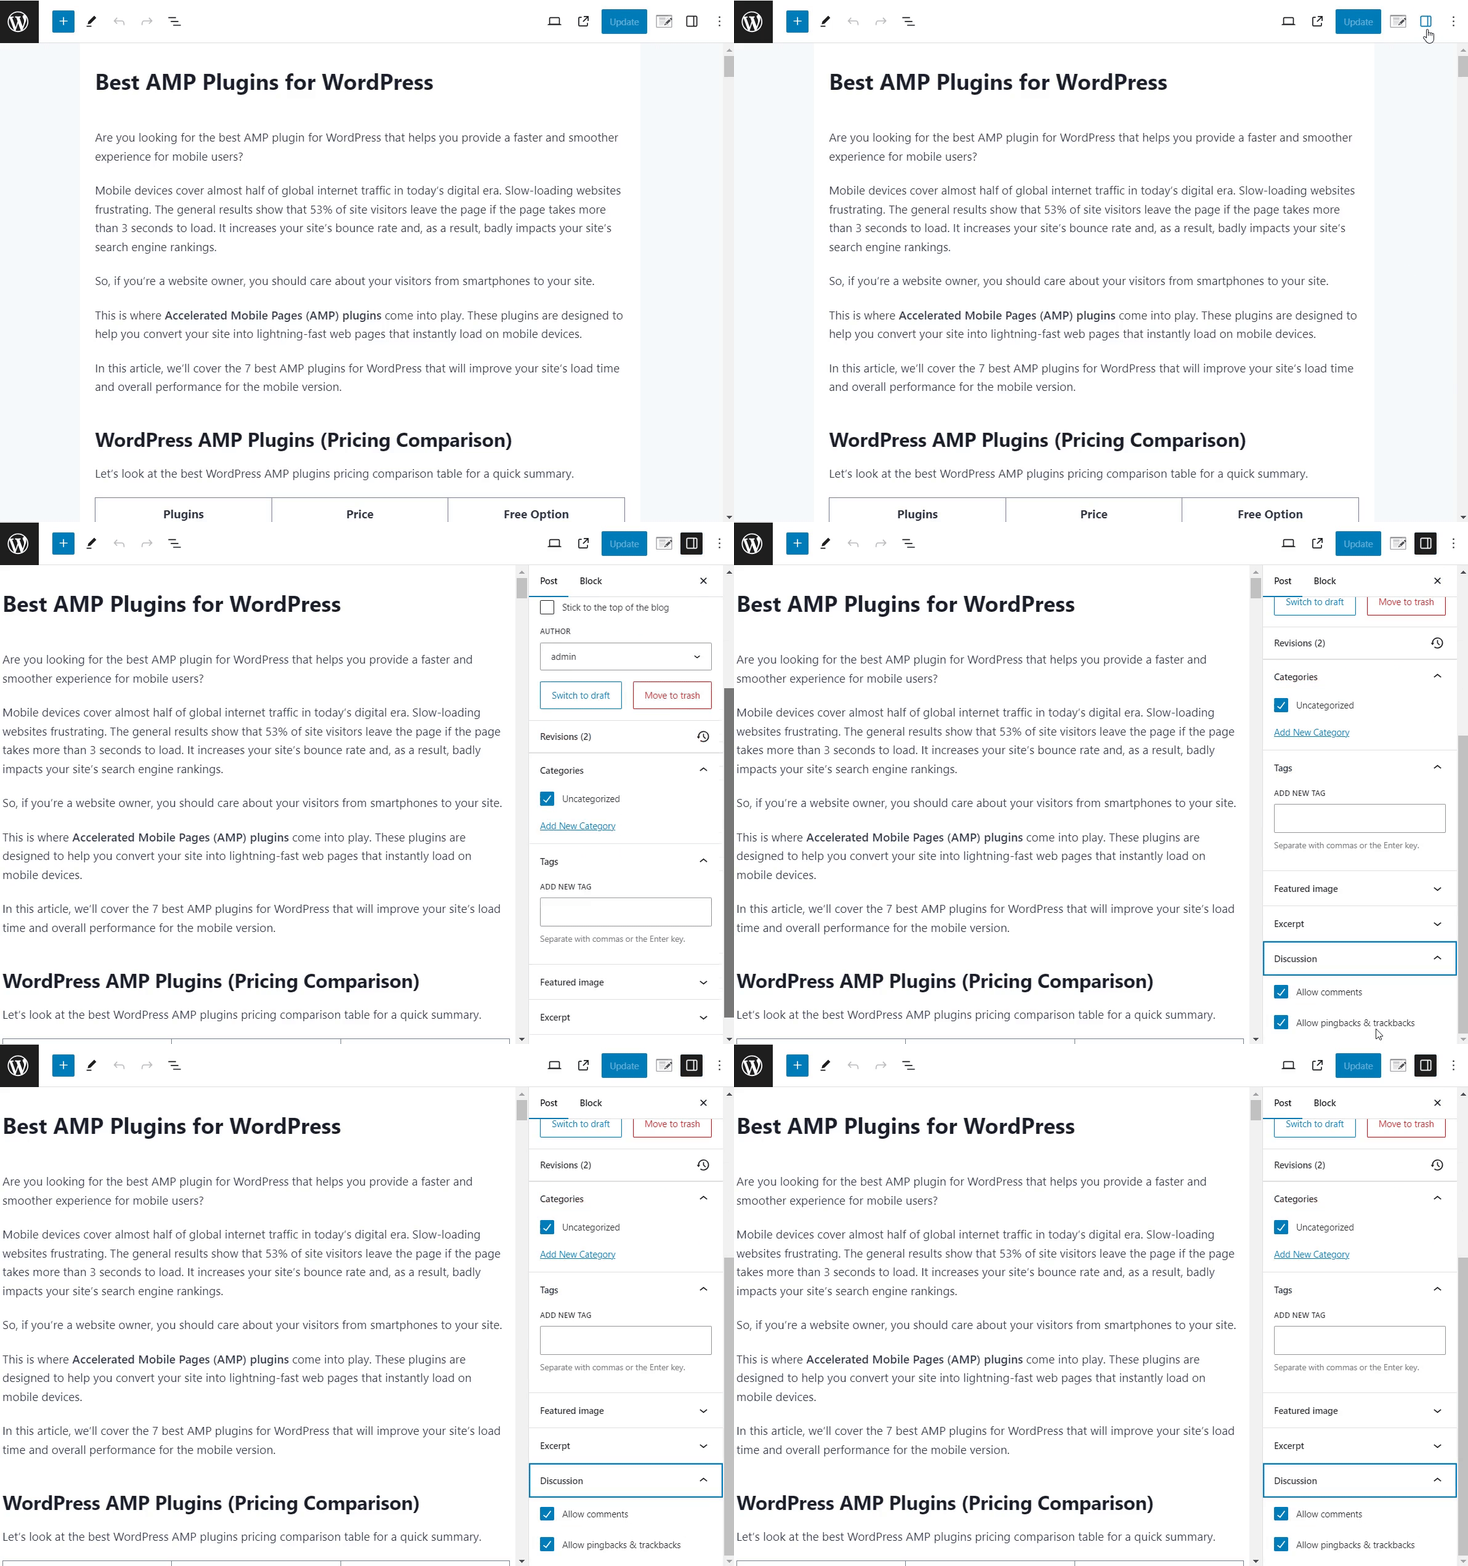
Here, you can see two comment options, including:
- Allow comments: You can enable/ disable comments for specific posts from here.
- Allow pingbacks & trackbacks: From here, you can enable/ disable pingbacks and trackbacks for individual posts on your site.
When you are done, click the Update/ Publish button at the top right corner.
To change the comment settings for individual pages, go to the left sidebar of the WordPress admin dashboard, navigate to Pages, and click the All Pages option.
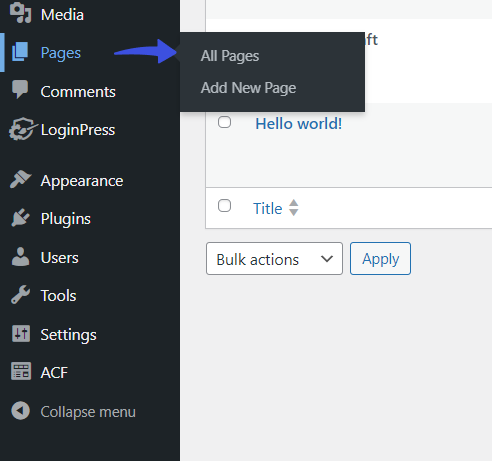
Click on the page you want to enable/ disable the comments.
On the next screen, click the Settings icon and check or uncheck the Allow Comments box.
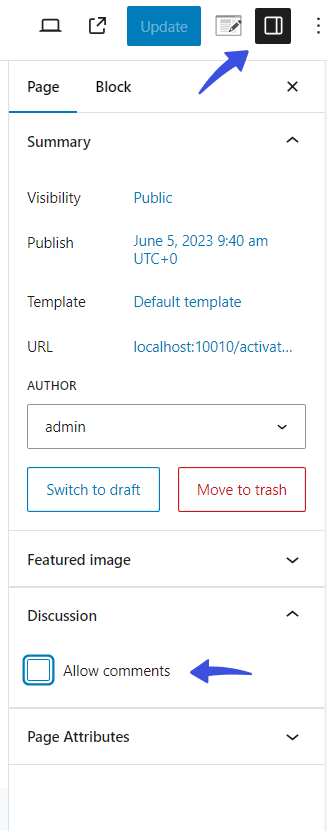
When done, click the Publish/ Update button at the top right corner.
All done!
Disabling WordPress Comments
You can easily disable comments for your WordPress site.
You can access the Discussion option by going to the left sidebar of the WordPress admin dashboard, navigating to Settings, and selecting the Discussion option.
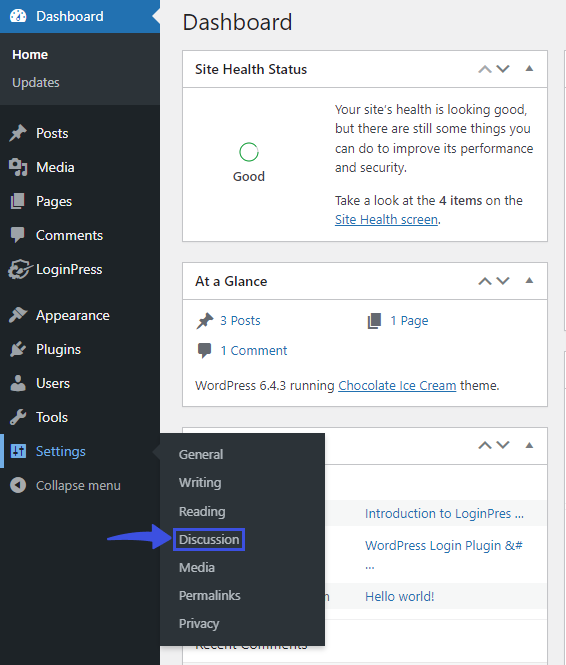
Now, disable the “Allow people to submit comments on new” option Under the Default post settings.
When done, scroll down a bit and click the Save Changes button.
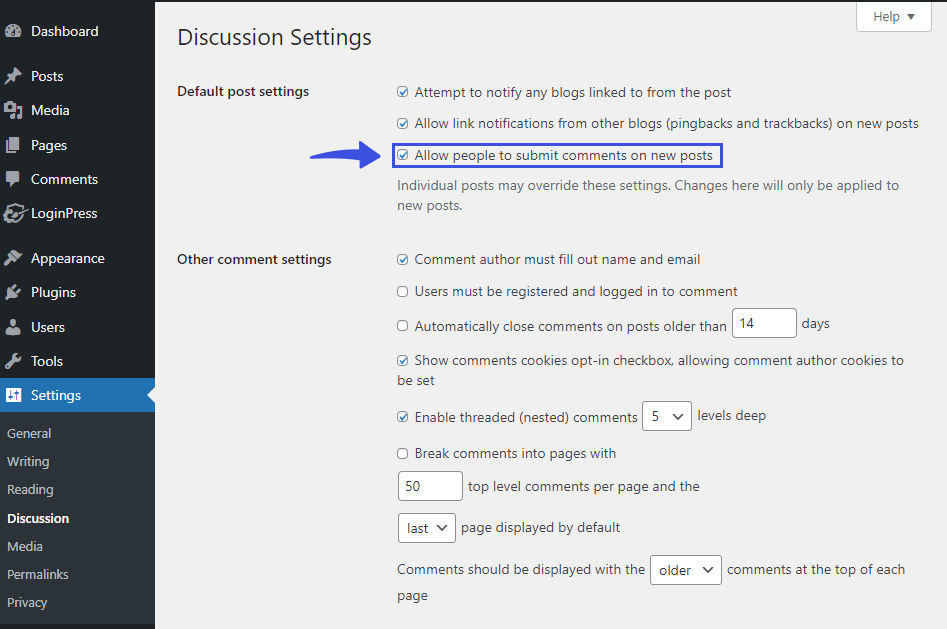
This option will disable comments for your whole WordPress site.
Note: If you want to disable comments for other parts of your WordPress site, see our detailed guide on How to Disable Comments in WordPress With or Without Plugin (2024).
Bonus: Customize Login Page with LoginPress
We hope you now understand WordPress comments. Now, it’s time to change the default WordPress login page with LoginPress.
LoginPress is the best WordPress login page customizer plugin. It lets you customize everything without the need to code or hire a developer.

Customize Your WordPress Login Page
Wait, there’s a lot more packed with LoginPress Pro, including:
Upgrade to LoginPress Pro and strengthen the default WordPress login security.
WordPress Comments FAQ
Can I add reCAPTCHA to my comment form?
To add reCAPTCHA to your comment form, you’ll need to install a reCAPTCHA plugin like LoginPress Pro. It is the best plugin for integrating reCAPTCHA into your WordPress comments. Configure the plugin settings to add reCAPTCHA to your comment forms.
How do I prevent spam comments on my WordPress site?
To prevent spam comments, you can install a plugin like Akismet (a plugin to filter out spam). Next, enable comment moderation by navigating to Settings and clicking the Discussion option. Now, adjust the settings under “Before a comment appears” to require manual approval.
Can I disable comments on a specific post or page?
Yes, you can easily disable comments on a specific post or page. Simply edit the post or page. In the right sidebar, find the Discussion section, uncheck the Allow Comments box, and Update/Publish the post/page.
Why are my comments not appearing on my WordPress site?
Comments might not appear on your WordPress due to pending moderation or a spam filter. To resolve this issue, you’ll need to check the Comments section in your dashboard and ensure comments are not marked as spam by plugins like Akismet. Also, check Settings > Discussion to ensure comments are enabled and not restricted.
How do I change the default comment avatar?
To change the default comment avatar, go to the left sidebar of the WordPress admin dashboard, navigate to Settings, and click the Discussion option. Scroll down to the Avatar section and select your preferred default avatar image.
Final Thoughts
To sum up, WordPress comments are invaluable to building a successful WordPress site.
We hope this guide helps you understand how to manage and optimize your commenting system.
Remember, a well-maintained comment section is important in building trust and loyalty among your readers. So, apply these insights to your site to boost your WordPress community!
That’s all for this article!
You may also like to read our other valuable how-to guides, including:


LoginPress Blog” is a fantastic resource for anyone looking to enhance their WordPress login experience. With insightful tips, updates on the latest features, and practical tutorials, it’s a go-to for making your login page more secure and user-friendly. Keep up the great work!
Thanks for your kind words.
Very Nice And For Everything
“Wow, this guide on WordPress comments is super helpful! It’s great to see an up-to-date resource for understanding the ins and outs of comment management in 2025. I especially appreciated the tips on controlling spam and moderating comments more effectively. The step-by-step instructions make it easy to follow along, and the recommendations for third-party plugins like Akismet and Disqus are spot on. I also love that you included insights on how to balance user engagement while maintaining site security. It’s clear that WordPress comments are evolving, and this guide covers everything from basic settings to advanced strategies. Definitely bookmarking this for future reference!”