How to Customize WordPress Login Page (Easy Guide)
Are you thinking of customizing the WordPress login page for your website?
You are off to a great start because a custom login page adds a touch of uniqueness that distinguishes your website from the rest.
In addition, you can display your brand colors and give the users a very pleasing start to their visit to your website. Plus, a custom WordPress login page also helps in securing your website.
In this article, we’ll show you how to create a custom WordPress login page that looks and works great!
Table of Contents
1. Why Do I Need a Custom WordPress Login Page?
WordPress is a well-known content management system (CMS). It is an open-source platform that helps you create a website with ease.
A custom WordPress login page helps you set up the branding and secure your website by (optionally) changing the URL of the login page.
The problem with the default WordPress login page is that it’s the same for all websites. That might be good if you’re the only person logging into the website. However, if it’s a website where other people also log in, you might want to change the generic look of the page to reflect the brand’s personality.
Here’s what a default WordPress login page looks like:
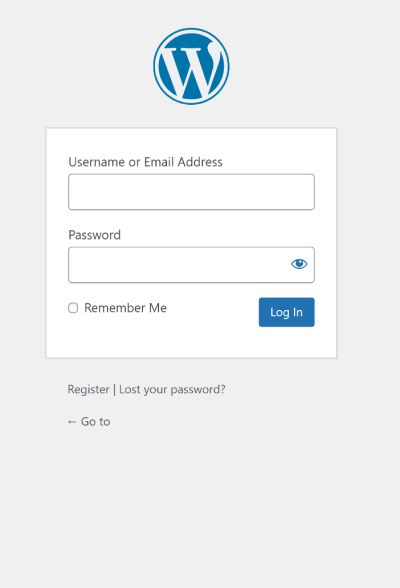
As you can see, aside from the WordPress logo, the page has got nothing in the way of colors, branding, and background images. So, there is no way of knowing which website you will log in to when you fill out the form and click Log In.
On the other hand, here’s an example of a custom WordPress login page.
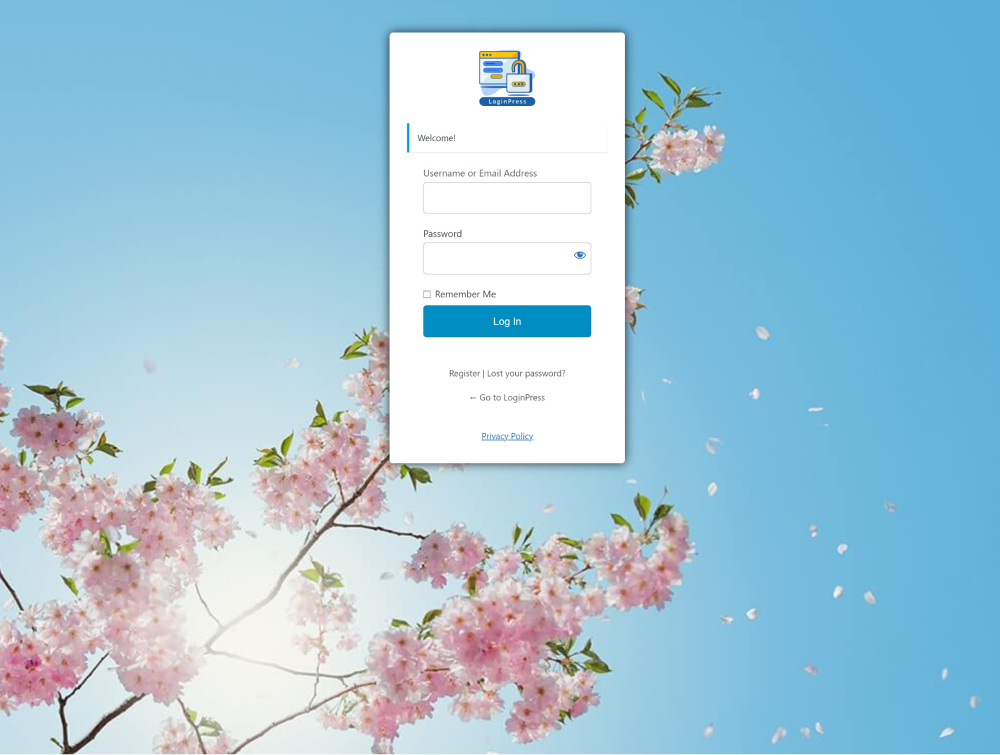
The first thing you’d notice is the beautiful background image that covers the entire screen. Next, you can see the brand’s logo at the top of the form. This immediately distinguishes your login pages from the competition. The form is also stylized and could be further customized to fit the rest of the website’s design.
2. How Can I Customize the WordPress Login Page?
Like most things in WordPress, the easiest way to customize the WordPress login page is through a plugin.
Whether a lay user or a developer, you can use a WordPress login page customization plugin to customize the login page. These plugins offer a lot of options for fine-tuning the looks and functionality of the login page. Best of all, you don’t have to mess around with code at any point.
Of course, if you have the right coding skills, you can write custom login pages from scratch. Often, you’ll find that this approach isn’t worth your time and effort. You can get better results with a plugin, probably half the time.
3. Introducing LoginPress
LoginPress is a simple and feature-packed WordPress login page customizer plugin that takes all the hassle away from the process of building your custom login pages.
Built for all users, LoginPress offers every functionality you’d need to create awesome-looking login pages within minutes. For instance, templates can speed up page creation and add backgrounds, logos, and custom colors.
In addition to the aesthetics, you can add reCAPTCHA to prevent spam and social login to simplify the process for your users.
Here’s how the LoginPress design screen:
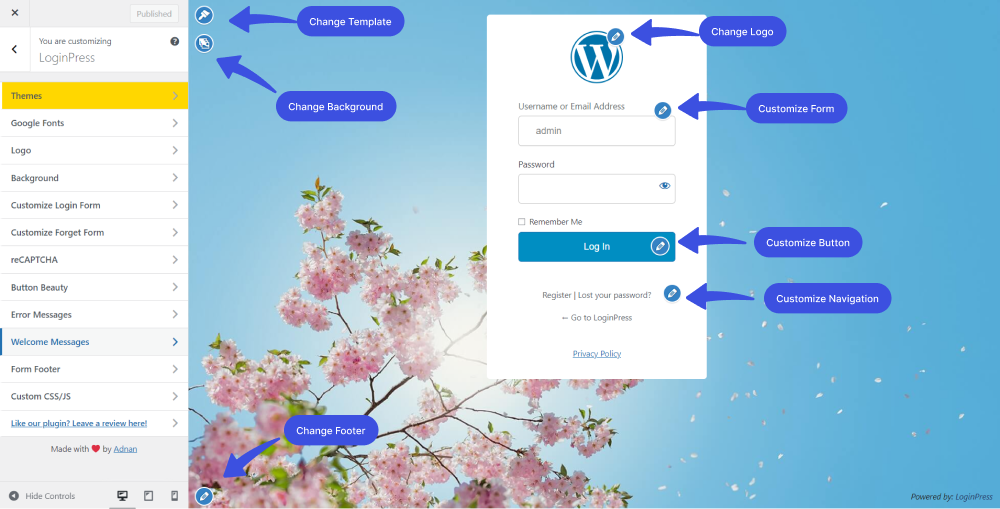
As you can see, you can change all elements of the login page to make it your own. You don’t need to know any HTML, CSS, or PHP to create the page, as it has an easy drag-and-drop feature.
Let’s walk through the process of creating a custom login page using LoginPress. You’ll see that LoginPress comes with all the useful settings, add-ons, and features you need to create the pages.
Let’s go!
4. Customize the WordPress Login Page Using LoginPress
Install the LoginPress Plugin
The first thing you’ll need to do is install and activate the LoginPress plugin. The process is straightforward.
Go to the left sidebar of the WordPress admin dashboard, navigate to Plugins, and click the Add New option.

Search for LoginPress in the search box. Next, click Install Now to install the plugin and then Activate button.
Note: LoginPress Free version helps you make your login page look branded and customizable. However, you can add some extra features by buying the LoginPress Premium version, which takes the plugin’s functionality to the next level.
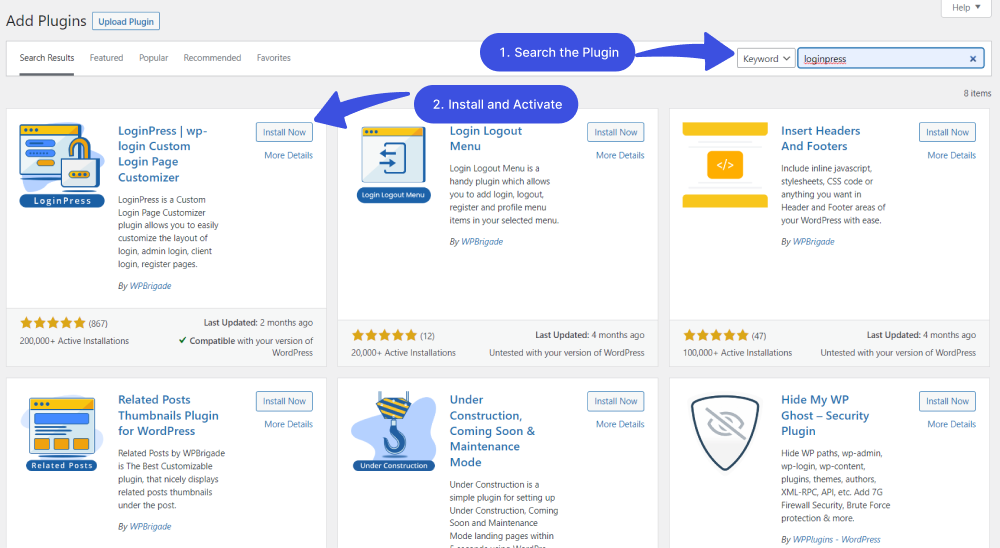
LoginPress is added to the left sidebar of the WordPress admin dashboard.
5. The LoginPress Settings
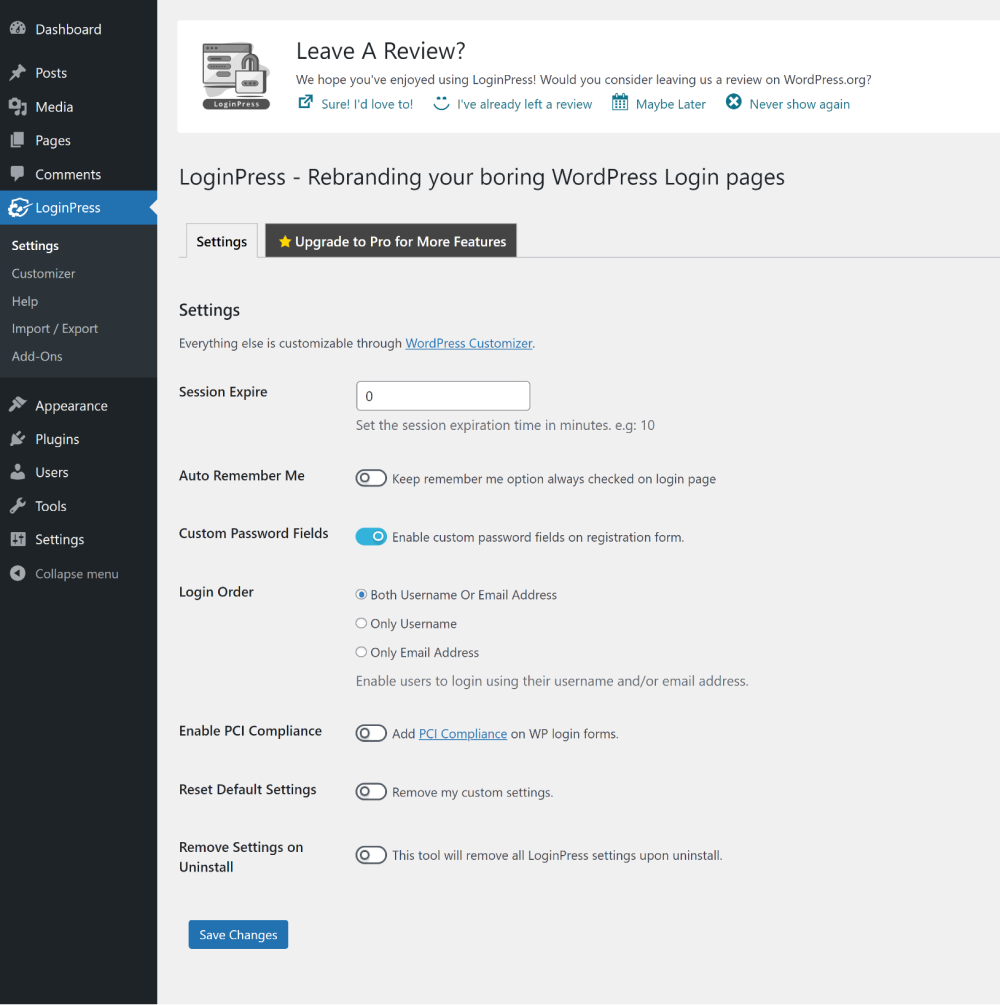
First, let’s go through the LoginPress settings. These settings help you control the overall behavior of the login page. Here’s a brief description of the options available on the Settings page.
5.1. Force Login
The first toggle, Force Login, determines whether users need to log into your website to view the content.
5.2. reCAPTCHA
The following seven options help you set up reCAPTCHA on your login page. As you might know, reCAPTCHA offers protection against automated signups. We recommend you take the time to set up reCAPTCHA to ensure your user data remains accurate. You can also enable reCAPTCHA at just the login or on the user registration and Lost Password forms.
5.3. Session Expire
Next, you can set the duration (in minutes) after which the user session would expire, and they’d have to log in again.
5.4. Username Selection
You can also choose whether the users need to provide their usernames or registered email addresses (or both) when they log in. This is a helpful option for websites that identify users through custom usernames.
5.5. The Reset Button
Finally, if you decide not to use LoginPress for customizing the WordPress login page, you get the toggles for resetting the default options.
Once you have set the options on the Settings page, remember to click Save Changes.
6. Customize the WordPress Login Page Through Customizer
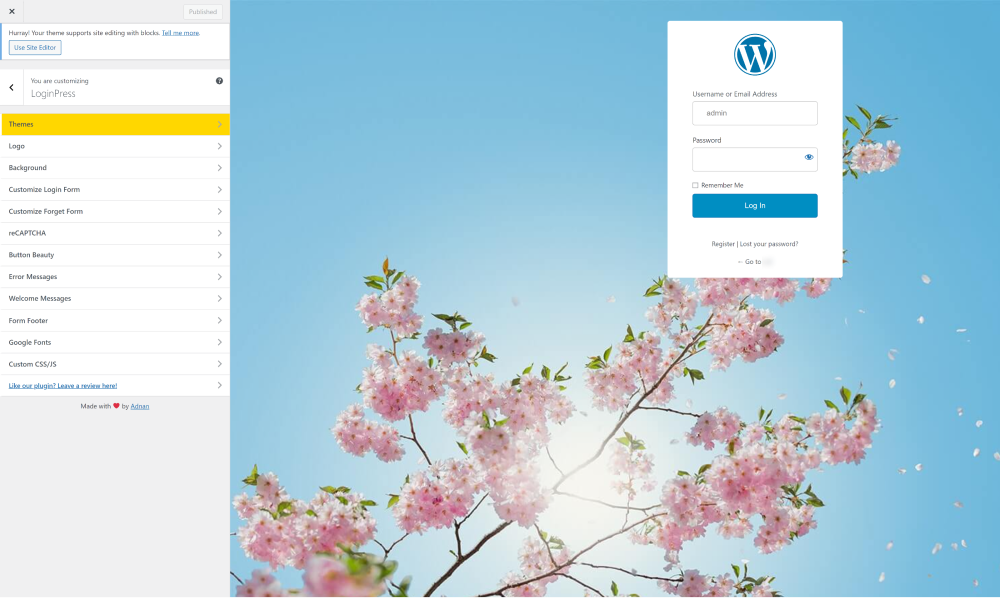
LoginPress uses the WordPress Customizer to customize the default WordPress login page.
Go to LoginPress in the WordPress Dashboard and click Customizer. You’ll be taken to the Customizer screen, where you get several essential options for customizing the default WordPress login page.
See the image below:
6.1. Themes
The first option is Themes. This is where you pick a theme for the login page. Each theme has a background image and form placement (usually in the center or to one side of the page).
6.2. Google Fonts
The second option Google Fonts allows you to pick the font for the form. Here, you can choose the font from the dropdown menu.
6.3. Logo
The third option is Logo, where you can set the logo at the top of the login form. You can choose not to show a logo by toggling the Disable Logo option. If you decide to show a log, you can upload an image and precisely control the appearance of the logo.
6.4. Background
Now that you have set the logo, the next option is the page’s background. You can display a static image or a video in the background and control the display size of the background image.
6.5. The Login Form
The option is about the login form. Here you can select the colors for the form labels and fields. In addition, you can control the appearance of the form by adding margins and padding to the form design.
6.6. Button Beauty
Now that you’ve edited the form, you can change the appearance of the main login button. For this, go to the Button Beauty section. You can fine-tune the appearance of the button and change everything from the color, size, and appearance of the button.
At this point, you have set up the page background and the login form.
6.7. Error and Welcome Messages
The following two options allow you to set the messages on the page. The first of these options is the Error Message, where you can set the error messages for ten possible errors. The second option is Welcome Message for the login, registration, and forget password forms.
6.8. The Form Footer
With the background, form, button, and error messages customized, the last piece of the puzzle is the Form Footer which displays two options – Register and Lost Your Password. You can set the text for these options and opt to display a customized copyright notice.
6.9. Custom CSS/JS
To customize the page further, you can use the last option, Custom CSS/JS.
7. Take the Login Form Customization to the Next Level With LoginPress Add-ons
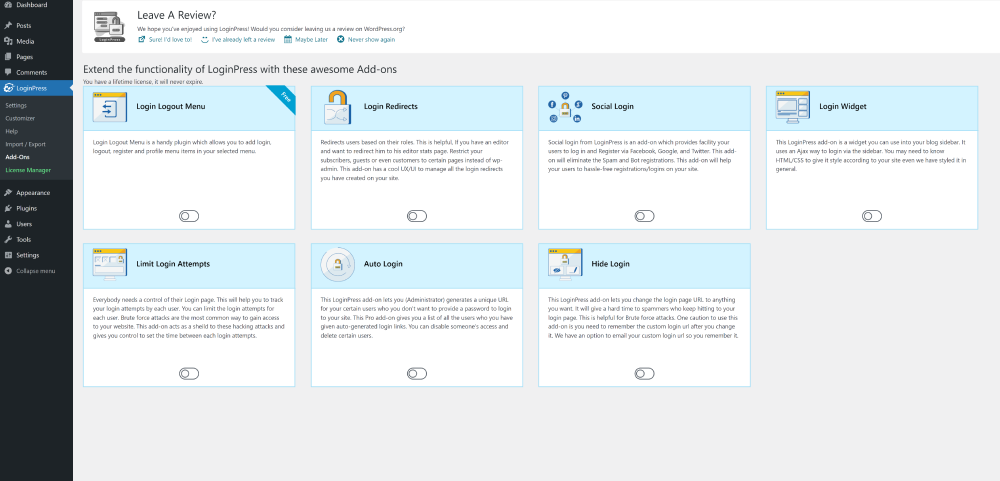
The login form is a crucial component of any WordPress website. To add more power to the login form customization, LoginPress offers several free and paid add-ons. These add-ons extend the functionality of the login page.
Let’s see how these add-ons help you customize the login page.
7.1 Login Logout Menu
The Login Logout Menu is a free add-on that you can use to add options such as Login, Log Out, Register, Profile, and User as menu items to the website menu.
7.2 Social Login
Social Login is a premium add-on that allows users to register and log into your website with their social media accounts. The add-on supports Facebook, Twitter, Google, or LinkedIn. With this add-on, you’d see a significant drop in the number of spam and automated signups.
7.3 Auto-Login
Auto Login is a premium add-on that allows selected users to log in to your website with a unique customized link instead of their login details. You can easily add or remove the users who are allowed to log in with a URL instead of their credentials.
7.4 Login Widget
Login Widget is a premium add-on that adds a fully customizable login widget to your WordPress sidebar.
7.5 Limit Login Attempts
The Limit Login Attempts is a premium add-on that restricts the number of login attempts for all users. You can protect your website from brute-force attacks by limiting login attempts.
7.6 Hide/Rename Login Page
The Hide Login is a premium add-on that lets you change the URL of the login page. This adds another layer of security to your website.
7.7 Login Redirects
Login Redirects is a premium add-on that redirects users to specific website URLs. The redirection could be set for individual users or entire user roles.
Conclusion: Customize WordPress Login Page
LoginPress is an excellent way of customizing the default WordPress login page. With this plugin, you get powerful options for changing the login page’s layout and enhancing individual elements without knowing CSS, HTML, or PHP.
You save time and significant effort and develop a great-looking login page that fits right into the website design. In addition, you could extend the functionality of the login page by opting for free and paid add-ons.
We hope you learned how to customize the WordPress login page. If you have any questions feel free to ask us via the comments section below:
Let us know how LoginPress helped you build awesome login pages for your website.
That’s all! You can also check out How to Find the WordPress Login URL (Easy Guide), how to customize WordPress dashboard for clients without coding, and How to Easily Change the Login Logo in WordPress.
Not using LoginPress yet? What are you waiting for?
Frequently Asked Questions
How to find the WordPress Login URL?
You can find the WordPress login URL by /wp-login.php at the end of your domain name. Generally, the URL is:
www.yourdomain.com/wp-login.php
Can I change the default WordPress login URL?
Ans: /wp-login.php is the default WordPress login URL. You can change this default URL to harden website security.


