How to Change Menu Color in WordPress (3 Easy Methods)
Are you looking for easy ways to change menu color in WordPress?
A thorough understanding of WordPress themes and menus is essential when it comes to changing the color of the WordPress menu. These two components are essential to the overall layout and operation of any website.
In order to give you a better understanding of the customizing process, we will cover how to change menu color in WordPress using different methods.
Change WordPress Menu Color (TOC):
WordPress Menus Structure
A key component of WordPress’s navigation system, menus allow users to move between pages, posts, categories, and custom links. You can find and adjust the menu color in the appearance section of your dashboard by knowing how WordPress menus are structured.
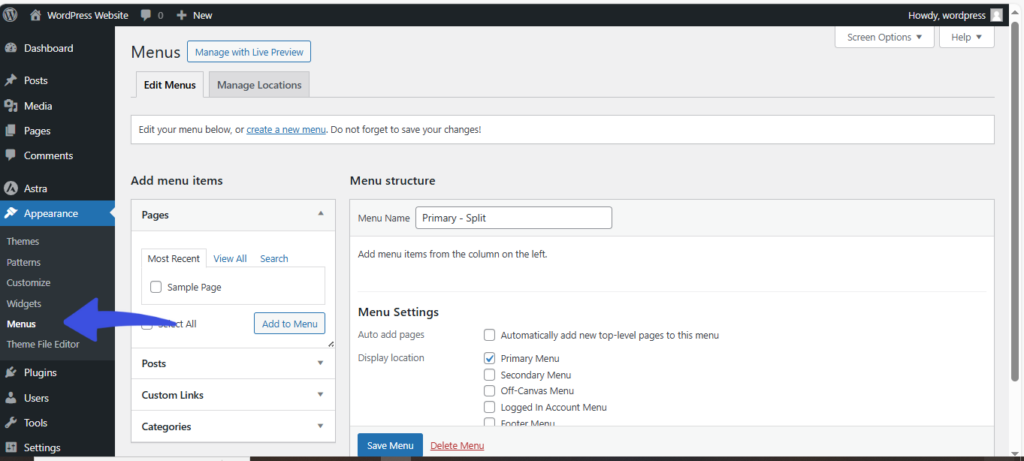
The following are the main components of WordPress menus:
Menu Locations
The theme defines the positions of the menus on your website, and WordPress supports a variety of menu locations, including the primary menu, secondary menu, footer menu, and more.
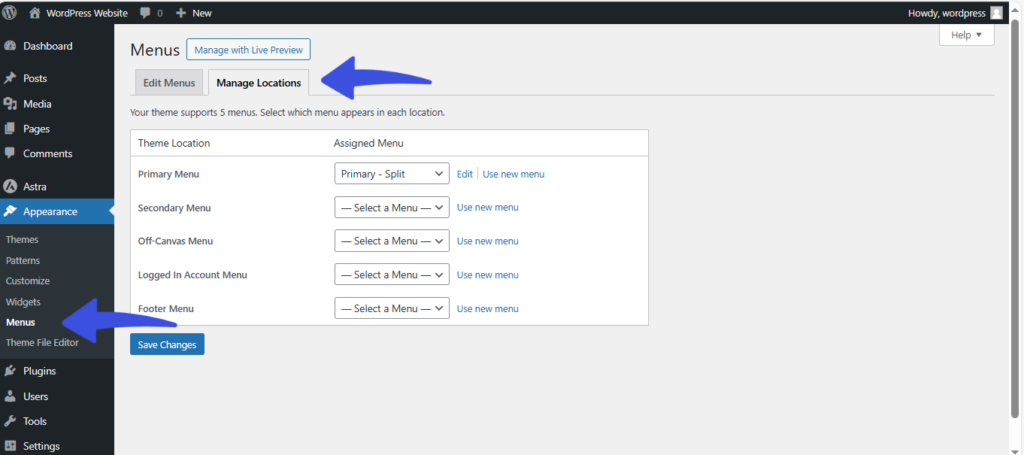
Menu Items
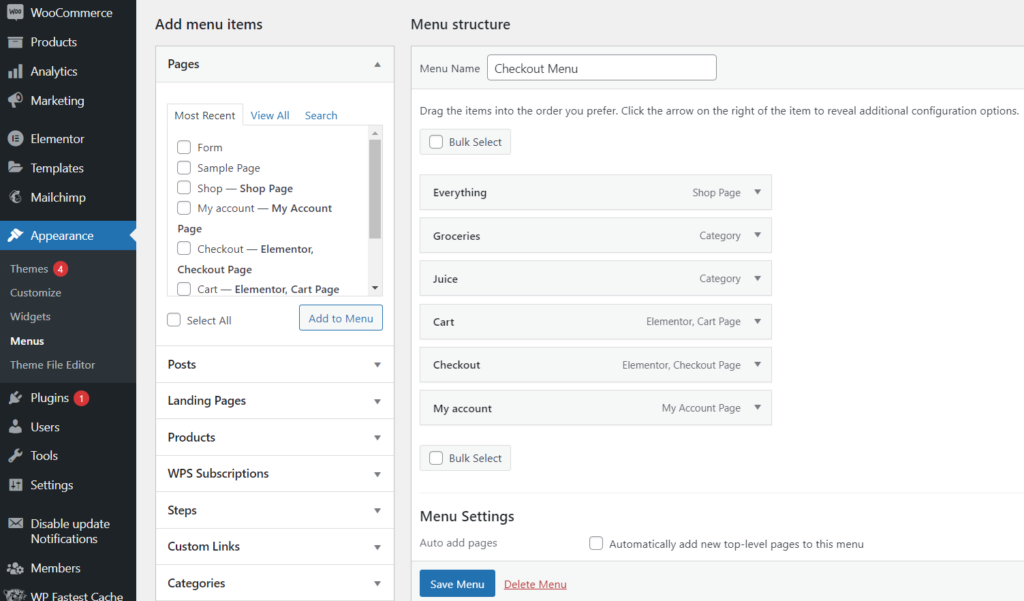
The distinct links shown inside a menu are called menu items. They can be posts, pages, categories, custom links, or even anchor links, which are certain parts of a page.
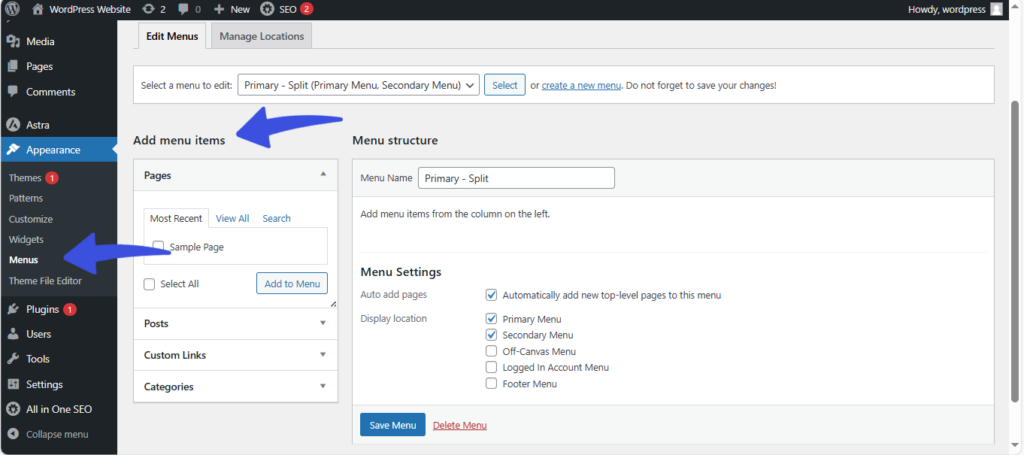
See the following screenshot for an example of menu items in WordPress:
Why Do You Need to Change the Menu Color in WordPress?
Changing the menu color in WordPress can serve several important purposes in terms of user experience and branding. Here are the key reasons why you might want to change the menu color:
- Aesthetic Enhancement:
The overall appearance of your website can be greatly enhanced by altering the menu colors. Visitors might be drawn in and kept by a visually appealing design that complements your business identity.
- Better Readability:
It is possible to improve readability by adjusting the color contrast between the menu text and background. Users have a higher chance of successfully navigating your website when the menu is easy to see.
- Improved Interaction with Users:
A well-chosen color palette can highlight the menu and entice people to look at more information. Using eye-catching colors can pique users’ interest and encourage them to click on different menu items.
- Consistency of Brands:
Brand identification is strengthened when you use particular colors that correspond with your brand. A unified user experience is produced by using consistent colors throughout your website, which increases brand recall.
- Emphasizing Crucial Elements:
To draw attention to specific menu items and direct users to crucial pages or sections, you might employ color shifts. This can assist in driving traffic to important sections of your website that you wish to advertise.
- Design That Responds:
On mobile devices, using different colors for menus might improve usability. Making color adjustments for smaller screens guarantees that mobile device users can still navigate easily and intuitively.
How to Change Menu Color in WordPress?
In order to help you create a visually appealing and user-friendly website, we will examine various ways to alter the menu color in WordPress in the following sections.
Method 1: Changing Menu Color Directly in WordPress Customizer
WordPress built-in Customizer is one of the simplest and most direct ways to alter the menu’s color. Using the Customizer, you can alter the menu color and other visual aspects of your website in real-time. The steps to access the Customizer, locate the menu color selections, and apply new colors to your menu will be explained in detail in this section. These few steps will allow you to use the WordPress Customizer:
- Access your WordPress admin Dashboard by logging in.
- After selecting “Appearance,” select “Customize.” By doing this, the Customizer interface will open.
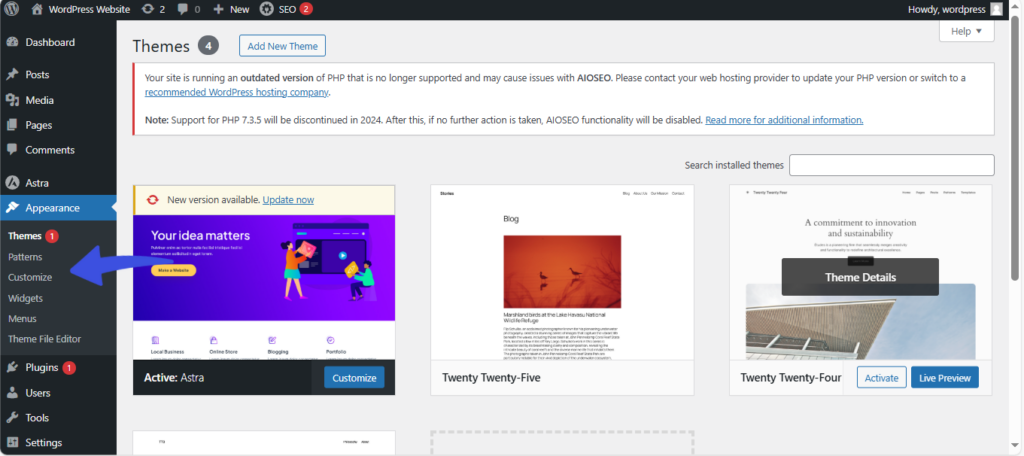
A live preview of your website will appear on the right side of the screen when you enter the Customizer, and a panel with personalization choices will appear on the left.
Menu Color Options
To find the Menu Color Options, select the “Header builder” option in the Customizer panel. Depending on your theme, the exact positioning might change. Then, choose the menu you wish to modify in this step; it may be the primary or social menu.

Its Design section should provide a number of menu-related customization choices. Select “Menu Style,” “Menu Color,” “Menu Background,” or such phrases. The specific terms and settings that are offered will vary depending on your theme.

You can adjust the color to your preference as soon as you’ve found the menu color options. There may be various methods for altering the menu color depending on your theme:
- Color Picker: Some themes come with a color picker feature that allows you to enter a specific color code (such as RGB or hexadecimal values) or select a certain color from a spectrum.
- Predetermined Color Schemes: You may be able to choose from presets or predetermined color schemes offered by other themes. These presets will complement the general theme design.
- Theme-Specific Options: There may be special options for changing the menu color for specific themes. For instance, you might be able to add a unique picture or design to serve as the menu background.

After you are satisfied with the new menu color, select “Save & Publish” from the Customizer top panel. Doing this will save your changes and make them appear live on your website.
Method 2: Changing Menu Color Using CSS
If you want to have more control over the color of your WordPress menu, CSS (Cascading Style Sheets) is a strong and adaptable choice. You can modify the menu color and other aspects of your website’s layout and appearance using CSS.
- Understanding the Fundamentals of CSS
A coding language called CSS was developed to format and style web page elements. Text, colors, typefaces, sizes, and layouts are all under its control. You have to understand a few fundamental concepts in order to use CSS to change the menu’s color:
- CSS Selectors
- Properties and Values
- CSS Syntax
Finding the appropriate CSS selector that targets the menu element is necessary in order to alter the menu’s color using CSS. Depending on your menu structure and theme, the selector may change. The following are a few popular CSS selectors for menu targeting:
- Class Selector
- ID Selector
- Element Selector
The right CSS selector can be found by looking at your menu’s HTML structure with the browser’s developer tools. Once you have the appropriate selector, you can use CSS to apply the new color.
- Applying New Color Through CSS
After determining which CSS selector is used for your menu, you can use the “color” or “background color” properties to add a new color. Here’s an example of using CSS to customize the menu’s color:
css.menu-selector {color: #ffffff; /* Change to your desired color */}
Using the selector “.menu-selector,” this CSS code targets the menu and sets the “color” property to the preferred color. You can use your favorite color code or name in place of “#ffffff.”

Then click on Additional CSS, and the screen will appear as follows:

The following choices are available to you for applying the CSS code:
- Theme Customizer: Some themes come with an integrated CSS editor in the Customizer. You can copy and paste your CSS code into the CSS editor.
- CSS File: Access the theme’s CSS file, which is typically called “style.css,” and add your CSS code at the end if you feel comfortable working with theme files.
- Custom CSS Plugin: Alternatively, you can add your CSS code without changing theme files directly by using a custom CSS plugin, such “Simple Custom CSS and JS” or “Custom CSS.”
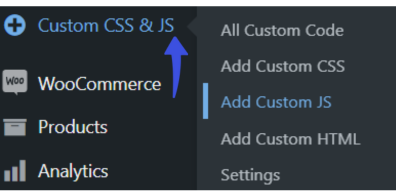
Once the CSS code has been applied, save your modifications and reload your page. The updated color you provided in the CSS code should now be displayed in the menu.
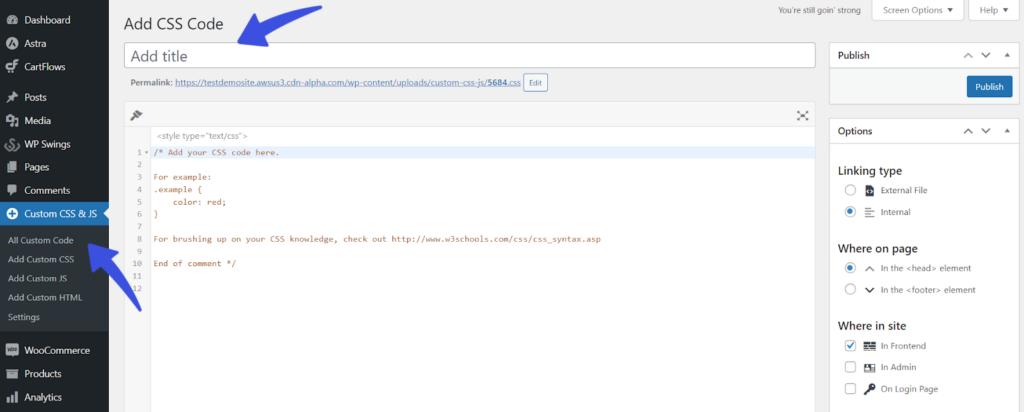
You have more freedom and control over your WordPress menu’s appearance when you use CSS to change the menu color. You can experiment with different color values, variations, or hover effects to improve the appearance.
Method 3: Changing Menu Color by Adding Custom HTML to ‘Navigation Label’
Adding custom HTML straight to the WordPress Navigation Label is your best option if you want to alter the color of a particular menu item. Few people are aware that the Navigation Label field is prepared for HTML. This implies that you can just enter code into the field, which will be implemented on your live website.
The following steps will help you use the Custom HTML in the Navigation Label:
- Choose the menu item that you want to modify by going to Appearance > Menus. In this instance, we’ll choose our “About” menu option.
- Then, depending on the modification you want to make, just add the custom code below within the corresponding Navigation Label.
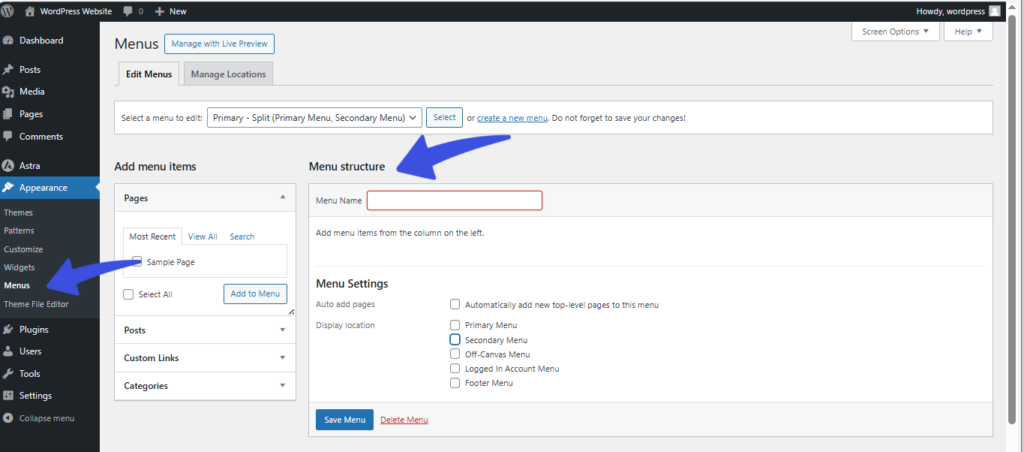
- Once more, make sure that “HEXCODE” has the hex value you want and “About” has the actual menu item you want to alter.
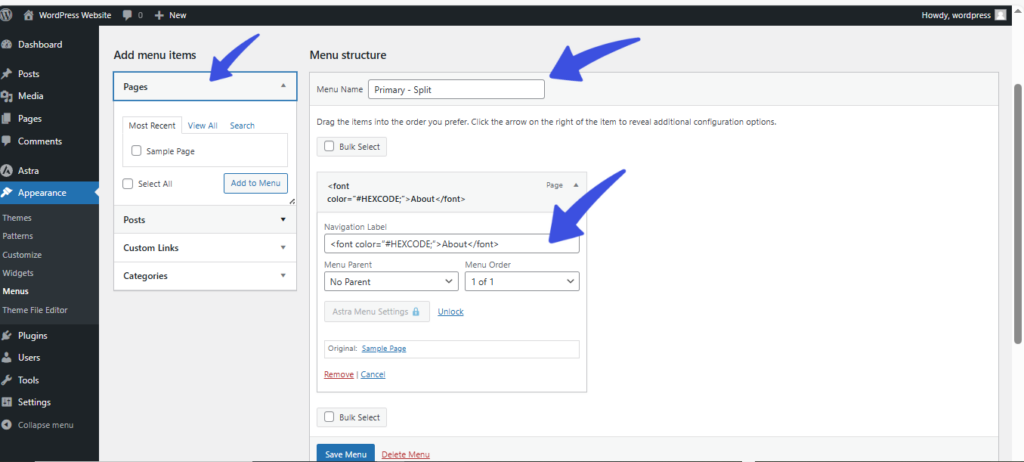
Once you finish the changes you want, you can click on the save menu button to reflect the changes on your live site.
Bonus: How to Customize Your WordPress Login Page

Customize Your WordPress Login
Stand out from the competition with the best WordPress login plugin that lets you customize your login page – no coding required!
Now that you have learned how to change the color of the WordPress menu, you can also customize the WordPress login page.
The most effective plugin for customizing the WordPress login page is LoginPress. You may use it to customize every element on the WordPress login page without knowing any coding.
Now you can customize the WordPress login, register, and reset page’s overall look using almost any of the features available, such as:
- Themes
- Logo
- Background
- Customize Login Form
- Customize Forget Form
- reCAPTCHA
- Button Beauty
- Error Messages
- Welcome Messages
- Form Footer
- Google Fonts
- Custom CSS/JS
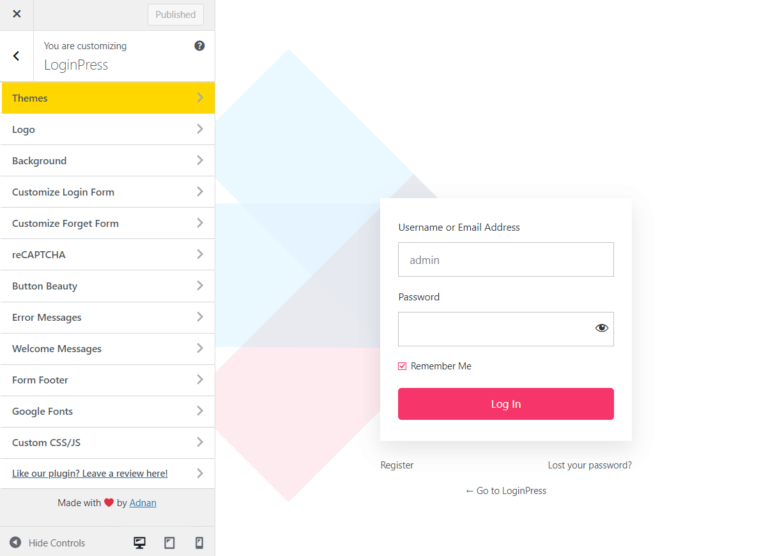
Wait, there’s a lot more packed with LoginPress Pro, including:
Upgrade to LoginPress Pro and strengthen the default WordPress login security.
Change Menu Color in WordPress (FAQs)
How do I change the appearance of the menu in WordPress?
Visit your site’s dashboard. Navigate to Appearance → Customize → Menu
How do I change the color palette in WordPress?
Navigate to Appearance → Customize. Click on the Colors & Backgrounds option. On the next screen, you’ll see the option to “Choose a Palette“. When you see a palette you’d like to try, click on it to apply the colors to the live preview shown on the right side of the customizer.
Can I change the menu color using CSS?
Yes, you can change the menu color by adding custom CSS;
Go to Appearance > Customize > Additional CSS
Add your custom CSS code to modify the menu color
Will changing the menu color affect the mobile version of my site?
If your theme uses a responsive design, the color change you make will likely apply to both desktop and mobile versions. However, if the mobile menu has a different CSS class, you may need to target it separately using custom CSS.
Can I use a plugin to change the menu color without coding?
Yes, plugins like Elementor, WP Menu Icons, or Simple CSS allow you to customize your item’s appearance, including its color, without writing any code. These plugins offer visual editors for easy customization.
Is there a recommended color scheme for menu items?
Several considerations, including usability, accessibility, branding, and the overall appearance of your website, should be considered when selecting a color scheme for your WordPress menu.
Consider the following guidelines and suggestions when choosing a color scheme for your WordPress menu:
– Follow Your Brand Colors
– High Contrast for Readability
Final Thoughts: WordPress Menu Color
Modifying the menu colors in WordPress is a great approach to improve the user experience and branding of your website. There are several ways to get the results you want, whether you want to make slight modifications or totally redesign the menu design on your website.
In this article, we’ve shown you three easy ways to change the menu color in WordPress.
That’s all for this article!
You may also like to read our other valuable how-to guides, including:
- How to Change the Link Color in WordPress
- How to Change Author in WordPress
- How to Create a WordPress Dropdown Menu
Beyond just styling, the ability to create and manipulate the structure of your menus can profoundly impact user experience and site discoverability. If you’re ready to take your site’s navigation to the next level, a comprehensive guide on how to create a WordPress custom menu will empower you to build personalized navigation that perfectly guides your visitors.


