
To make the plugin extra easy and functional as per the requirements, here comes the detailed documentation regarding the plugin. All about educating the things related to the plugin.

LoginPress + WooCommerce Integration
LoginPress integrates smoothly with WooCommerce to boost your site’s security and improve user experience.
With this integration, you can easily add CAPTCHA protection and enable Social Login on your WooCommerce login, registration, and checkout forms. All managed from the LoginPress settings.
This article will guide you step-by-step on how to set up and configure LoginPress features with WooCommerce.
LoginPress WooCommerce Integration (TOC)
Accessing the WooCommerce Integration Settings
To get started, log in to your WordPress Dashboard and follow these steps:
- Ensure WooCommerce is installed and active.
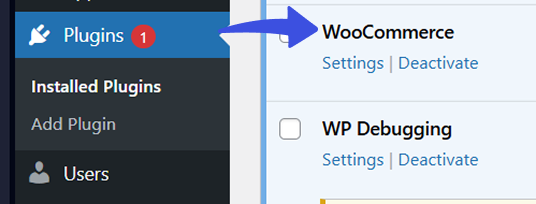
If it’s not already installed, go to Plugins >> Add New, search for “WooCommerce,” then install and activate the plugin.
- Navigate to LoginPress >> Settings >> Integrations.
- Find WooCommerce in the list and click the Configure button.
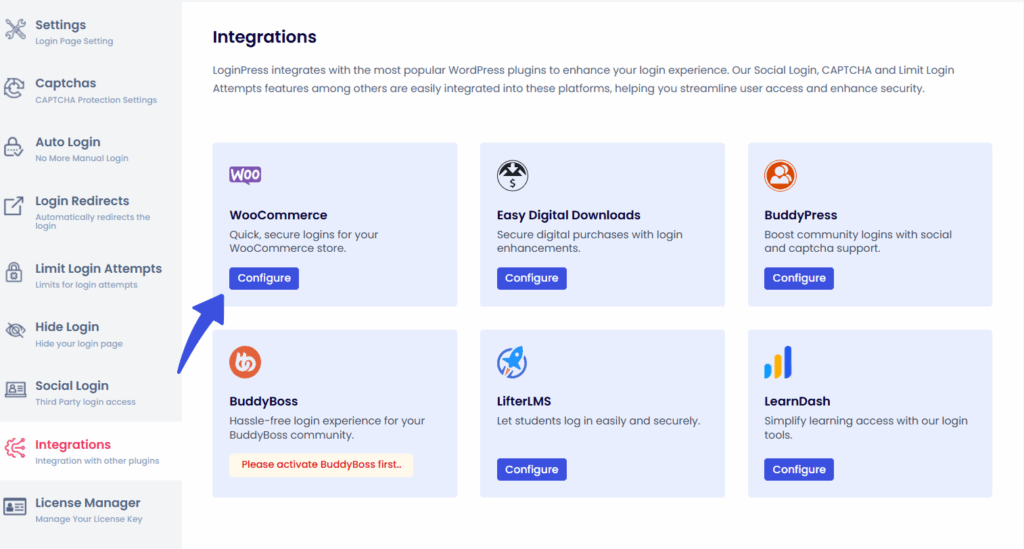
Here, you’ll see options to enable or disable CAPTCHA and Social Login features for WooCommerce forms.
CAPTCHA Integration with WooCommerce
CAPTCHA helps protect your site from spam and automated login attempts. LoginPress supports three popular CAPTCHA services:
- Google reCAPTCHA
- hCaptcha
- Cloudflare Turnstile
- Math CAPTCHA
You can choose the one that best fits your needs. These tools protect your site from spam, bots, and other malicious login attempts.
For the setup instructions, refer to our detailed Captcha Guides for Google ReCAPTCHA, hCaptcha, Cloudflare Turnstile, and Math CAPTCHA.
Supported WooCommerce Forms
You can enable CAPTCHA on these forms in WooCommerce:
- Login form
- Registration form
- Checkout form
How to Enable CAPTCHA on WooCommerce
- Use the toggle switches next to each form in the LoginPress WooCommerce settings to enable CAPTCHA.
- After selecting your preferred forms, click Save Changes.
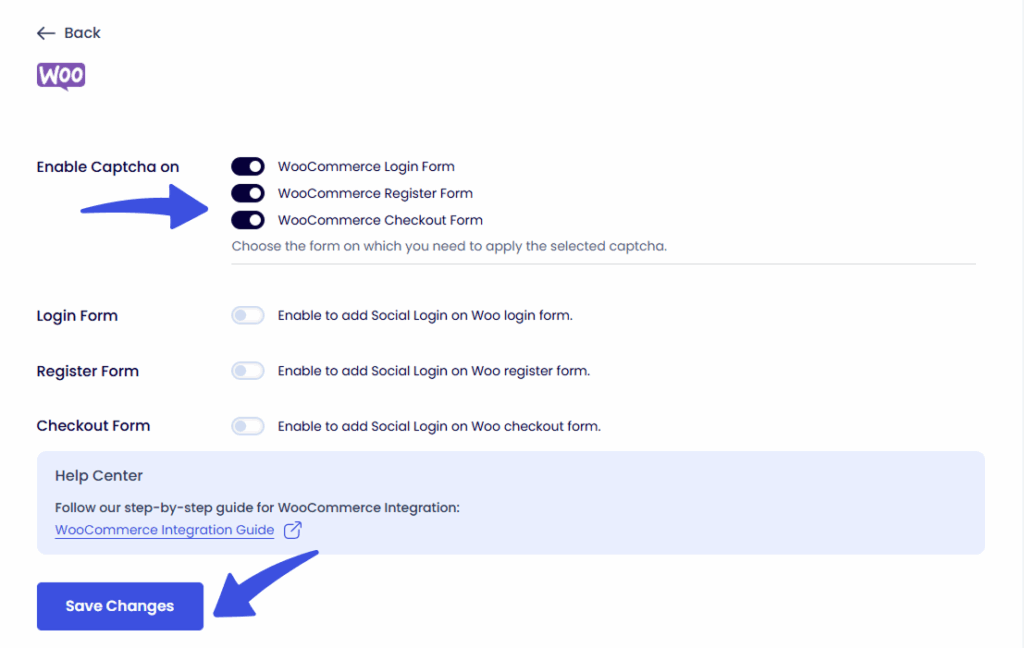
- The CAPTCHA configured in LoginPress >> CAPTCHA Settings will automatically appear on the selected WooCommerce forms.
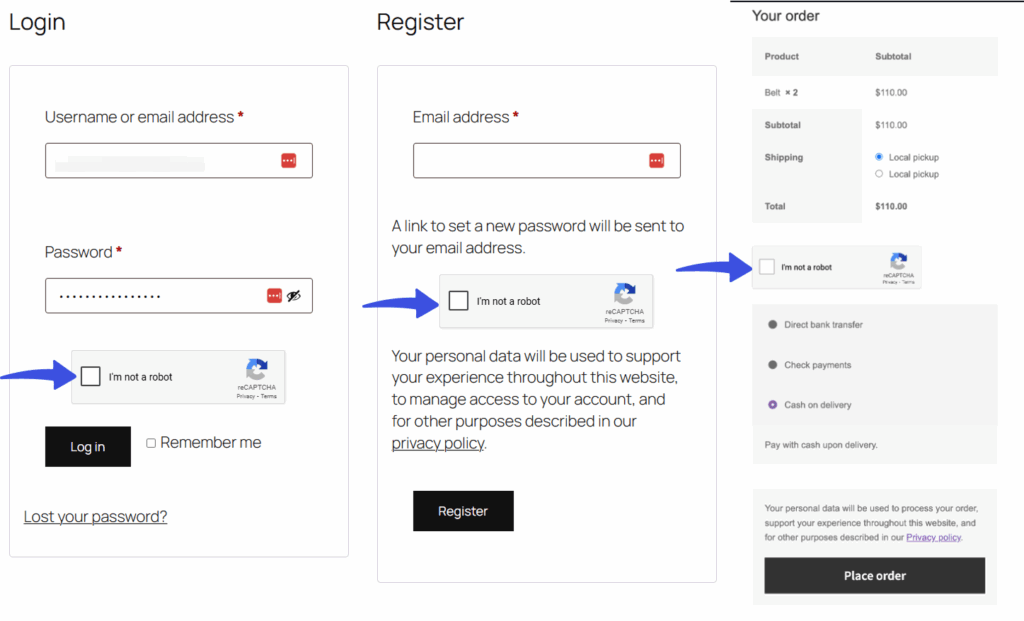
This setup helps keep your site safe without causing friction for your users.
Social Login Integration with WooCommerce
Social Login lets your customers sign in quickly using their existing social media accounts, speeding up the login and checkout process.
Supported WooCommerce Forms
You can add Social Login buttons to:
- Login form
- Registration form
- Checkout form
Important Note About Checkout
Social Login buttons on the checkout page only appear if you use the [woocommerce_checkout] shortcode on that page. The default WooCommerce checkout page built with Gutenberg blocks does not support social login buttons.
To enable social login on checkout:
- Edit your checkout page using the Gutenberg editor.
- Add the shortcode [woocommerce_checkout] to the page.
- Go to WooCommerce >> Settings >> Advanced and set the Checkout Page to this edited page.
This ensures the social login buttons show up properly during checkout.
Customizing Social Login Button Placement
You have full control over where the social login buttons appear on each form. Choose from these options:
- Default: Buttons appear below the form fields, separated by an “OR” line.
- Below: Buttons show directly below the form fields.
- Above: Buttons appear above the form fields.
- Above with Separator: Buttons show above, separated by an “OR” line.
Hover over each option to see a live preview before making your choice. The preview updates in real-time, so you can pick the layout that fits your website’s style best.
Interactive UI Preview
- Hover over each option to see a live preview before making your choice.
- The preview updates in real-time, so you can pick the layout that fits your website’s style best.
This allows you to confidently choose the layout that best fits your website's design.
Limit Login Attempts to Enhance Security
To further protect your WooCommerce login forms, LoginPress offers a Limit Login Attempts feature that blocks users or IPs after too many failed login attempts.
Key Features
- Set the maximum number of login attempts allowed before lockout.
- Customize messages displayed during lockout.
- Automatically block suspicious IP addresses.
How to Configure
- Go to LoginPress >> Limit Login Attempts.
- Adjust the settings according to your security preferences.
Once enabled, these rules apply automatically to WooCommerce login forms, adding an extra layer of protection against brute-force attacks.
Final Thoughts
LoginPress makes it easy to secure and improve your WooCommerce login experience. By adding CAPTCHA, enabling Social Login, and limiting login attempts, you protect your site while offering a smooth user journey.
If you need help with the setup, feel free to ask!
Frequently Asked Questions (FAQs)
These FAQs answer the most common questions about our WordPress custom login page plugin.

Where can I get support for LoginPress?
If you need help with LoginPress, you can contact us here. We’ll be happy to answer any questions about the plugin.
Do you have an affiliate program?
Yes, we have an affiliate program that you can sign up for here. As an affiliate, you’ll earn a commission on every sale you refer to us.
Do you offer refunds?
Yes, we offer a 14-day money-back guarantee on all of our plans. If you’re unsatisfied with LoginPress, simply contact us within 14 days of your purchase, and we’ll process a refund.
Can I upgrade my license after my initial purchase?
Yes, you can upgrade your LoginPress license at any time. Simply log into your account and go to the My Downloads page. From here, you can upgrade your license and download the latest version of the plugin.
Will LoginPress slow down my website?
No, LoginPress will not slow down your website. The plugin is lightweight and only loads the necessary files when someone tries to access your login page.

If you Still have Questions?
Get In Touch