To make the plugin extra easy and functional as per the requirements, here comes the detailed documentation regarding the plugin. All about educating the things related to the plugin.
LoginPress and WooCommerce Compatibility
LoginPress is one of the best WordPress login page customizer plugins, letting you customize the default WordPress login page.
It focuses on rebranding your login page in just a few clicks, without touching a single line of code.
We're thrilled to announce the addition of WooCommerce compatibility to the growing list of LoginPress integrations. We recommend using LoginPress with WooCommerce.
In this knowledge base article, we'll show you how to redirect users to your custom WordPress Login Page instead of the default login page of WooCommerce.
How to Make LoginPress and WooCommerce Compatible
Let me describe a scenario here: a customer visits the My Account page. When the user tries to Log In, instead of landing on the default WooCommerce Login Page, they will be redirected to your custom login page.
After logging in, that user will be redirected to their My Account page and see their information as usual. Pretty simple, right?
Learning how to customize your woocommerce login page allows you to control this entry point completely, ensuring a cohesive user experience from the very first interaction.
Here are the steps you need to follow:
Step 1: Add the Snippet in the Theme’s functions.php File.
Once you’ve created a customized login page with LoginPress, you’ll need to redirect the user to the default WooCommerce login page.
All you need to do is add the following snippet to the theme’s functions.php file. This code ensures that if the user is not logged in and navigates to the my-account page, they are redirected directly to your custom login page.
Note: It’s recommended to use a child theme to edit the functions.php file instead of the parent theme. There is a risk of losing the modified code when you update your theme. It might cause some adverse effects on your website.
function loginpress_woo_login() {
 if ( function_exists( 'is_account_page' ) ) {
   if ( ! is_user_logged_in() && is_account_page() ) {
     wp_redirect(wp_login_url());
     exit;
   }
 }
}
add_action( 'wp', 'loginpress_woo_login' );
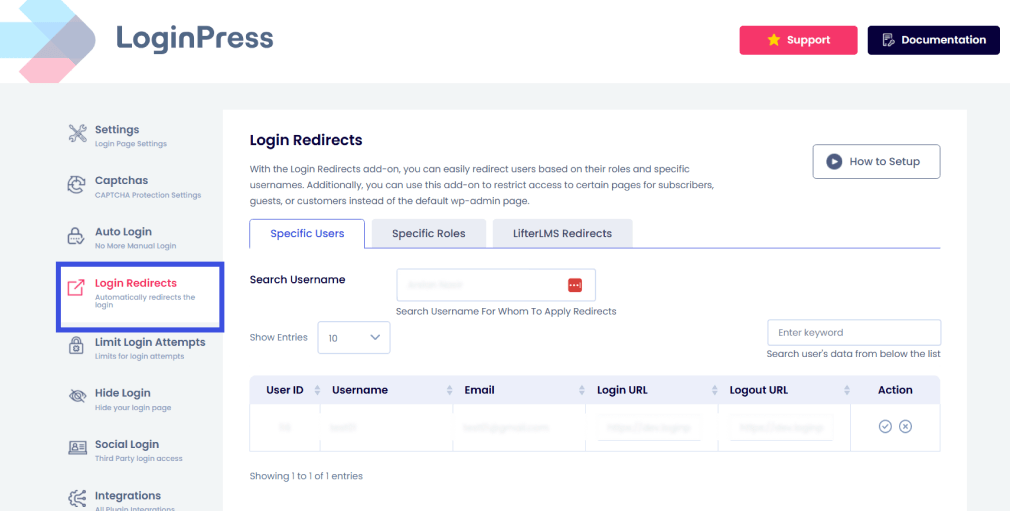
Step 2: Use LoginPress Login Redirects Add-On
Now you need to set up redirects for customers or any other role you want to redirect to the my-account after login, so they can redirect to their own my-account page after login.
This is where the LoginPress Login Redirects Add-on comes into play.
Note: You can see our detailed guide on the Login Redirect Add-on here.
Once you’ve installed and activated the Login Redirects Add-on, navigate to the Login Redirects settings page to set up the redirection based on role/s.
Choose the Specific Roles tab. Search your customer’s role, i.e., Customer. Now add your “My Accounts” page URL in the Login URL field, e.g., www.mysite.com/my-account. This is where the user with the customer role is redirected after logging in.
Then enter the desired customer logout URL in the Logout URL field. This can be your site's default landing page, e.g., www.mysite.com. This is where the user will be redirected when logged out.
Now, when the user tries to log in, he will be on the following page:
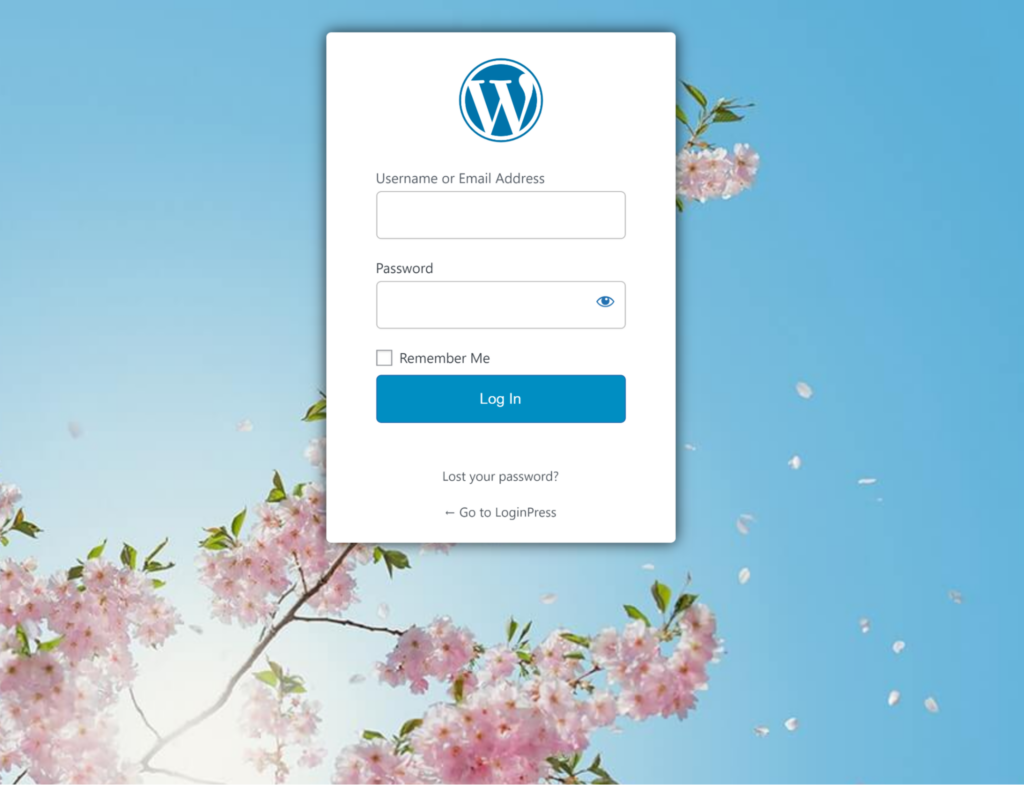
The Login Redirect Add-on redirects users with a customer role to their my-account page upon successful login.

That’s it! All done. Easy right? Now you can display an excellent login page to your WooCommerce customers.
If you have any questions or concerns or are experiencing any issues, please don’t hesitate to contact our support team. We will be happy to help you.
Frequently Asked Questions (FAQs)
These FAQs answer the most common questions about our WordPress custom login page plugin.
Where can I get support for LoginPress?
If you need help with LoginPress, you can contact us here. We’ll be happy to answer any questions about the plugin.
Do you have an affiliate program?
Yes, we have an affiliate program that you can sign up for here. As an affiliate, you’ll earn a commission on every sale you refer to us.
Do you offer refunds?
Yes, we offer a 14-day money-back guarantee on all of our plans. If you’re unsatisfied with LoginPress, simply contact us within 14 days of your purchase, and we’ll process a refund.
Can I upgrade my license after my initial purchase?
Yes, you can upgrade your LoginPress license at any time. Simply log into your account and go to the My Downloads page. From here, you can upgrade your license and download the latest version of the plugin.
Will LoginPress slow down my website?
No, LoginPress will not slow down your website. The plugin is lightweight and only loads the necessary files when someone tries to access your login page.

If you Still have Questions?
Get In Touch